
Disclosure: this post may contain affiliate links, which means I may make a commission if you decide to make a purchase through one of my links, at no cost to you.
This easy step-by-step tutorial shows you how to skim coat damaged drywall after wallpaper removal (with my favorite products that make things easier!).
Believe me when I say that there isn’t one square inch of the primary bathroom that won’t have some kind of joint compound/skim coating on it. As hard as I tried to get the wallpaper off evenly, and really I DID, and I think it would have been a LOT worse without the removal product I found, the hard truth is that I’m working with old drywall. Since no sizing was applied to the wallpaper before slapping it on, the builders of my beloved UDH made my job really hard. Really.

But, I’m learning. Hip hip, hooray. And what is the purpose of this blog, if not to pass on the knowledge I’ve picked up? Your frustrated ranting from lesson for this week is skim coating damaged drywall.
Jump to
section : Tools Needed | Sealing Damage | Skim Coating | Sanding | Painting | Cleanup Tips

)
How to repair damaged drywall after wallpaper removal
First of all, we should start by clearing up a myth: most drywall by itself is not smooth. When first putting up drywall, you screw it in place, tape the seams, and cover them with joint compound. But the paper covering the entire sheet of drywall is typically not smooth. Many brands have a subtle texture like
Next lesson I’ve learned: To do it right, you will have to put in the time and effort. As much as I would like there to be, there is no easy button for this. While I have turned my skim coat into a post-workday evening project, it took several of those evenings to learn to get it right, to get a rhythm going, and to start seeing finished results. So remember: it’s not impossible, but you will have to put in the time to see satisfactory results. You can’t just slap it on and expect a smooth finish in the end. You can’t expect the sanding step to take care of all of the loose ends (trust me, the sanding part of four walls is a real pain, and you want to give yourself as smooth of a start as possible to prevent hours of correcting later). And paint won’t be forgiving of your mistakes.
Skim Coat Tools
Create your smooth finish, and everything after it is easier. Which brings me to my next tip: The right tools for this job are key. The right tools are the difference between getting half of a wall done in two nights versus three in one night. To do it wrong, you’ll need only a bucket of joint compound (“JC” or “mud” as you’ll see in this post) and a 4″ metal putty knife. To do it right, you’ll want joint compound, a mud pan, a wet rag, and a much wider knife called a joint knife or taping knife – I chose the 10-incher simply because I’m small, in a small space, and wielding anything larger felt like using a snow shovel – but there are wider versions available at your local Blue or Orange.

UPDATE: For those of you who like a list, here’s a list (with links to Amazon, which I’d make a few cents off of if you purchased direct for the referral, but it really doesn’t earn me much more than a few cups of coffee!):
- drywall sealer
- mud pan (be sure you can fit whichever sized taping knives you use)
- putty knife (for smaller fixes)
- lite joint compound (updated since first posting)
- hand sander or sanding kit (if you do more than one room like I did, get the sanding kit!)
- sanding screens of various grits (you start with coarse and work your way to fine)
- taping knives of various sizes… I used a 6-inch and 10-inch because it’s easy to manage
Tool shopping tips: All-purpose joint compound is cheap, but I wanted to share a little tip to make things easy for you when shopping at the big box stores. If you go to the paint aisle (where most people search for wallpaper remover, spackling, and other related materials), you’ll find that there is usually only one brand of joint compound, comes in small containers, and can leave you overwhelmed with all of the other vinyl spackling, interior/exterior compound, “smooth”, “flexible”, “high-performance”, “lightweight”, “fast and final”, BLAH BLAH BLAH types around it. But if you want to save your money, clear up the confusion, and feel more like a pro (who doesn’t?), walk a few aisles over to where they sell the drywall. Here you’ll find contractor-sized buckets of lightweight joint compound – simple, plainly labeled, and surprisingly cheaper. You’ll also find taping knives in every size, sanding tools (sanding screens last longer and are a little quicker for a project like this rather than the traditional paper), and a mud pan (a plastic or metal trough-like container that makes using a large taping knife easier when trying to scoop up mud).
Pre-priming
UPDATE: I’ve now done this skim coat thing a number of times in the house, and a good tip I learned later from a contractor is this: use an oil-based primer prior to adding your first skim coat. After peeling the paper off in my dining room, I noticed that the first skim coat would sometimes bubble slightly when the paper layer was weak or peeling (and although you can spend hours removing each peeling piece, it’s impossible to eliminate this possibility 100%). By applying an oil-based primer, you’re essentially hardening the layer beneath. This will help minimize (or even eliminate) the chance of any peeling paper from bubbling up in your skim coat job. Good tip!
UPDATE #2: I tried the oil primer in the kitchen and dining room on later projects and didn’t like it. I wound up discovering a water-based, low odor peel stop sealer (with a weird name) that performed far better.
Related: How to Seal Damaged Drywall
Skim Coating
Okay, so now that you’ve got the right tools for the job, it’s time to get to work. Since even lightweight joint compound needs to be thinned out a bit for skim coating work, you might want to stir in thin texture compound if you have some. Since you probably won’t, and I didn’t, I suggest using the free version: water. Scoop some compound into the mud pan, and start adding water a little bit at a time, mix, then add a little more.

It’s easy to think you’re adding enough and then be left with soup, which means adding more compound, more water, etc. until you get it right. You’ll eventually want it to be about the consistency of thin pancake mix; if you find yourself thinking “oh, that must be why it’s called mud and not paste“, stop. You’ve reached the right compound-to-water ratio.

Next, turn on your radio or set up some kind of music (like my playlist), because this is going to take a while. Starting at the top right corner of your wall, scoop some mud onto your knife (just a little across the entire blade will do).

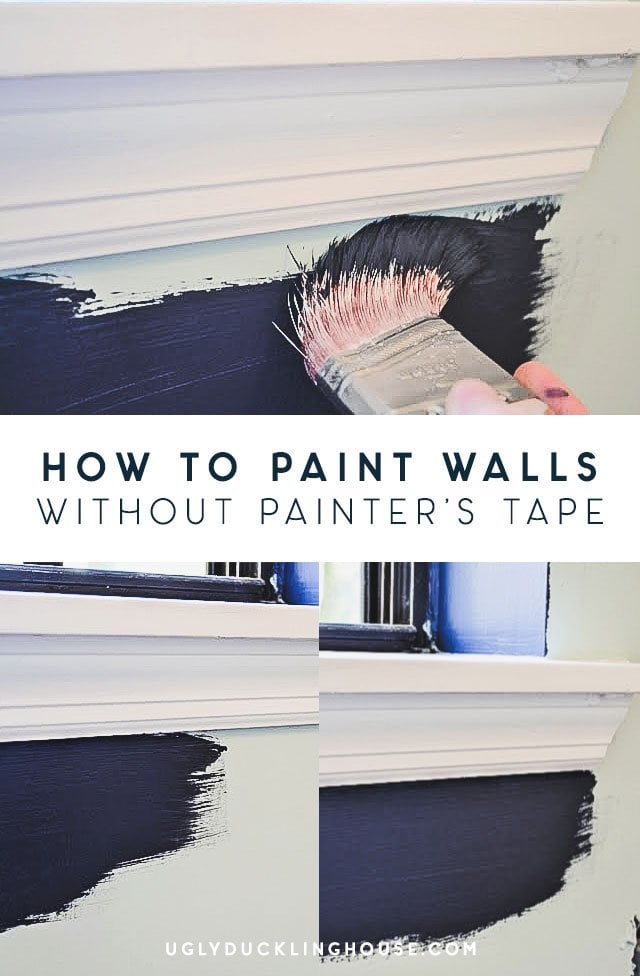
At an angle, press the knife against and down the wall, leaving a thin layer of compound on the drywall. You’ll want to scrape the knife across the wall in such a way as to leave a little of the mud behind, filling in the ridges and gouges while skimming over the entire surface. (*Note: some of these photos have been darkened to enhance the difference between the wet mud and wall – it’s hard to see off-white on white*)


Then wipe off the knife on the side of the mud pan, and using the same motion as before, scrape the excess mud from the wall.


It will take some practice, but with a steady hand, you’ll get the hang of it in just a few passes. And don’t be afraid to go over the same spot if you don’t like your first pass; the mud is thin and wet, so it’s forgiving until it begins to dry. But if you find that you really liked


You’ll want to continue doing this across the wall, but since the mud is impressionable until it cures, be careful not to overlap the edges of your various passes across the same wall or else find yourself working to fix a patch of wall you were already done with. You will be working on this for multiple nights, so it doesn’t have to be covered all at once. If it’s smoother looking than before you began your work, you’re on the right track!
Related: Fixing Bubbles & More Skim Coating Tips
Sanding

After you are satisfied with the skim coat and it has had time to dry, the next task is to sand. Wear a breathing mask and protective eyewear; and maybe a hat – dust will be everwhere. If you’re going to be doing skim coats in several rooms like I am, consider investing in sanding screens instead of traditional wallpaper. The sanding screens last longer and do not clog like traditional sandpaper, and also come in 220 grit to give your walls a smooth finish. The screens attach to either hand or pole sanders, and you can also buy kits that attach to standard shop vacs to keep the dust level down. I chose a hand/pole combo sander so that I have the option to use a pole extension for the ceiling areas, and also a comfortable and controllable grip to get the areas closer to the floor. I’ve tested it out in various places on the wall, and so far it’s miles above traditional sandpaper or blocks.

UPDATE: If you would like a helping hand with the dust, you can also purchase a drywall hand sander kit (most also come with a connection that allows for pole attachment). These kits come with a connection hose that allows you to hook up the sander to a shop vac, eliminating about 90-95% of the dust that you will experience. I freaking LOVE mine; it’s so much more convenient and cost less than $25 (you can rent professional drywall sanders too, but they are a bit more of a hit to your wallet). Just be sure to also purchase the HEPA filters and bags to protect your shop vac from the fine dust.
In addition to the right tools, you’ll also need the right lighting to do a proper sanding job. The better the lighting, the easier it will be to see areas where you have missed, scratches and pock marks on the wall, areas that are uneven, etc. If you find such an area, you can easily take a normal putty knife and fill in gaps with extra mud or sand down ridges. Try to fill in spots as smooth as possible to avoid having to re-sand later (though I did just for good measure). It’s important to be systematic in your approach; any missed spots will be highlighted once you paint the wall. Consider using a flashlight in one hand and the sander in the other, moving the light around in different angles to make sure you didn’t miss anything.
Painting
UPDATE: I tried experimenting with paint and primer combo products, and to be honest, I hate most of them. I don’t find that they do either job (the paint nor the priming) especially well. And when it comes to freshly repaired drywall with lots of skim coated areas like these, I find that this is especially true. Even the nicest paints will have trouble sticking to new mud. So if you want to keep your walls pristine after all of that hard work, don’t skimp on the last step! Grab your primer and use it to seal your walls once more, then paint it with whatever you want. This will not only help the paint
Related: Post-Repair Wall Prep for Paint

Cleanup Tips
- Keeping your tools clean and ready for the next job is an important step that should not be missed. (I realize how much of a hypocrite I am for typing that, but I’m trying to give the right advice here. 100 points to me at least for trying.) Taping knives are thin and can rust if you leave putty on them – meaning your next project will either have distracting reddish-brown streaks everywhere (increasing the chances of missed spots and ultimately an uglier finish job) or will force you to purchase new tools.
- I eventually got the hang of timing my evening right so that I wouldn’t have leftover mud, but if you wind up with some on your first day, do not put used mud back into the container. During your skim coating process, you watered it down, scraped it along a wall with gouges, dirt, and (in my case) tiny bits of paper coming off the wall. To keep the joint compound in tip-top shape for your next use, just get rid of the left over amount.
- When rinsing off your tools and cleaning out the mud pan, do not (for emphasis, I’ll repeat, do not) rinse big gobs of joint compound down the sink or tub. No one likes adding clear clogged drains to their to-do list. And since you are all aware of how perfect I am (you can’t see it but I’m totally wearing a straight face as I say this), I am merely making a statement for all of you newbs out there – not that I would have any personal experience or anything.
- For God’s sake, woman, take a shower already.
There you have it – a full skim coating tutorial by a non-professional first timer who lived to tell the tale. Next up – priming the walls, getting rid of the painted linoleum floor, installing tile, replacing the vanity, and re-grouting the existing shower tile. No big, right?
Right?
********************************************
MORE UPDATES
Want even more tips on how to skim coat damaged drywall? It’s been a few years since I wrote this post, so I highly recommend reading this update with even more advice on preventing bubbles in the drywall paper, good sealing products, tools that cut down
More Drywall Tips
Drywall can be intimidating; luckily, I’ve got more posts to help you learn what you need to know! Check them out below.


You give such good lessons. Your directions are easy to understand and real. Well done.
Way to Go! from one single gal to another, I like your realness and ability to tackle the job! I too have an old bungalow style home that I am proud to call my OWN, and am working on sheetrocking over old walls as well as ripping out old thin paneling and replacing it with new sheetrock. I have to say it is not easy! So reading how you went about fixing your home has been very helpful, keep the tips coming!
Wow, what a wonderful comment. Thank you!
Yes Sarah ur welcome! here it is May and I am STILL sheetrocking!!! It is coming along though; primed my hallway and 2 of the walls in my main living space, I took my time and have to admit I am sick of it already! but the walls look really good; can’t wait to paint and decorate!
t
I am still laughing over your quote at the top of your blog “I'm not going gray, that's just paint in my hair!” haha!! I LOVE it!! I am SO going to start using this line… I hope that okay! :) Thanks for linking up at the Sassy Sites Free For All party! When you get a chance, come back by and see what we've done for the American Crafter's competition… and maybe vote for us too! *wink*
xoxo!
Marni @ Sassy Sites!
Wow- great tutorial and such a big messy dusty job!! Taping and sanding is so NOT a favorite job of mine to do because of all the dust… kudos to you for this big job! Thank you for sharing at FNF~ Hope you will come back and share the next steps too! :)
Thanks for the tutorial! I've been in the middle of my own wallpaper removal nightmare, lately, so I will be needing to do some skim coating soon!
SO helpful! Thanks so much. I'm doing this in my kitchen after multiple attempts at getting wallpaper off. I tried skim coating it on my own and stopped halfway through. Obviously I needed this tutorial first. Thank you!
Amazing Tutorial! Wayyyy better than any books or even videos in Youtube. Thank you very much. I've learn lots
My walls in my bathroom look a lot like yours after removing the old wallpaper, but I believe mine was skim coated. In some places it's peeling up like paint. Anyway, where the brown paper is exposed….do I need to skim coat just that area 1st if I'm going to texture my walls? I'm so overwhelmed!
@Pidge If it's peeling up like paint, you may need to to a more thorough sanding job or cleaning. That peeling could be due to painting over areas that still had glue residue (but I'm only guessing). For textured walls, DIYDiva.net is a great resource. And to answer the skim coating question, if the brown part isn't *too* gouged, you might be ok to just do the texture over the top, since it's supposed to be uneven anyway. Fill in major dents/dings with a thicker version of the joint compound, let dry, then do your decorative texturizing!
Excellent post. I love paragraph 4! I'm in the middle of mudding my bathroom walls after removing wallpaper. It's been a learn-as-you-go experience. Hopefully, my patience will pay off in the end!
right on! great tutorial. I think the most important thing to have is your playlist ready to go
I would recommend to connect a vacuum cleaner to your sander, this way you have very little sanding dust. Keep up the good work
I didn't realize I could do that to a manual sander. Going to see about that for the guest bath ASAP!
Yes, there are manual sanders designed for this. They make versions that can attach to a ShopVac and to a pole as well. You need to use sanding screens for it to work properly though. The one I picked up was from a company called Richard.
http://blip.tv/easy-home-renos/product-review-richard-vac-pole-dust-free-drywall-sanding-kit-4273449
I O-ficially love your site! I am the worse drywaller … getting by the project but a looong way off. This helps tremendously. Thanks!
I'm think of buying and cutting drywall for practice. Will be pure entertainment for family, friends and the neighbors, but I refuse to be whipped by drywall!
Hi there. I got a bathroom mess. What started as a routine wallpaper removal ended up as a drywall paper removal also. I found your website via google and read the blog on Drywall Skimming. I am gonna put it to the test as soon as I am done with this comment and visit Lowes to buy what I need. My question is: Can I apply the mud to the bare wall or should I primer first. I can't get a straight answer from anyone. I am going to go without the primer and see how that works. By the way, I am not sure how to comment using those profiles so I have to use the anonyamous name. I will let you know how it turns out. In addition, I spent most of the night reading about your Ugly Duckly home and am very impressed. Keep up the good work. Reellucky
Well, since I can't respond directly to Anonymous messages, I'll do my best to answer for everyone who may have had this question. Think of primer as a precursor to paint. Before applying either, you want the wall to be as smooth as possible, so you apply mud to fill in any gouges BEFORE you apply primer and paint. Another reason for applying primer after you mud the walls is to make sure that the paint doesn't lose its sheen in any spot (dead giveaway of a patch job). The mud smooths out the wall, primer will coat the entire wall, and then the paint will stick to the primer. Make sense?
Hi there again! Yes, it makes very much sense to put the mud on the un-primered wall. Once I applied the mud, it stuck like glue. Thanks, I really appreciate the information. As it turns out I won't have to skim the whole area (thank goodness), just where the scraper dug in and exposed the rock. I have already feathered some of it in and its starting to look pretty good. Still got a ways to go though. Just like you, gotta go to work and continue the project after hours. Ha! I get to sand tomorrow afternoon and night. Fun. Fun. But, I did get a mask and glasses. Thank you for the information again and I will check back later. Reellucky
Thank you SO MUCH! I headed to Lowes today to get the drywall supplies. Tomorrow I tackle the next stage of bathroom redo. Got overwhelmed/confused by the person in the paint dept when it came to sealers and couldn't remember what you had used. So back tomorrow :-)
This is great in that a)you've been there and b)obviously succeeded and c) I'm not a failure in that I know I am going to have to skimcoat the bathroom AGAIN. (Thanks for not being infallible!) And thanks for the reality check that I have to relive this nightmare if I hope to achieve anything remotely like decent results when I wallpaper. *sigh*
I have a son with an ugly duckling house. All textured thick wallpaper, gouges, and compound stuck here and there. I copied your article and I'm ready to help him get one room at a time done. I should be 70 by the time we are finished, but your article made me feel powerful!
@patlinton@aol.com Right on! Glad to hear it!
I recently brought a house and thought taking the wallpaper down was going to be a breeze. Well, lets say the living room was easy because the walls were prime before. but, the dining room is another story. The walls weren't prime, so when I removed the wallpaper on 1 wall I said their is no turning back. I call several contractors (whose prices were out of this world). I kept googling & kept googling because no one gave me a direct answer. So here I found your site & I am so happy because I am running to the store with my list. Thanks for the info & for being so thorough with the steps.
Hi Sarah,
This tutorial is amazing!! I'm in my 20s and just started learning how to do home improvements, so thank you so much for documenting this stuff. I used to shiver with intimidation when I went into a hardware store, but no longer :)
Hey Sarah, I guess I am far behind in reading this, but I am not ashamed that I'm a “newbs” so I'm going to try to not be ashamed of this question… What's the difference between this and sparkling??? Eek! Embarrassing!
Thanks,
Margy
Are you using the “green” Sheetrock brand all-purpose joint compound thinned down and/or the lightweight “blue”? Thanks.
Thank you so much for putting your experience out! This is truly helpful!
Being a visual learner, I found this so helpful. Thanks!
Thanks for this site. Vinyl wallpaper top layer peeled off ok and DIF took the paper backing down to the glue layer (finally found that good product). Now the glue layer seems permanently welded to the wall despite primer I applied to vinyl-covered wall board (mobile home) before papering. I bought Zinsser oil based AllPrime to coat the gluey walls. Am thinking to skim coat, then spray on orange peel oil based texture, more primer and paint. I've found conflicting opinions but puny hands can't stand much more of the glue battle. Do you think this will work, or will it slump off the walls one fine day?
A tip I learned a couple of float jobs ago is to get rd of the sand paper. In the drywall aisle you should be able to find a large closed cell sponge, about the size of 2″x3″x8″long. Using a small bucket with clean water, wet and wring out the sponge. Rinse the sponge every few minutes and ring it out well. As you rub it over the surface of the mud it will soften the surface layer of the mud allowing you to work it like you would with sandpaper. On fresh gyp board it will fill in the surface of the paper as you work over the tape seam and nail head giving you a real thin skim coat. Best part is no more sandpaper dust.
Yes, on fresh board, the sponge method works great, and I would still recommend it as a last step in drywall repair or if filling in a single hole on drywall. But I have had less luck when repairing damaged drywall with the sponge method. I have sometimes experienced that re-wetting the surface causes bubbles if the drywall paper was weak from wallpaper removal. I do like the sponge enough for quick repairs!
Is there anything that can be done to make the walls smooth if paint was applied before skimming?
As in, wallpaper was removed and there are gouges in the wall, and someone painted over the holes and damage without smoothing it first, or painted on top of wallpaper?
Painting on top of wallpaper is usually very ugly. You'll still need to take down the wallpaper, repair, then paint if that's the case.
If someone didn't skim after removing wallpaper and the wall is bumpy because they didn't smooth certain areas, you could either try sanding the wall a fine grit sandpaper sponge (depending on how extensive the surface is damanged) and repainting or you'll have to skim over the areas, smooth down, and prime and paint.
I am skim coating and repainting a room in which a previous owner removed the wallpaper and just painted over the bumpiness/gouges without repairing the wall. In this case, would I need to prime before skim coating since there is already a coat of paint on the wall? Or can I just do it after the skim coating?
Thanks for your help!!!
Hmm, is there any bubbling that you need to scrape away? If the wall is already painted, priming before skim coating may not be necessary. The purpose of priming is to seal the wall so that the skim coat doesn’t bubble. If the paint doesn’t show signs of that, you might be ok to skim coat.
I tore down a wall between two sections of the same bathroom. Then I noticed that one 'room' had knock-down and the other 'room' had orange peel.It took two coats (at least) of skimming to get the room smooth. I found that using my 18v Skil battery-powered sander with 220 grit paper worked fantastic for smoothing out the layers.
Thank you so much for your tips!!! I love that you tell me all the things NOT to do, that I would have ordinarily done. I took the wallpaper off the kids bathroom wall, and it was surprisingly easy… but the wall has this weird texture to it, so I haven't painted it yet. Luckily, my kids love me, so they don't complain about their drywall bathroom :)
Wow! I just bought a house on the water for my wife of 45 years. The house is falling down. Literally. I felt overwhelmed. Bit off more than I can chew sort of thing. Then I found your posts. I can do this. I can do this. Keep up the good work and especially the blogs. And thanks from those of us who realize how tough it is to write clearly and make it entertaining.
This advice was great! I am working to smooth out the walls in my San Francisco house that was built in the late 1990s with that horrible orange peel texture. Big mistake I have made is that I haven’t properly thinned the joint compound. I see now that it needs to be much thinner. Thanks!
Thanks so much for doing the legwork on this! I spent several hours the other night trying to figure out what the heck I was doing when it came to making my walls look presentable after thinking “I’ll just rip down this wallpaper and paint, and it’ll be a cinch!” No siree-bob. I’m finding out this home improvement stuff isn’t for the faint of heart. This post was exactly what I needed!! Thank you!
You’re welcome! Glad you found it helpful!
What did you do about the walls behind toilet and the sink? Did you just skim around them? We have wallpaper behind the fixtures. I’ve peeled it as close as possible. Trying to decide if I really need to move them.
Nice tutorial. We redid our kitchen, which had 30+ years of various layers of paint and wall paper. The main exposed wall was a mess. We should have replaced the drywall, but instead, we floated the entire surface of the wall; 3 coats of mud. Came out looking good once it was painted, however…..
With the entire wall surface being joint compound, it is not durable. A slight hit that would not leave a mark on painted drywall, creates gouges and we have to do something. We are thinking about putting up paint-able wall paper with a subtle pattern to keep our original design & colors. Any other suggestions?
I’m sorry to hear you’re having those kinds of issues! My process kept the coat of mud fairly thin (it would be practically nonexistent in most areas, and then sanded); I’ve done it in two of the bathrooms and haven’t seen a gouging problem like the one you’re describing, so maybe the 3 coats of mud were too thick? Or maybe I need to throw more elbows around in the house? Ha. I think a paintable wallpaper would be a good solution, but there other options too that you might be open to (such as horizontal wood planks, or beadboard, or using spray texture to create a knockdown textured effect, which might make dents and dings less noticeable).
I had the same problem after smoothing a wall in a high traffic area. The easiest solution is the keep some touch up paint on hand. Eventually, it will need to be repainted anyway, and after a few coats of paint have hardened (they cure slowly), the walls will be as durable as any others. If the situation is intolerable, an oil based primer or PVA will toughen it up, but if you use PVA, you’ll have to find some paint that will stick to it. Also, in some areas, you can still get veneer plaster (which is supposed to be much more ding resistant) done, but to make it stick to an existing wall you’ll need a special bonding paint first.
Very helpful! I’m trying to smooth and paint interior bulkheads on my boat so am using a different type of putty but the technique is essentially the same. Thanks much!
Joint compound isn’t particularly strong. Thin it out, and it’s even weaker. It might be worth your while sealing the wall with gardz or an oil-based primer, such as cover stain, BEFORE AND AFTER skim coating. BEFORE to lock any wallpaper glue residue to the wall that might prevent your joint compound from sticking, and AFTER to penetrate your joint compound and harden it so your paint isn’t just sticking to a layer of joint compound dust. I’ve been there. After skim-coating, priming, and painting my bathroom, I masked off the trim to paint it, and the painters tape pulled the paint and primer right off the joint compound. You could call it primer failure, or you could call it weak joint compound. Tomato Tomahto. Either way, the paint peeled, and the way I’ve learned to prevent it is to seal it with Gardz or a quality oil-based primer. Thinned-out-lightweight-ready-mix-top coats don’t dry hard, they are forever chalky, and water-based primers that only stick to the top layer of dust can’t stand up to painters tape.
Agreed. I used oil-based primer in my primary bathroom after all was said and done, with excellent results. I tried a paint and primer combo in my guest bath when I did the same thing in there, and the paint wouldn’t stick as well. Great advice!
Sarah – GREAT tutorial! I’m skim-coating my dining room ceiling this weekend… wish me luck. I’ll need it.
Hi Sarah.
Great tutorial, you made a most messy job sound very easy & fun.
This is useful advice, and will be necessary in a lot of situations. But there are times when smoothing and painting an existing layer of wallpaper is the most expedient rout. If the paper was put up soundly and smoothly, and taking it off will ruin the wall underneath (this can happen with crumbly plaster as well as drywall), it’s easy to simply tape the seams with fiberglass mesh and 2 coats of redi-mix (hot mud for the first coat, if you like), sand and paint it. Then cut out any ripples or bubbles and cover the edges of the cutouts with fiberglass mesh, mud over those, sand and paint the patches. It’s quicker than it sounds because the tape acts as a screed, making the patches smoother than they’d be without it. I did this in my parents house and told the realtor, as well as all potential buyers, all said that it looked fine and had no problem with it. It’s a judgment call, eventually you get a feel for what will work and when.
thanks for sharing this, oil prime before and after was great tip which I had not found elsewhere. Personal note: I used a rectangular cake pan for my mud with good result. $1 dollar, also buckets for mixing, clean up etc. $1 dollar store. Happy renewal!
This website was… how do I say it? Relevant!!
Finally I’ve found something which helped me.
Cheers!
Thanks! I am in the process of removing wallpaper to find ancient, ugly walls that have been wallpapered, painted, and wallpapered again! There is little smooth about them at all. I am disappointed this will not go faster (sigh), but this info definitely helps! I may even try to use a roller in some of the smoother areas. Thanks again!
Glad it helped! Good luck with your project!
Thank you a million times for your post. We removed wallpaper from our kitchen walls only to find plaster, drywall, and I swear what looked like sandpaper underneath! Your post was extremely helpful and gave me the confidence to do it myself. The walls turned out great, in fact compared to the rest of the walls in my 100+ year old house, they are the nicest! Thank you again, I never would have been able to do it without you!
Thank you for TOTALLY MAKING MY DAY with your comment :)
Love this! We just bought (well, a year ago) a 1975 house with a glued onto unprimed/painted drywall laminate backsplash in the kitchen and already painted over wallpaper in every bathroom!! I want to rip off that backsplash and hang beadboard wallpaper until I can afford to do tile and new countertops!
Hello! I could have sworn I’ve visited your blog before but after looking at a few of the articles I
realized it’s new to me. Regardless, I’m certainly delighted I
came across it and I’ll be book-marking it and checking back regularly!
Its good to see you figured it out. In the future you should try a blue top finishing mud, the green top shown in your pic is for taping and is way harder to sand. Because there is glue in it! If you have a good drill get a paddle mixer andmix a whole bucket at one time. Thin it down to how you like to float, about pudding or so. Also try a knock down trowel they are very wide and can spread out and skim coat much quicker. Fixing old work sucks anyway you look at it but it seems you did it your way and came out good. Just trying to help you out next time.
I use the blue top stuff now – been a few years since I first posted this tutorial! Thanks for the tip.
Hey,
I am removing wall paper and a lot of the dry wall underneath is getting gouged. It looks like the dry wall was never taped or skim coated. Also it is nailed up so it would be hard to take off and get new dry wall. Should I tape it and try to make it work or is it too far gone and should replace the dry wall? I’m feeling super frustrated and at a loss with what to do.
That’s exactly the same as the situation I was in with my walls. I’m choosing to repair rather than replace, but there really isn’t an “easy” option, as both require some work. A contractor might give you a free quote if you would like to get their input on what you should do.
I love u sarah
Dear Sarah,
This is my first time reading your blog and as a lifespan human developmental/behavioral specialist (and professional trainer) I was truly impressed by your delightful tutorial on skim coating walls. Here in Charlotte, NC, we have similar weather to yours (aka mega-humidity-issues) and as a result, I’m cussing up a storm (you’re my kind of honest/forthright woman!) because the previous owners put wallpaper up in most-every room, including our 80-100% humid bathrooms! So, I’ve began my quest to strip & refinish the walls in those spaces, and I’m thankful for your wisdom and your sense of humor, but perhaps even more importantly, I was inspired to tell you the true story of my artist/daughter, Sarah. When ‘Sair’ was 5, and getting ready to start Kindergarten, she was practicing writing her name, and she asked me, “Momma, why does my name have an ‘H’ on the end?” Well, I had a dozen answers for her, but I paused for a second, puzzling over which one to offer her first… But before I could say a thing, Sair excitedly raised her hand, and she said, “I know! I know! The ‘H’ is for DECORATION!”
Truly, DAG of Charlotte
That’s awesome… “Decor-HATION” :) Glad the tutorial was helpful, and welcome to my little DIY world!
I like your work station and tool display. It made me smile. I am go through the exact process in my own Powder Room although I have to admit I did most of the damage myself when I moved junction boxes to new locals. Anyhow I put a link on my blog to this page. I have just started sharing my DIY passion with the world and I glad to meet a kindred soul.
Can you use a water based primer in place of an oil one?
I would highly recommend checking out my follow up post with additional tips for skim coating and the materials to use under/over it. There is a water-based product I found that I really like that I discuss there!
Overall you have a good DIY post…if and when one becomes good at it you can skim coats next to each other and over lap them instead of leaving the “fill in” gaps between each coat…the trick is to mud up the side of the blade where you want the mud on the wall and not so much the other, then apply pressure w/ your fingers on the back of the blade where there’s no or less mud…ex: if you’re working right to left then mud the R side of blade and apply pressure to L side which is how we “feather” it…to fallacies noted in the paint aspect: you do not have to use oil base primer and the “smooth” texture comes from multiple coats of paint properly applied and rolled out (depending on sheen). Flat paint should take 2 coats. Oil base is noxious and hazardous, ANY flat pain till work if you’re using flat anyway then just do 2 coats and be done. An acrylic primer is technically the best as the acrylic hardens on top, but either will do just fine. If using a shiny or sheen paint (any other than flat) you will need a flat or acrylic primer 1st then apply the sheen 2 coats. If you’re repairing a hole in the sheen paint you will need to repair, prime the repair, then paint the whole wall or else the new paint will “flash”…aside from removing wallpaper you do not need to skim the whole wall prior to painting, just feather, sand, and paint properly…and those pesky bits of paper that won’t come off… 80grit sandpaper ;).
in case you’re wondering, I have 16yrs experience….hope this helps
…understanding different compounds and the how’s and why’s helps as well…
Typical pre mix: Green, Blue, Purple, Light Green (in order from hardest to sand to easiest)
Then there’s the “Easy Sand” dry mix series that you add water to
The premixes have different strengths, if you’ve repaired a large hole or taped a fresh seam then you should use Green top as the initial base coat as it is hard to sand because it is most solid, then “top coat” or skim w/ the Blue or Purple or Light Green (purple/ light green are ultralights that sand well, my favorites). So if you’re just skimming out dings from moving furniture use the Purple/ Light Green.
The premixes stay wet longer and dry from the inside out, they must fully dry before more work can be done…this is where the Easy Sand dry mix comes into play. It is the strongest of them all, but is hardest to sand and apply…however it dries from the outside in which means you can begin to sand some or apply another coat before completely dry…WARNING if it starts to turn more clayish in the pan you need to dump it and make a new batch- you WILL NEVER sand out the edges once it starts to dry and will have to add more coats around the edges later.
Great blog post! Very helpful as we are now tackling our walls and rippng down wallpaper, and just now found your blog.
We are also scraping popcorn ceilings. Do these techniques for skimming walls work the same for skimming ceilings?
Thanks!
yes, they work for ceilings…skimming drywall is skimming drywall, its just more of a pain in the @ss since you’re working upside down. The good news to ceiling work is that you don’t have to seek perfection like you do walls for a few reasons: if there’s lighting in the ceiling observers will be “blinded” by the light, and they make ceiling paint which hides imperfections, however use decent ceiling paint…ceiling paint is FLAT paint which is whit w/ some black added to it to absorb light which hides small imperfections. DO NOT USE CHEAPO PAINT. Val spar ceiling paint is fine, sherwin williams is also good- ask for ceiling paint, if they are confused tell them “the old Duron color code 914white”.
Note: if you use glossy paint on ceilings then they do have to be near perfect or every flaw will be shown, you generally DO NOT need to use a gloss in bathrooms or kitchens as paint stores recommend.
I am not sure if it has been noted earlier, but on 6″ and larger blades, there is a slight angle factory set in the blade. This side should be the one to apply the mud to the surface.
Nope, don’t think that was mentioned before! Great tip!
Under paint you write “Even the nicest paints will have trouble sticking to new mud. So if you want to keep your walls pristine after all of that hard work, don’t skimp on the last step! Grab your oil-based primer and use it to seal your walls once more, then paint it with whatever you want. ” Is the oil-based primer you are referring to the RX-35?
I’m following your steps EXACTLY. Had to order the RX-35 since no one carries it around here, think it will be worth it based on your experiences. Thank you so much for sharing. This will be a first for me and I know no matter what comes of this project, it can’t be a bad as it is now!! Bathroom Nightmare!
I did an updated post too with more tips and went over the primer info in more detail, and I’ve since found a water-based primer I really like! So in later projects, I actually used the RX-35 to seal the drywall, then do the mud work, then use a separate primer once I was ready for paint.
I actually hadn’t thought about getting taping knives of different sizes. The downside of having all boys is that you will have to repair your drywall on numerous occasions! We have a pretty good sized hole in our living room wall and “no one knows where it came from.” I don’t really know a lot about doing the repair myself so I might leave this one to the professionals. I have done a few smaller ones in the past but this one might be too big for me.
Thanks Sarah for this wonderful and helpful post! Your post made it look easy, but actually it’s a pretty daunting task.
I am so glad i found this. I am in the middle of redoing my grandmas bathroom and it has been a nightmare. Removing the tile itself gave me a break down. I had been trying to remove the paint with paint thinner however there are 5 different shades of pink that are on the wall apparently. I would post the pic however i am ashamed lol. I am going to do your method lol i am hoping it will work out well for me lol i am a single female and have never attempted anything like this before lol wish me luck
Good luck! You got this.
I just want to say thank you for sharing what you’ve learned. Because of your detailed steps and info, I am tackling our ripped up drywall (curse the 70’s wallpaper fad!). A drywall contractor estimated $3600 to fix it, and thanks to you, we’re saving ridiculous amounts is money. Seriously, thank you. And curse anyone who installs wallpaper, double curses on people who paint over it. Triple on those who texture over it. Sigh.
Sucks that you’re having to go through it, but I’m glad my tutorials have helped! Good luck!
I just finished a skim coating project using this site and a tutorial on Family Handyman as my guides and wanted to share my experiences. Family Handyman recommends using a squeegee knife. I found this tool not to be helpful and feel you should go with the taping knife listed here – it worked a lot better. For my project, I was going from heavily textured walls that even with sanding were not really flat (not merely a little uneven from wallpaper, etc). Keep this in mind as I provide my advice…
On Family Handyman they recommended a roller. I do not recommend the roller because it does not go on thick enough. I used the taping knife or even my hand to apply and spread about the wall and then smoothed it with the taping knife.
Like this article says, definitely add some water to your drywall mix – this helps go on a lot smoother and easier – though I preferred it a little bit thicker than the article suggests.
I used regular all-purpose drywall, not the lightweight compound – I’m not sure if this makes too much of a difference or not.
Finally, I bought the drywall hand sander kit (vacuum attachment) suggested in this article however, I did not end up using it much. While the idea sounds great and certainly lessens the dust (which does go everywhere), I found that I could not sand rapidly or precisely enough using the attachment.
Fantastic instructions it’s people like you that help make jobs easier
Thank you so much. This was very informative & easy to understand with your instructions & pictures. I have made an absolute disaster of an area in my kitchen & I feel relief after stumbling upon your website. The men at Home Depot & Lowes were great but I left both places thinking I am so dumb. I am motivated again & it sounds like I will live through this mess I have made thinking I could scrape textured paint off with a putty knife!. When I did the gouges were an embarrassing work of art.
Thank you!!!!
So glad you found the site, Judy! I love hearing when people are using my tutorials to fix their homes!
This is long overdue: THANK YOU!! I have learned so much from your whole site, but the skim coat stuff was the first bit I found. Thank you for excellent advice, delightfully presented. You will never know how much I have enjoyed reading what you’ve written and how much I have benefited from your advice. I can’t honestly say I have enjoyed the actual work, but I loved following in your footsteps.
Here’s to Ugly Duckling houses ever’where! Thanks a million!
How necessary is it to thin the compound?
I find that it’s way easier to work with and I get fewer flashing problems (where the ridges & sheen are visibly different) if I thin the compound.
Thank you for this. I Googled, “how to re-mud a wall” and I was happy to see this about fixing damaged drywall, not just mudding new drywall. I bought a fixer in Dallas and it’s coming along slowly. Today I replaced the broken spray nozzle in the kitchen sink. PROGRESS. :)
I never sand when I’m doing drywall. I always put it on very thin and smooth so that it needs no sanding. It can also be applied with a paint roller for high-quality smoothness.
Sounds like you’ve got a lot of experience to do this well. This tutorial is more meant for beginners who won’t yet have that kind of skill, but thanks for the tip about the roller application… going to have to try that next time!
Having to repair drywall after removing wallpaper is not the easiest job and sometimes it can really be a pain.
One of the best ways to keep the paper edges from fraying and showing up when you paint is to seal them with a 50/50 mixture of an oil based sanding sealer and paint thinner. It does have a rather strong odor but it is worth putting up with for a day to get better looking results.
You only need to apply it on the edges of the damaged paper.
Apply your joint compound to fill in the damaged areas and lightly sand to feather in the edges.
You will love the results.
I have done this mant times and have never been disappointed with the outcome.
Thanks so much for your blog!!!! It’s made me feel sane :). I hired someone to strip the wallpaper of a bathroom. Well he didn’t do the job, and cut into my kitchen, hallway, stairway. I’ve been forced to just figure it out myself. I work 2 jobs so this has been a never ending few month job. But your blog has helped me realize the length and dust is normal. I didn’t know I had to prime the walls. After all this hard work I can’t afford to skip a step. Thank you!!! Amy
I hope it works out for you! Sorry to hear about your guy not following through… sometimes you look at someone else’s work and you just know you could have done a better job on your own!
Hi Sarah,
I took off the wallpaper from our bathroom. The walls were still tacky but smooth. We tried to primer it. Now you can see the texture. I’m going to try and skim the walls. So you suggest to use an oil based primer over water based primer. Thanks.
You should read the follow up post for specific product recommendations. They’re listed here, including the primer I like best!
There seems to be a major flaw in your instructions, and so many who follow them will suffer from it. All knowledgeable experts say that red-mixed, light, prepared joint compound should not be used for skim coats in a bathroom, because those kinds of joint compounds will soften/dissolve when exposed to water after they are applied and dry.
I too have been struggling to skim coat areas of water damaged walls and ceiling in two bathrooms. I have used setting-type compound to repair the water-damaged plaster (not drywall). However getting final skim coating smooth with setting compound is difficult or impossible. From what I have seen here and other places, using pre-mixed, light joint compound would give a smooth finish much easier, but I do not want to go back and have to repair damage that might occur in the future.
I guess that using a oi-based primer over a water based primer over the final skim coat would give some measure of moisture protection, but I am not sure that it would. So, using that approach is something of a gamble, and I have not seen any written evidence that it would hold up over time.
Your comments?
My opinion is still relatively the same as when I first wrote this post. Bottom line, bathroom walls in general aren’t often hosed down with water to the amount that drywall should be getting soaking wet except in areas meant to be waterproofed (such as a steam room or shower walls where you tile over the wall). It’s the same reason why there is a different kind of tile adhesive for wet areas (shower + steam room) and everything else. If the rest of your walls get water exposure enough to soak into the drywall seams, it’s likely to ruin drywall altogether.
Your advice would make sense if all of the bathroom walls were consistently exposed to HIGH levels of moisture rather than the occasional splash like near a sink. If you’re soaking down your walls to that extent every time you brush your teeth though, you should probably just tile the bathroom walls instead of gamble with drywall at all, since drywall IS sensitive to moisture (and standards have changed for items like the shower walls — they use cement board and no longer use drywall in those spots for exactly this reason).
I’ve been in this house for close to 8 years now and have had zero issues with my walls. Plus, if you use a paint with any sheen as a topcoat (as recommended typically for a bathroom, such as satin paint) small water droplets or splashes will bead up on the surface to make cleaning easier. As for the sealer-primer, there’s another post about that where I recommend one that isn’t oil-based. You can read that here.
Thank you!!
First time here trying the whole DIY and Im impressed after reading your blog (more than once) I felt ready to conquer my bathroom ????????
Glad you’re here! I hope you find these tutorials helpful and conquer your room with ease!
I have exactly the same tiles….would have loved to see what color you chose for the wall after all the hard work of preping it
Do you think this process would work on plaster, as well? I also live in an UDH. Right there with ya!
Honestly, I wouldn’t really feel comfortable giving advice on a different material but I’m sure there are forums about traditional plaster (and I think maybe even Manhattan Nest had plaster walls and fixed them on his own?). I hope you find your answer!
I can’t thank you enough for this tutorial. I’ve been thinking about just smashing the wall down and starting over because no matter what I did, it never looked smooth like the pros! Now I see that I was using waaaaay too thick a compound. Thank you thank you thank you!
really dig the reality and detail. thank you.
This tutorial is so good…probably the best one out there, I even had a few laughs; I.e., take a shower woman! Thank you so much!
I was literalllllly just looking for blog posts and how-to’s on this, hooray! You’re so knowledgeable hahaha. Thanks. I really effed up my drywall by moving my baseboards down a smidge when I replaced the carpet with luxury vinyl plank :(
So glad you found my tutorial then! Be sure to also read the follow-up post so you can get more details on things I’ve learned over the years (here). Good luck on your fix!
hi sarah! thanks so much for writing this post — lots of great info here without being excruciatingly in-depth. you seem to have a ton of knowledge about this DIY home repair stuff, so i thought you might be able to help clarify a few things for me:
1) what’s the consequence of NOT thinning out the joint compound before coating the walls with it using spackling knives?
2) i have read that before painting, you should wipe down your walls with a damp cloth. this tip, i think, applies only to painting an already-painted wall to a different color WITHOUT making any sort of repairs that require skim coating or sanding, right? because if you wipe your skim coated wall with a damp cloth, it’s going to mess it all up, yes? & the reason you don’t wipe your skim coat with a damp cloth — besides ruining all your hard work — is that primer is different than paint, & primer applied to walls with some dust will not flake off the way paint does. is that right?
So glad you found this helpful! And I’ll do my best to answer (based on my personal experience, though of course I’m not a pro!):
1. I’ve tried skipping (because if I can be lazy, I will be!). From when I haven’t thinned it down, it is kind of annoying with the consistency. The layers are thicker and crack easier if a bubble is underneath, and the sanding results are kinda lumpy in ways I don’t want it to be (it’s hard to really put it into words but “weirdly lumpy” was what came to mind). I prefer the thinned out way because the thinner layers have led me to a smooth sanding job. It’s kind of like spray painting something: when you go in thinner coats rather than trying for full coverage all at once, the end result tends to look better.
2. Pretty much. Re-wetting the joint compound — like just plain wetting it again with a rag — means you have to wait for at LEAST the top layer to dry again. Join compound gets wet again pretty fast. It might not be a HUGE mess-up if it’s a quick wipe and more “damp” than “soggy”, but when I’ve wiped down the wall with anything other than a dry cloth, it’s just enough that it shows a little texture from the wipe (which, if it’s bad enough, means sanding it smooth again, which also means you have to wipe down the wall again, and then I’m basically just in some kind of hellish loop that I can’t escape). The purpose of wiping down a wall is to get it clean so that the paint can stick to it, because dust and/or dirt will create a bad bond between the paint and wall. So I wipe the whole thing down with stuff that traps dust, similar to how you wipe wood down after sanding and before staining (such as a non-oily tack cloth or even Swiffer dry cloths – one of my sponsors just FYI, but I used them for this reason before they ever sponsored me, ha!). If it’s some kind of patch where the rest of the wall is dirty and you put new joint compound in a section, you should still clean the rest of the wall before painting, but try not to get the joint compound area wet again. And that’s also why I recommended the primer before painting and not some kind of paint/primer combo. The only time I’ve ever had an issue with paint peeling off of fresh joint compound is when I was lazy and tried to use the paint primer combo that is so popular these days it refused to stick. The primer does its job to help with adhesion of all 3 of those layers (primer sticks to joint compound, then the paint sticks to the primer).
Good luck with your DIY projects!
Thank you for showing your before pictures. I was just going to call a professional . With your instructions, I think I can do it !
Fantastic, Denise! It takes patience and practice, but it’s not impossible. Good luck on your project!
Use Behr Marquee paint. It went over skim so surprisingly well I flipped. (Though I was frightened at first, it didn’t automatically self level for 12 hours.) Won’t ever use another paint/primer!
I’ve heard good things. Wasn’t an available formula when I first started DIYing, so it’s a relatively new product. I haven’t yet tested out whether or not it prevents flashing as well as it says but I’ll try it eventually, I’m sure.
Thanks so much for this walkthrough, Sarah!
Renovating our 1903 Old Style home, we’ve been going through a heck of a lot of wallpaper. Layers of it, with paint in between, before finally getting to the original plaster that of course crumbled in some places! So after days and days of exhausting work after a full day of work, my wife and I managed to transform two (loud, to say the least) wallpapered bedrooms into mostly smooth skim coated walls with your tutorial to thank.
Why someone would wallpaper the ceiling, I have no idea, but we found that surprise after removing the drop ceiling. Too much for me at that angle so I guess I’ll have to sheetrock over the ceiling and start fresh. Anyway, keep up the great tips!
So glad you found my tips helpful, Jon! Wallpaper on the ceiling sounds ROUGH. Would love to see your renovation when you’re all done and ready to show it off!
Girl – I’m coming at you from 2019 and I keep debating on doing this. We bought a 1950’s house and – thankfully – there is only one room that really needs a full skim coat. Our bathroom has wallpaper on it that I’ve been working on getting rid of for a few months now. We got a quote from a local painter to skim coat and the quote came in at $600! I’m like – But.. I bought most of the materials for less than $75 before I started getting cold feet! I read this blog post months ago and just read it through again. It definitely gives me the courage to really give the project a go! What’s the worse that could happen? =P
Yeah, the most expensive part is the labor! It’s time consuming to get right so I FULLY believe you that it’s pricey to hire out! I’ve done this to many walls in the house and I’m still (in 2019) thrilled with the results. Lots of luck and be sure to wear a good breathing mask!
I’ve been following your blog for years and have finally got to using your tips. I totally revamped my dining room plans and switched out for custom paint colors to get the same blue you have in yours…waaaayyyy better thany original plan. I am also repairing my powder room from a bad wallpaper removal using your tips and techniques. We were quoted about $1k to have it done, so I was motivated to head to the big box store for the supplies and spent $47 bucks…wowzers. Although I will be putting wallpaper back up for the design I want, this process is not as bad as I thought. Thank you!
You just made my day! Thank you so much for letting me know about your projects. I can’t tell you how much DIYers love hearing success stories from the tips we share!
Hi! Thank you for both of these amazing posts on skim coating! I wanted to know what helpful tips that you have for clean up? I have read TONS of posts and watched videos on skim coating but no one except you mentioned clean up. I read many forums as well and the solution vary. I have been skimming nightly in my office and the clean up is absolutely back breaking! I have diluted and put down the toilet and have also tried cleaning my tools outside although I don’t think dumping it down the sewer drain is the most environmentally friendly method. Do you have any tips for what you’ve done? I have heard you can dump in your yard but I also don’t want my grass to be totally white in some spots. Any help is appreciated!
Also, I was wondering if you had any tips for skimming the edges around windows and corners of the room? The build up on the corners is pretty awful looking but I’m hoping it will sand to a nice corner? Did you have to work around windows? Thanks in advance!
At the end of the day if I had some mixed joint compount (I tried to use only what I needed to minimize it), I scraped the majority into a trash bag and really tried to get as much as I could off with my taping knife so there was very little to clean. As for the taping knife and mud pan, I would hose it off in the front yard near my ivy (so it wouldn’t impact the grass as much) and get in the little grooves with a wet paper towel so it wasn’t washing down the drain (I agree with you, best to avoid the drains and plumbing!). You’re making me realize I should create a new post about cleanup (I’m skimming my garage this summer so I’ll have a good opportunity to take video and pictures of that), so thanks for the post idea!
Windows and corners are different for how I did each. My windows didn’t have any trim on them, but if yours do, you might consider removing the trim and then trying to get the joint compound smooth and then putting the trim back on. It might also be a technique issue, because you need to feather out the skim coat in really thin layers so that the thinnest part is near the widow edge so there’s less buildup. For corners, you use the taping knife edge in the corner and feather it out on both sides. I wouldn’t worry about little ridges since those can be sanded out and another coat put over them once smooth. There’s also a corner tool that you may find easier to use that looks like this. Hope that helps!
Thank you so much for writing such a thoughtful comment back with great tips! I’m putting them to use today. You should definitely write the post because I feel like it would be so helpful! Hope your garage skim project goes well this summer! We will probably have to do that down the road as well. Thanks again!
This is great. Thanks for sharing your journey with us! I started with DIY projects but then friends kept tapping me on the shoulder for advice so ended up just starting my own company! I’m still a DIY-er at heart though. Cheers again for your inspiration.
Hi, my bud just forwarded me your article. Thanks for sharing your processes – love the details.
Wow! I can’t thank you enough! I’m not going to tell you my sappy story, I just wanted to let you know that you saved my sanity…and my pride. :).
I’m subscribing now so you can save me again!
I’m so glad you found this post helpful, Cheryl! And so glad to have you following! I’m working on a series on my emails that highlights some of my best tutorials and tips, so hopefully you’ll enjoy those once it launches!
Skim. Coating. Sucks.
Thank you SO much! I was using a primer /sealer last night before joint compound, and by the end, I researched back and realized I used the wrong one. I got a water based white color primer sealer- Zinsser 123. I hope this is okay to joint compound over since I already have it on three walls thinking it was a similar product to Garda and roman(could not find anywhere local!) :(
Happy to be of help, Amber!
Thanks for the article. I have just painted the walls with Little Greene primer and paint, overall I can say that it looks really well but for me it is a little overrated
I am not quite sure that primer was really necessary
That’s often the case when something gets done right: you’re not sure if all the steps you took were absolutely necessary, but when you skip one and something goes wrong, you learn the opposite!