
Disclosure: this post may contain affiliate links, which means I may make a commission if you decide to make a purchase through one of my links, at no cost to you.
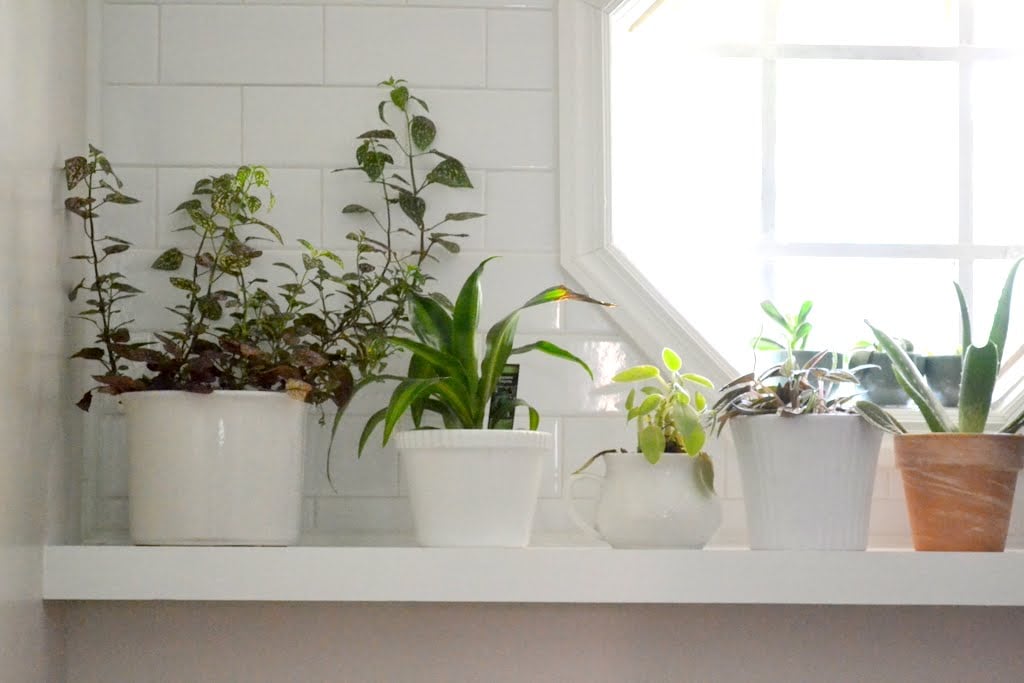
Got a new laundry room update for you today! Meet my new little greenhouse in the laundry room’s recently added back shelf:
When I upgraded to the front-loading washer and dryer less than two years ago, I realized that the biggest challenge I would face in the laundry room’s new design plan would be the awkward layout. There’s a small ledge that runs beneath the back window, which originally served as support for a deep shelf to hold all of my often-used laundry supplies.


But as the new design plan came together, I realized how difficult annoying it would be to try to use this ledge for a functional purpose. The ledge in the wall sort of forced there to be a shelf in that spot, but reaching up and over the yet-to-be-installed counter all the time would mean that the space would continue to feel cramped. And regardless of how deep I made the shelf, I’d still probably have to use a stool to reach detergent and other things… which I would then have to move out of the way to constantly open and close the washer and dryer doors. I also knew I’d be building two extra shelves on the right side to help increase storage (see here for the DIY), so the argument for putting the existing depth of the shelf back into place just didn’t make sense.

All in all, not a great plan. So as the options swirled around in my head, I kept coming back to the conclusion that: 1) I hate doing laundry; 2) because of item #1, I need to put something in here that will keep me regularly visiting this room to get it done (like watering plants); and 3) Since the room is going to be mostly white, plants would add some nice color and visual interest. See?
In all fairness, plants are not really the cheapest of all decorating ideas. Each little pot can be expensive if you go beyond the basic terracotta varieties, not to mention the plants themselves and the supplies needed to keep them healthy (and if you kill them, the replacement cost adds up). But if you’re willing to do a little work, you can easily keep this project under $75.
To find these pots, I went to a specialty store Goodwill. In total, I spent $25 on 17 pots of various sizes, heights and shapes. Since they’ll all be transformed into a color scheme that’s a lot more cohesive, I looked for ceramic containers with the most visual interest.

This is one of those kinds of activities where you have to see the potential of what it could be rather than what it is. Lime green, ugly labels, and purple specks can all be hard to overlook, but their shapes were interesting.
To get started, I unwrapped each container and split them into two separate groups: ones I thought I could drill through without breaking (or wouldn’t be upset at myself for breaking), and ones I wanted to keep intact.

I highly recommend doing the drill step first before painting and even before cleaning them, if only because cleaning and painting a cracked pot is pointless, and you kind of want to eliminate needless effort early.
How to drill a hole in a ceramic pot
What you need:
- 5/16″, 3/8″, and 1/2″ diamond drill bits for ceramic/glass (check the package just to make sure it’s ok for ceramic; some of them specifically say not to use it on certain materials even if it drills through tile)
- painter’s tape
- spray bottle of water
- drill that allows varying speeds or impact driver (my favorite)
I chose to do all of this in the back yard on the patio. I guess it really doesn’t matter, but with mucky ceramic dust and water being sprayed around as a part of this project, you may not want to do it on a family heirloom or on your hardwood floors. FYI: the newspaper the Goodwill items were wrapped in made for an excellent drop cloth :)
1. Lay out all of your pots upside down and inspect them for any cracks. If you’re all set, cover the spots you intend to drill through with some painter’s tape. You can choose to bore a large hole in the middle of the pot or several smaller ones closer to the edges, but I’d recommend the larger hole just because it means less drilling.
2. With your tape in place, spray some water onto the spot you’re drilling. Most of the containers I purchased had a small lip on the outside, so it allowed water to pool exactly where I wanted.
3. Load the drill bit and just start drilling. Use a small amount of speed until the bit catches, then increase it. Do not apply a heavy amount of pressure (it will crack the pot), but put enough pressure on so that it doesn’t just endlessly spin. This takes a while, so have patience.

4. Keep drilling. It really does take a few minutes. When the water gets cloudy, it means that the bit is working its way through the ceramic, but the friction is also creating a fair amount of heat, so spray the water bottle every 30 seconds or so.
5. When you get very close to breaking through the other side of the hole, the bit might cause the smaller bowls to rotate or rattle. Steady the pot, finish the hole, and remove the tape.
6. Now you can wipe things down and wash your new plant pots to prep them for painting. I prefer the lazy method of a Clorox wipe, but if you want to break out the soap and water, you do you.
Painting ceramic pots
What you need:
- 220-grit sandpaper
- primer
- spray paint color of your choosing in finish of your choosing (I chose White and Blossom White in semi-gloss and satin finishes to have some variety in the look and color variation)
- clear coat, optional (all of these were Rustoleum 2x)

1. Lightly sand down the items that will be spray painted.
2. Prime each piece. It’s important to use light coats, even if it takes longer (you get a smoother finish). For more spray painting tricks, see these 7 easy tips.
3. Lightly sand between each coat. Or skip it sometimes if you’re lazy. I’d say I was about 50/50 on this.
4. Spray your pieces with the color coat. I chose white because I want the plants to have all of the attention, but it’s up to you. I find that a flatter finish looks more chic to me, but varying sheens also look nice.
5. Optional: add a clear coat that is the sheen you want to finish with. I’ve spray painted things without one before and things were just fine, but a clear coat can really make the finish look glossy if you’re going for that.
Once everything is dry, you’re ready to plant.
Adding plants to the mix
Since I wanted a lot of variety to spend very little money, I went to a boutique nursery Walmart to see what kind of selection they had. In total, I spent about $70, but I came home with a huge variety of indoor plants and succulents that will be happy in all sorts of various places around this house (not all used in this project, so that cost is a little higher than what was really used for this project). Just be sure to check the labels so that they’re right for the lighting needs for the room.

You’ll also need some gravel or rocks to put in the bottom of your pots to help with drainage, and some extra soil that’s suitable for indoor plants (for succulents, use a cactus potting mix).

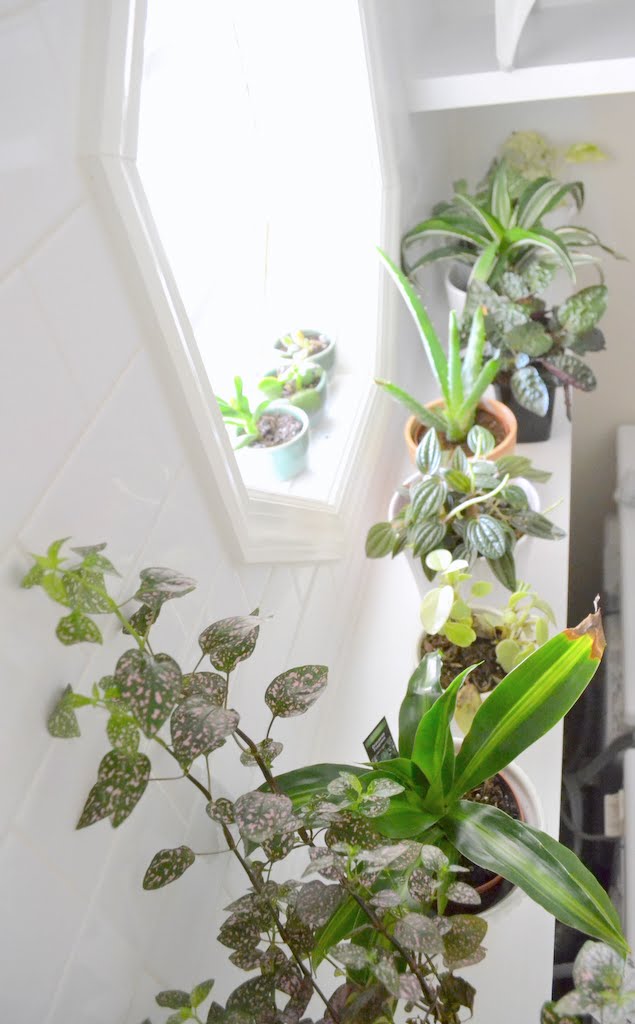
As you can see in the photos, there is quite a lot of variety going on here, but I’m really pleased with how things turned out. I’ll try to get a full shot of everything when the counter goes in (pointing the camera directly at the only source of natural light blows out the photos, so a whole-room shot will probably wind up much better when everything is finished).

I check on the watering needs of each plant weekly (I set a timer on my phone, a great tip from Kelly at VATW). All I do is simply stick my finger in the pot, and add water if the soil is dry (except for succulents; they only need watering about once a month). So far, things are going well, and they all seem to be relatively happy. I doubt I’ll be able to keep all of them alive indefinitely, but I’ve had a lot of success with other plants around the house for the last year or so before attempting a project this big, so this will be my truest test on whether or not I’ve finally earned my green thumb! I also use a foaming pump fertilizer that makes feeding them really easy.
There are still a couple of items to still finish in the room, such as the paint job, hanging rod, and counter, but it’s all coming together very nicely. Who knows? If I enjoy being in this room more, I might actually have clean socks on a regular basis.


Love all those plants and the pots turned out awesome! I think plants make a great accessory to any room. I just wish I had more of a green thumb…
That ledge of plants is so pretty! Houseplants are always so cute and I can’t resist them so I often end up bringing several new ones home (even before I have any place to put them, oops). Question, though…why did you drill drainage holes? Won’t they just drain all over your beautiful shelf? :( I’ve ruined a couple spots on my mantel and a bookshelf because my pots leaked out the bottom, gradually, over time (not even because of intended drain holes). If I pot indoor plants, I just use rocks on the bottom and soil directly on top (no drainage other than the rocks), or I use the decorative pot as a cachepot and put/leave the drainage holes in the “real” growing pot (no holes in the outer pot). When using a cachepot you can leave any extra water to evaporate (if you live in the arid desert like me) or you can pour it out. Keep your pretty shelf safe! :) Looking forward to seeing the rest of the room as you continue along :)
Terra cotta pots can cause water damage, too, because they actually absorb water. I had a terra cotta cachepot that didn’t have drain holes, but the bottom would absorb the moisture and wouldn’t dry out as quickly since it wasn’t exposed to the air. So the spot on my mantel where this pot used to sit is all water stained and swollen :(
Some of the bigger pots are decorative and did not get drainage holes… the plastic pot from the store just gets popped in on top of a few rocks (similar to the succulents I shared a couple weeks ago).
Some of the smaller ones got drainage holes because unlike the succulents, a few of the plants had deeper root systems and the roots had a tough time fitting into the smaller containers if I also used rocks for drainage. I left them out of the photos, but you can buy plastic saucers to go under pots that help take care of excess water without worrying about damaging what’s underneath. I just felt that they kind of ruined the look of the photo if I included them (plant vanity?). =) If you’ve got pots with drainage holes & you’re ever in the same situation, I highly recommend using them as they work really well even if they aren’t the most attractive (and I suppose you could always spray paint the outsides to be more decorative if you wanted).
So cute! I love the idea of buying interesting shapes at the thrift store and then painting them.
If you have pets who are munchers, as mine are, the ASPCA has a website where you can check houseplant safety for pets. Many (most) common house plants are quite toxic for dogs and cats.
Charlie has a thing for tearing fuzzy guts out of toys and chewing up sticks and cardboard, but she’s never gone for chewing on plants. But very good advice if you have plants on the floor!
you are a real motivation. when I dont know where to start this is exactly where i do, my plants
In the midst of blog stalking you, I am so happy I stumbled on this post! I literally have so many containers that I want to use as pots but had no idea how to do that. Now if I could just figure out how to turn my black thumb into a green thumb, that would make everything perfect!
You could always build a drip tray right into the shelf itself by adding shallow sides, lining it with waterproof material, and filling it with small decorative pebbles. Then when you set the plants on top, any draining water would simply run into the pebbles – good for increasing relative humidity around the plants. :) …Added bonus: you wouldnt have to dust the shelf!
I like this idea a lot, thanks!