
Disclosure: this post may contain affiliate links, which means I may make a commission if you decide to make a purchase through one of my links, at no cost to you.
Getting rid of the last of the wallpaper wasn’t the only accomplishment over the weekend. Today’s Dueling DIY update is probably going to be the biggest I’ve had so far. And I’m sofa king excited about it (if you don’t get what that means, just say it REALLY LOUD to your coworkers in the break room and see how they react… ).

Ready?

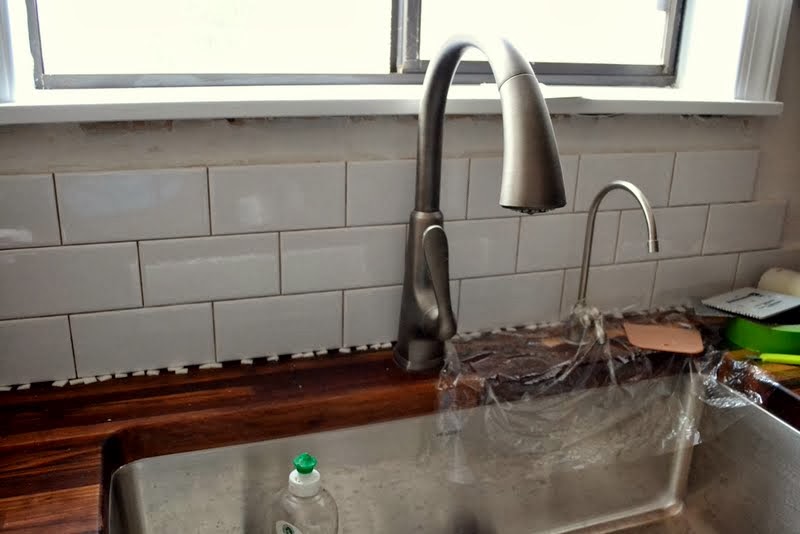
BOOM. Granted, it’s not Carrie’s mega-huge score of soapstone, but you know what that is? It’s a fully tiled wall. Next to a countertop that’s already installed and a sink that’s already running water. So, a certain blogger who doesn’t currently have those things? Ahem. Maaaaaybe you should pipe down real quick.

I got two out of three walls covered in white subway tile (working on the third as we speak). Today’s post is just going to cover the timeline of how things went down over the weekend, but I’ll have another post up tomorrow for all of the DIY details.
Friday Night
Picked up final supplies and set the first row along the long wall of the kitchen. I sort of jumped in before I realized I didn’t have all of the pieces I needed, but since I chose to “back butter” the entire first row (where you apply adhesive to each tile and not the wall, but more on that with pictures tomorrow), I didn’t have to worry about extra adhesive drying in places I didn’t want it to. I had a big bag of spacers (small plastic wedges) that I used on the bottom and corner (just in case the wall was uneven, I didn’t want to have to try to squeeze/cut whole pieces of tile into the next few rows).

Saturday Morning
Mom, Dad and Granny came over to observe/run to cut tile outside/do other shit (like take down wallpaper) while I dove headfirst into the small area next to the fridge. I’d debated whether or not tiling this area would even be worth the effort, but after it was done: yep. Totally. It took the entire morning to get all of the cuts required for such a small space (with an outlet right in the middle), but by lunchtime, it was a done deal.

Saturday Afternoon, aka Round Two:
Ouch. By taking a break, I came back to the afternoon tile project with new shoulder knots and cramped hands. Clearly, I am not a woman made for hunching over kitchen counters (is anyone surprised?). But since the bottom row was dry from the night before, I knew where the next row would be spaced (using a brick or “broke joint” pattern). I started in the middle of the sink and worked my way out on both sides to make sure that if things went wonky, they wouldn’t just start fine on one end and turn to complete crap on the other (with the layout in this kitchen, there’s really no place to hide if a row becomes unevenly spaced).
At one point, I realized I wouldn’t finish the entire thing in the same day (the knot in my shoulder just kept getting worse), so I back-buttered a few tiles on the right side so I could concentrate on the left. It took some patience, but it turned out that I chose the easier side to finish (only one outlet to cut around).

Sunday Afternoon
I slept in Sunday morning (still sore), but managed to work up my resolve to finish the rest of the wall by noon-ish. The tile saw and I got to work, and getting things to fit properly around both the outlet and switch was a little tricky. I was still damn proud of my handiwork by the time the last tile went in!

I’ll have a LOT more step-by-step info for you in tomorrow’s tutorial post, but for now, let’s take a walk down memory lane:
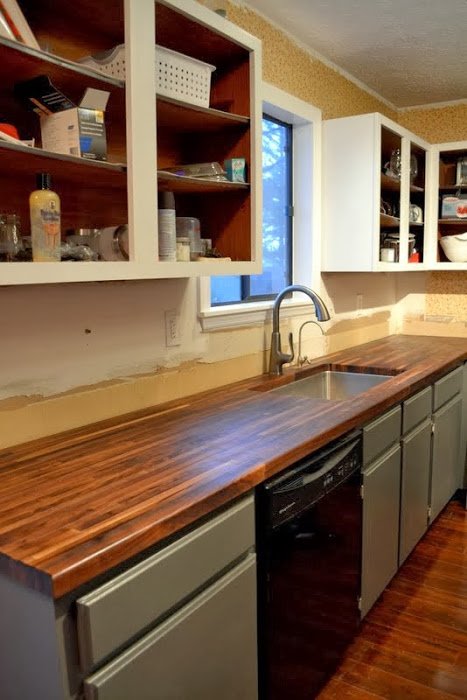
Before (just after moving in, 2010):

As of this week:

Not to shabby so far, eh? Speaking of memory lane, I’ve also been working on some updates to the Project Gallery and House Tour. More rooms & more categories added! If there’s anything that will remind me how much is still left to do, it’s adding more unfinished rooms to that tour :)
Ok, so onto the other updates: Carrie has been looking for the perfect faucet and countertop slab, and seems a little more determined than usual to talk some smack. So go check out her update this week and see what she’s up to.
And of course, the link up! Looking forward to seeing your own kitchen progress below (by the way, do you guys want a badge for this to share? I guess I’m not much of a good host without one, am I?):


Awesome progress! You are so fortunate to have family nearby who are willing to help out. Something to really be thankful for. :) You did really great on the tile. Not something I would feel comfortable doing but hey, I may have given it a go with a “before” kitchen like that! Yikesy.
It is beautiful, and I am jealous! Hopefully, I am just one step behind you. I truly hope that mine will turn out this well. You did a great job!
Wow! It’s looking great. I hate tiling. Love the look, hate the process. Actually, it’s the grouting part I hate. Your work is worth the effort, though. I’ve got the major shoulder knot thing going on, too. It takes about 2 days after I work on my walls for it to subsided enough that I can get back at it. Makes for a slow remodeling process.
Anyway, I’d love a badge to add to my weekly posts. Thanks for this link up. It’s helping me stay on task.
This looks great! Such a huge improvement. I can’t wait to start tiling this weekend. Ish. :)
Ahhh – I love the tile!! I just drew an air heart around the photo as I was reading the post. I think this is what I am leaning towards now for my kitchen.
p.s. totally using sofa king in my online vocab now!! :)
oh my gersssh it so sexy!!!
I can’t imagine how tedious that must have been lining each of them up and making sure they were placed just right. And then throw in the pseudo yoga pose of stretching across the counter top. But the aches and pains pay off and it looks great. Plus you’ve saved a bundle of money doing it yourself.
Nice job, it looks AWESOME!
Kitchen almost done just need to glue the end cap (I guess I need to buy an iron for that) and remove plastic from the appliances, Maybe tile backsplash someday. But before I can do that I have 1000 windows and doors to trim. oh wait, only 999 the kitchen window is done.
[IMG]http://i60.tinypic.com/103vogk.jpg[/IMG]