
Disclosure: this post may contain affiliate links, which means I may make a commission if you decide to make a purchase through one of my links, at no cost to you.
This post may contain affiliate links. This won’t change your price, but may share some commission. Read my full disclosure here.
I am a compensated 3M-sponsored blogger. Opinions are my own and additional products used in the project were selected by me.
I’ve been meaning to find a solution for our messy dog dish situation for years. I love the look of a raised dog bowl holder and thought a no-slip dog feeder would prevent one of our dog’s favorite naughty tricks.
Ever since Charlie was a puppy, she’s had a bad habit of turning her bowl over while she eats. She seems to be endlessly amused by my frustration with it and the dog food strewn all over the floor. We’ve tried several different dog dish options, but nothing stopped the dish from slipping around.
After lots of adventures with her running a ceramic cereal bowl into the wall and chipping it, I went out and bought some new stainless steel dog bowls. These worked okay, but they were easy to flip over. I knew from experience, the best answer to our dog dish dilemma was to solve the root of the problem.

I planned to build Charlie a new DIY dog feeder with feet that wouldn’t get pushed or tipped over so easily. I’ve heard that raised dog bowl holders can help dogs eat slower and aid in digestion as well. The no-slip dog feeder I envisioned would be a win-win on all accounts.
After thinking about the plan and idea for a design, I ran out to the store and came back with the supplies I needed to build my DIY non-slip feeder.
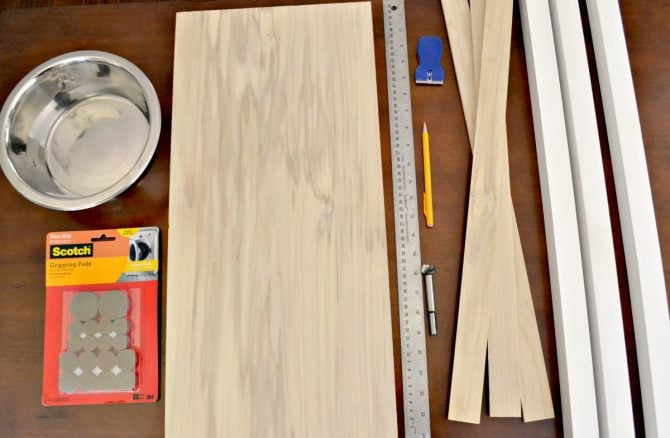
Materials Needed for the DIY No-Slip Dog Feeder
- 12″ x 24″ poplar board
- 3 – poplar strips to cover the sides
- 3 – pre-primed stair balusters
- Straight ruler & measuring tape
- 2 – dog food bowls with a lip edge (I think these were the large size)
- Pencil
- Razorblade scraper (to get the stickers off the wood)
- 1/2″ Forstner bit
- Jigsaw
- Clamps
- Sandpaper
- Wood glue
- Wood putty
- Stain (if you so choose) and a poly you like
- (Sponsor) Scotch® Non-slip Gripping Pads
Now, your dog may not be the same size as my dog, Charlie. So I’m not going to include a cut list here, because it’s going to vary based on the size of the bowls, the height of the elevated feeder that you need to customize for your dog (here’s a good example of how you figure this out), and plain old aesthetics.
The legs for my raised dog dish holder wound up being about 15″ each. I ripped the entire board down to about 10.5″ wide just because I didn’t want there to be large strips of wood in front or behind the bowls in the finished result. You can customize this plan for the dog feeder to your liking!
1. Cut Holes for Each Dog Bowl in the Top of the Feeder

First, you’ll want to cut holes for the bowls (hey, that rhymes!) in the top of your feeder. To make the dog dish holes, I flipped the board to the back and used a pencil to trace along the outer lip of the bowls I wanted to use (as you can see in the supply picture above, they both had a small lip that would help hold them in place).
It’s going to take some measuring if you’re as much of perfectionist as I am, you’ll want each dog bowl to have equal spacing on the sides, middle, and edges. This feeder holds two dishes, so they must sit evenly.
After placing and tracing the dog bowls on the board, I hand drew the lip a little further in, which would provide enough of an edge all around the bowl for it to rest on.
Once you’ve sketched out the pattern, you’re ready to drill. A Forstner bit is an easy way to drill a pilot hole (dealer’s choice for a spade bit instead if you don’t have one of these). I used a jigsaw to cut out each hole for the dog bowls. It wasn’t exactly perfect, but that doesn’t matter much…

2. Cut and Add the Legs and Edges

I used the tabletop in the middle of my kitchen as my work surface for the majority of this dog bowl project, since it was level and an easy spot to just leave something to cure.
Now that I cut the top of my raised dog feeder, I needed to get the legs ready. First, I cut the primed balusters to about 15″ and then glued them in place for legs. Once the glue was dry, I flipped everything over to right-side-up and clamped wood strips to all four sides to make the top edges look a little more dressed-up. See? Pretty.

3. Fill, Sand, and Poly the Dog Dish Holder

I wanted the top of my dog dish feeder to look really smooth and finished. To fill in any gaps of the edge pieces, I used a little wood filler and sanded the whole top down.
I’ll admit, I was kind of lazy and didn’t bother to paint the pre-primed legs because they already looked fine. For the top of the feeder, I add some high-performance water-based poly to the top to help bring out the grain a little more and protect the wood from sloppy water bowl abuse (a good idea if your dog is a messy drinker).
It wasn’t until later that I added more stability to the bottom left and right side with the crosspieces. I mainly added the pieces for aesthetic reasons (see photos below). You can leave your raised dog dish without this addition, or cut more lengths of the balusters to make the sides of the feeder look more mid-century.

4. Add Non-Slip Gripping Pads to the Base of Your Dog Feeder

The whole point of this project was to keep Charlie from shoving her dog dishes across the floor, so I was glad to have Scotch® Brand as a sponsored partner on this project. The Scotch® Gripping Pads were perfect for stabilizing the base of the feeder and for keeping it from sliding across the floor in case an overzealous pooch decided to play with her food. I was sure I was going to need the largest size of gripping pads for this project, but I wound up using the medium ones instead.

The Scotch® Gripping Pads come in a pack. They’re easy to separate and stick onto the bottom and middle support of the base on both sides. If you end up with more than you need for this project, you can definitely find plenty of uses for them elsewhere.

I used a total of six Scotch® Gripping Pads for this dog feeder project, so I had some left over. I’m going to keep them on-hand in case I need to add more at a later point.

5. No-Slip Dog Dish Done!
Once the dog dish feeder is dry, it’s ready for dog food and related furball messes. As you can see, this no-slip dog feeder turned out really great. It looks so polished and keeps the dog food mess at bay.

From the front:

From the side (because why not):
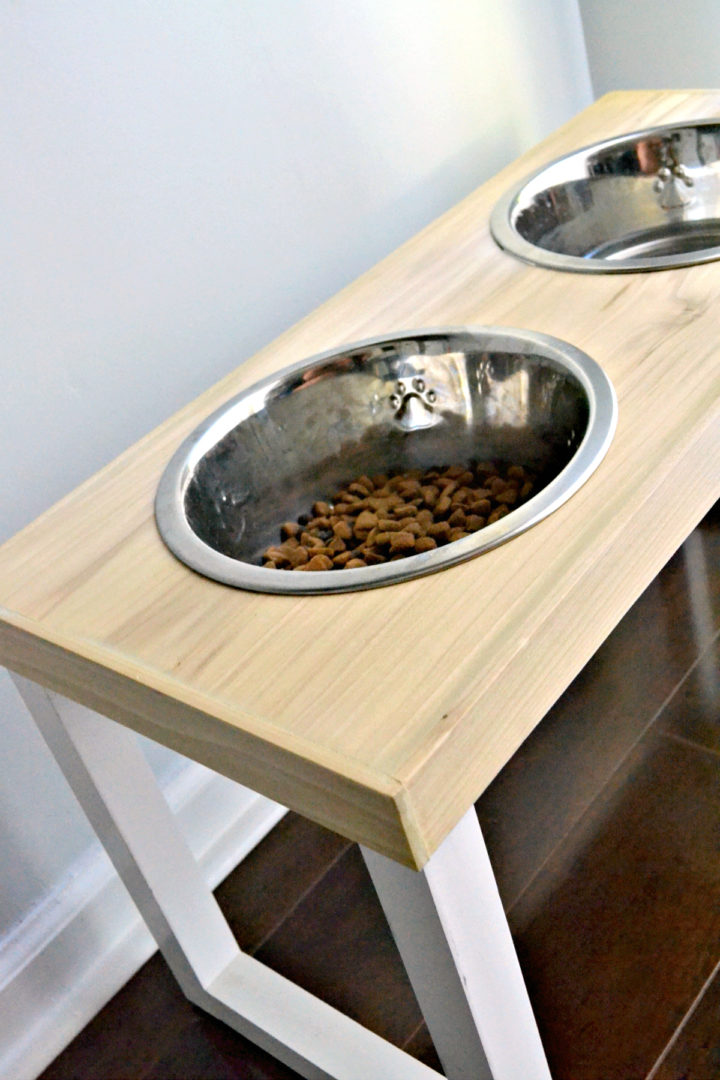
It was a beautiful day outside, and I’d already been working on the bar area in the kitchen, so I temporarily placed the new dog food stand near the sliding glass door. I won’t be keeping it over here, but Charlie was plenty intrigued by her new doggie dining area. She’s been eating out of the feeder without a tipping incident ever since.

Yay for happy endings!

Project created by Sarah Fogle of The Ugly Duckling House for Scotch® Mounting and Fastening


It really is a good idea to elevate a dog’s bowls. It’s supposed to be easier for them to eat. Personally, I’d hate to have to lean way over my plate to eat! I need to do the same thing for my dogs and I love how yours turned out. I shall have to shop my garage for some scrap wood.
Actually, that’s not true :( Raised food dishes increase the risk for bloat, which can and often is deadly.
Your dog must be loving you more for this .. Wondering what his reactions were when he ate first time in that.
She hasn’t turned over her bowl anymore and seems to have adjusted to the new spot to expect her food. I’m loving it!
i love the clean lines and the legs that square everything off at the bottom. i guess those help add space for the most grip pads, too.
I made this for my pregnant dog that I brought inside. She was used to eating with bowls on the side of her crate outside so I made one for her to still have her food raised inside. Was gonna post a pic but couldn’t figure out how. Anyway. Thanks for sharing!
What was the overall cost for everything?
Hmm. I’ll have to look at receipts. But not very much at all! I’ll get back to you when I’m able to total it up. Thanks!
Thanks for the great pics!! Will be making one of these tomorrow for my 11 year old beagle-mix just diagnosed with degenerative disc issues in her neck. It hurts her to bend her head down and I can’t wait to see her enjoy eating again without discomfort!! Thanks so much!
Aw, poor thing! Glad I could help the little lady!