
Disclosure: this post may contain affiliate links, which means I may make a commission if you decide to make a purchase through one of my links, at no cost to you.
To save time and money each spring, I decided to upgrade my mailbox with a creeping phlox garden bed: a plant that will fill in the garden bed over time and return every year!
For the last six years, it’s been kind of a ritual for me to periodically change the annuals in the garden bed beneath the mailbox. From geraniums to vinca to marigolds to snapdragons, this little area has been a neat spot to help me learn the basics of what flowers grow best in my yard, the kind of care they need, etc. And as much fun as it has been to put my growing (pun-intended) gardening skills to the test, I felt like spring’s early arrival signaled a major shift in this house.

For one, my front yard no longer looks like a drab, brown mess thanks to a blanket of pine straw:

Now that the pine trees have been (for the most part) removed and the remaining foliage pruned back, the bright sun has been beaming down on my front lawn and pouring light into the front windows. Sure, to the uninformed eye, it’s still just a lawn full of weeds. But to me, it’s also a lawn… and seeing this much green outside of my windows is making me very, very happy.

With each passing year, I feel like I have sufficiently proven to myself that I can, in fact, grow healthy and beautiful (even sometimes overgrown!) flowers. I also realized that unlike many of the other outdoor projects I have spent my time on, the mailbox and the front garden are the only two spaces where I have deliberately avoided making a permanent decision on. I guess I kind of always expected that to be the case—adding new flowers as I saw fit each season—but until I found a good enough reason, I was content to just keep trying out new ideas. That is, until I saw this:

Every (or nearly) Monday, I hop in my car and meet up with a running group in another part of Atlanta. Once I started working from home, I realized how important keeping a regular schedule and getting myself out of the house is, so it’s been a great way to get out, meet new people, etc. During the winter months, the sun has already set, and we usually run in the dark. But now that the days have gotten longer, I have the opportunity to run past lots of homes with different landscaping plans and see them in colorful detail. Even though I can often picture how something on the interior of my home is going to look, it’s always been more of a struggle to picture landscaping. So, I look forward to my run and the mental notes I take from the homes I pass by, hoping for something that will strike me as a good option for mine.

I snapped a quick picture of the lawn above and kept glancing at it over the last week, growing more and more infatuated with the little bluish-purple flowers. Phlox comes in several varieties and I’ve experimented with growing them before, but had not really ever considered them for the mailbox. After all, they are a perennial, and I had largely been expecting to continue to try out annuals. Since the intent with annuals is that they aren’t going to grow back the next year, I usually go for the cheapies of whatever’s on sale, never spending more than about $5-7 at a time for whatever I plant (I can often find six-packs for $1.50 if I time my visit to the home improvement store correctly). But if I were to plant something that can and would grow back (and my confidence level has grown over time to make this less of a risk for me), I could splurge on something a little pricer—especially since places like Home Depot and Lowes have guarantees on perennial plants (if they die in the first year, just take in your receipt & the plant for a replacement). At $5 per plant, I picked up four of the Emerald Blue cultivars (there are over 100 cultivars out there, but I had about 5 different color types to choose from at the store I went to, and these caught my eye the most).

First, I had to dig out the remaining dusty miller I planted last fall, but they were still growing strong, so I put them aside to replant (I absolutely LOVE the soft leaves of this plant, but if they die, they die… they are inexpensive and sold around here as an annual, but can also last a long while once established). I also took this opportunity to clean up layers of extra mulch I simply never removed from the multiple seasons of replanting (I’d scrape a small amount away, but over time, the mound just got bigger). I had a small, empty spot in my front yard from where I tree had long since been removed (it wasn’t part of the removal I did last year), so I took the mulched soil and weeds and tamped it down with my feet. On top, I threw down some grass seed and fertilizer—the expectation being that the area will grow in and no longer risk being stumbled into (my dad’s done it once or twice when not watching his footing).

Next, I took out my new garden edging tool and finally got to work on securing the scalloped edging that decorates every part of my front and back yards. I don’t necessarily like them, but I also don’t feel like spending lots of money replacing it all because it’s the edging used everywhere—front garden, side of the house, around the trees that were removed, etc. I dug the ones around the mailbox out a long time ago when I first moved in, intending on either replacing them with ones I liked or making the garden bed slightly larger and digging them back down again (the mower kept knocking them loose).

But soon after, my wallet spoke up and gently suggested that I hated them less than I hated spending all of that money. So, a mere five years later, I finally actually dug them back into the dirt again. #slackerprojects

The edging tool made this a much quicker job than I expected, so I’m definitely going to be making the effort to do this in other spots soon. Just a few stomps every few inches allowed me to create large voids in the soil, which I then sunk the stones into.

I re-used clumps of the dirt I’d dug up and filled in the space on both sides. Red Georgia clay isn’t super awesome for planting in, but it sure can secure loose edging! Little things, amirite?

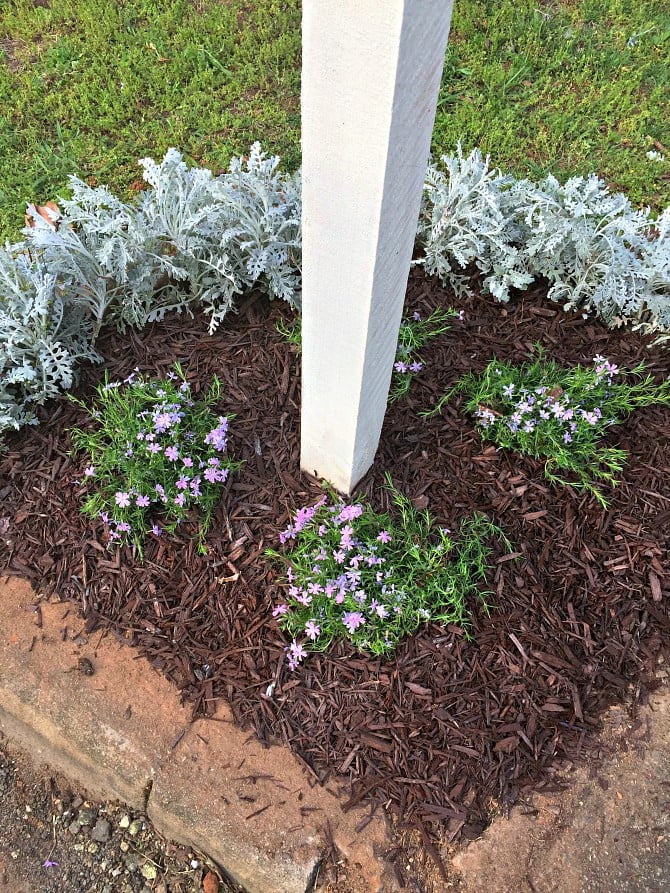
I then went on to add the border of the dusty miller and phlox. Since phlox can be divided in spring and fall, I went ahead and split the roots down the middle of each plant and spread them open (kind of like opening a book), which allowed me to sort of plant them into more of a crescent shape, each circling the mailbox post. I have no real basis for thinking this would be at all helpful in the future when I do divide the plants completely (once they have had a chance to grow in a little), but I figured that creating a wider expanse for the roots to take hold would be helpful. I also added some fertilizer on top of the soil before throwing down the now-regular method of newspaper and mulch to keep weeds at bay.

So, this might be sayonara for annual plantings at the mailbox, but I also think that it’s an impactful change that will fill in nicely and require less maintenance going forward (phlox is drought-, pest-, deer-, frost-, etc. tolerant, so they are a pretty perfect choice for someone like me who won’t pay them much attention). It’ll take some time for these to grow in as full as the lawn I was inspired by, but it’s called creeping phlox for a reason. Win-win. What have you been planting lately?


Looks awesome, Sarah!
I really like this! Guess I should pay attention to my mailbox this season!
Looks good!! I struggle with our mailbox. I HAD bulbs planted there, but those little A-HOLEs we call squirrels dug them up a year ago, so I gave up on that. Then I planted a bunch of other things that eventually died out on me. Last spring I divided the day lilies we have in the front and planted two in front of the mailbox and called it a day. This year, We actually bought a stone edger for it and mulch, but I need to have this baby first in order to plant down the phlox and whatever tall plant I can get my hands on to call it done!
The thing I don’t like about scalloped concrete edging is the scallops – I have had visually pleasing results by installing them upside down. The smooth, linear concrete underside of the edging looks entirely intentional and much “cleaner” in line and style.
I’ve considered that and tried it out. The scallops are definitely not my favorite, but flipping it just doesn’t seem to be working for me visually either. So frustrating! I’m leaving it be for now, but that’s definitely a good free option!
I love this! I struggle every year with my mailbox because I plant flowers that dies, so it ends up being a weed garden. I am pinning this for later!
I like your article very much. I had a struggle with my mailbox too, I was thinking like to do something really simpleright, easy to keep and easy to do. I’m a practical woman as you can see. So I did itwith some margaritas (sun flowers) just the way you did it with the mailbox, it takes time and definetly patience, I try to do this every 2 days a part you know, may be is right or not. I liked your article ’cause it shows that you have experience on this, I’m just starting I’m a new wife and new mum too so I’m just catching up with everything and hope for some advise to have a better garden, my neighbors and my husband will really appreciate it!!!!
Nice touch to the front yard. I also didn’t know that you could return perennials at Lowe’s and Home Depot. Thanks for sharing.
I really like the phlox! Our mailbox looks terrible but I want to replace the whole thing, post and all. Maybe that will be my next project after my challenge with Julia at homeon129acres.blogspot.com. I mean, after I beat Julia! Ahahahaha
I agree with the edging. I don’t care for the cheap edging options but I hate to pay very much for all of that edging.
It looks great! Can’t wait to see what it looks like once those flowers really start blooming and filling it in :)
The phlox is going to look so good! Great call. Looking forward to seeing some update pics in a couple months.
Loved this post. I’ve got a barren area around my mail box and can’t decide what to put there. Thanks for the tips!
Yeah, my mailbox area has needed spiffing up for forever. Also, I think the reusesd brick edging looks nice, too. It has a nice patina to it. Much better than something brand-new. Enjoyed reading your post!
Love this idea! I just bought 9 creeping phlox plants tonight to plant in my backyard flower garden in front of our rock wall, but may use this idea around our mailbox too! I’m curious to see how much they have “creeped” in the last two years…the man I spoke with at the garden center said with the right soil they can spread a foot per year! I’ll search for an update to your post. Thank you for sharing!
I had an image in one of my posts this year but it wasn’t a full recap. Does give you some idea on how they fill in though! I’ve been VERY happy with my decision to switch to creeping phlox!