Disclosure: this post may contain affiliate links, which means I may make a commission if you decide to make a purchase through one of my links, at no cost to you.
224shares
I’m over at East Coast Creative today sharing a quick Ikea hack that wormed its way into my bedroom hallway. So just for kicks, I asked Jess and Monica to stop by and share a project with all of you. Seriously – these girls rock. I hope you enjoy!
Hey there! We’re Jess and Monica, from East Coast Creative (formerly The Real Housewives of Bucks County). We’ve been best friends for (ahem) 14 years and are now not only best friends, but blog partners. We’re passionate about all things DIY and design and like to keep it real-sometimes really real- about our successes and failures along the way.
We think that Sarah is pretty much one of the funniest girls (not to mention, she’s super talented!) in all of blogland and we’re thrilled to be here today!
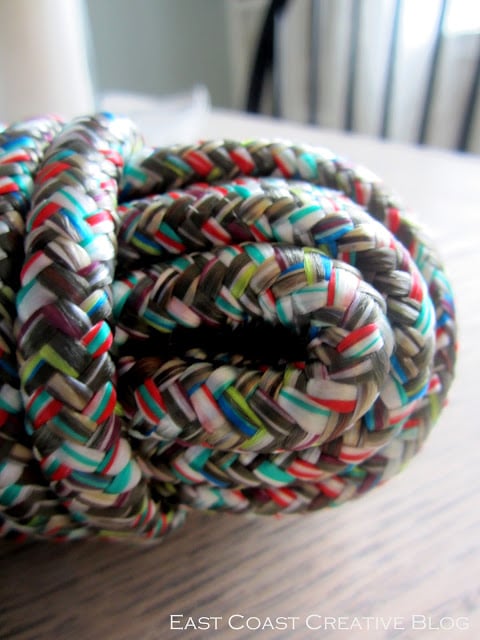
Have you guys seen Nate Berkus’ line at Target? So many cute things, it’s impossible not to fall in love. We like to think we’re good buddies with Nate, since we spent time with him filming a few episodes for his show, so we’re pretty sure he wouldn’t mind if we knocked off one of his items. I loved this jute-wrapped hurricane vase. It retails for $25+ but I knew I could make something similar for much less.
Here’s what I came up with;
Isn’t it awesome? I love the colors and think it looks very high end for less than $10!
Here’s what you need to make your own:
-Rope of any kind(I found this utility multi-colored utility rope at the dollar store)
-Ribbon
-Large Hurricane Vase (found at Target for $2!!)
-Upholstery Tacks
-Hot glue gun
These colors were totally calling my name, and I couldn’t resist! It’ll work with holiday decor, for sure, but can totally work the rest of the year too!
1. Wrap the rope tightly around the base of the hurricane. Cut one side so that the ends meet.
2. Wrap regular ol’ tape around the ends to prevent fraying (don’t worry- you won’t see this in the end!)
3. Using one cut rope as your template, cut the remaining rope into however many strips you need. Cover the ends with tape.
4. Starting at the bottom of the hurricane, place a line of hot glue around the entire base. Immediately lay your first length of rope around the hurricane. Put a dab of hot glue on both ends and attach them together.
5. Do the same with all of the rope, making sure that ends match up to create a seam. Other than the rope at the bottom of the hurricane, I only put hot glue at the seam, the back and then the other side of the seam of each rope (not all the way around- I’m so cheap I don’t like to waste anything!)
I used 10 pieces of rope stacked on each other for my vase, but you’ll have to decide what looks best on your hurricane depending on it’s height and width.
6. Now it’s time to cover the seam! Slightly pull the top piece of rope away from the glass, run a line of glue behind it and tuck one end of the ribbon behind the rope. I used navy grosgrain ribbon because I like the thickness of it and because I know that Nate loves this stuff!
It looks messy, but the glue comes right off the glass with a little warm water and some scrubbing.
7. Flip your hurricane upside down, cut your ribbon to the desired length and hot glue to the underside. Be sure not to leave too much ribbon, because that plus the glue can make your vase wobbly.
8. Adhere the tacks to the ribbon. Because nothing is ever easy, my tacks were too long, so I cut the back of it off with some heavy duty wire cutters. I added a dab of hot glue to the back of the tack and poked it through the ribbon so that it laid flush with the ribbon.
Ta-da! I’m sorry, Mr. Berkus, but I’m kinda partial to my version. Thanks for the idea!
————————————————————————————————————
We would LOVE it if you’d stop over to see what we have going on at East Coast Creative,! We’re constantly working on something and we’ve got loads of tutorials, room makeovers and yes, even project fails…here’s just a peek at some of the stuff we’ve done this year:
(Click on the picture to see the full post)
Thanks so much for having us, Sarah! This was a blast. :)
Hey there! I'm Sarah. My favorite things: 1) tearing my house apart and 2) putting it back together again. I occasionally talk about other things, like life and food and travel, but it's mostly my obsession with DIY and power tools that you'll find here!
Got a DIY question? Tag me on Instagram @uglyducklingDIY or use the hashtag #uglyducklinghouse to show off your projects!


Love this hack! Thanks for sharing EC2! :)
Wow really love this, thanks for sharing. Plan on getting some Dollar Store vases today.