Disclosure: this post may contain affiliate links, which means I may make a commission if you decide to make a purchase through one of my links, at no cost to you.
Sharing the new front, back, and side yard landscaping designs along with a lighting plan!
I’ve been hinting at it over the last few weeks, but this year, we got a professional landscaping plan done! For the first time, I feel like the back yard, side yard, and front yard will have a cohesive look rather than be subjected to my whims.
I have mentioned it before on this blog, but landscape design is a different challenge for me than interiors. I find it harder to picture outdoor spaces in my head and second-guess myself more. If I think about it, I suppose that’s due to a number of things:
- Everything outside grows; it’s a true space planning challenge! I’ve also found that the labels on plants I buy don’t always grow as fast, or as wide, or they grow even bigger than what was listed. My couch basically stays where it is and never gets any bigger…
- Spending money on living things that need love and care to thrive, the right lighting conditions, and weather = a risk that they will die. I don’t always have the greenest of thumbs (thank goodness for K, since he is much better at it than I am!).
- In my experience, outdoor projects just tend to take more time and labor (building a deck vs. building a piece of furniture). Mistakes feel like there’s more at stake when I make them.
- It takes a long while to see the end result of every part come together; that leads to a lot of changing my mind and reluctance to pull the trigger. Sometimes, I simply get tired of making every decision and mentally check out.
I actually started on this plan last fall, did some price comparisons to some companies I found on Instagram, and wound up working with a new, women-owned (💃) company called Tilly. I signed up for the full shebang: front yard, back yard, side yards, plus a lighting plan. Since this was all virtually done, I would need to send them all the details over email. They would design while I would execute… which would save a lot in labor costs but take some of the decision-making struggle out of the equation.
The design took a LONG time… because of me! If you recall, last fall and winter, I was trying to get a whole bunch of new holiday content up, so the idea of getting the landscaping plan completed wasn’t priority #1. I was mathed up with a designer, Zoe, who was completely understanding. It also took a while to locate and send over some of the things she needed: a land survey (with info on the dimensions of my yard), a few extra measurements where details weren’t clear (width of my front walkway and driveway, for example), photos of the yard (I sent video!), and general info on what I want to keep and what can go (shed = keep, deck = keep, garden beds = can be relocated/redesigned, etc.). We also had a consultation over Zoom/Skype (can’t remember) where I walked around to every part of the yard describing any problem areas, what plants I like best, my general level of interest in garden maintenance (as little as possible), colors of flowers I liked, plants I hated, and more. She also kept in mind all the plants I already have so they could suggest new places for them to be transplanted — not because I was adamant about keeping them all, but if we already had something similar growing, it would save us the expense of buying new plants. I really wanted to see their vision and hoped they would surprise me with things I hadn’t considered.
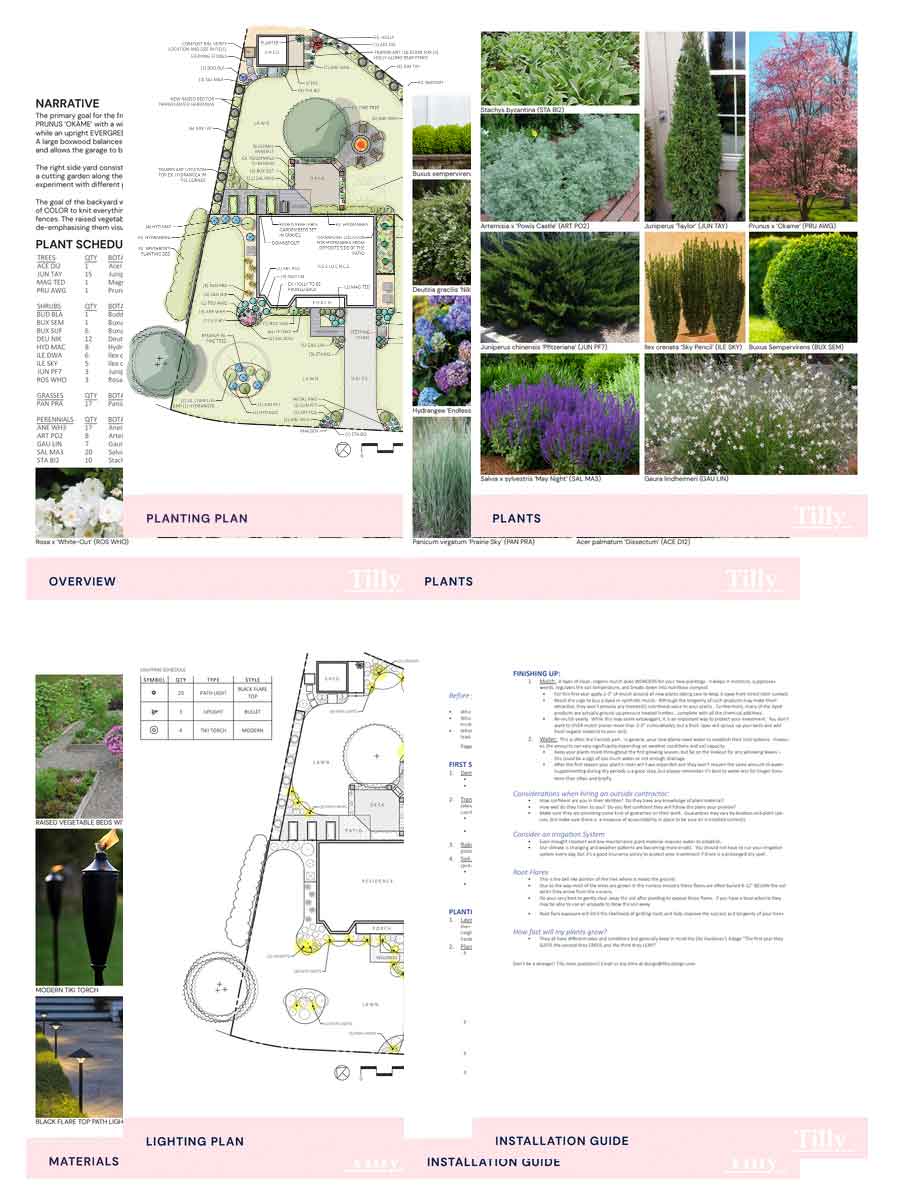
The new landscaping plan!
After a few rounds of back and forth (tweaks based on things we wanted to add, switching out certain plants, etc.), they sent back a plan. The images I have below are kind of a mix of the initial plan plus our changes, but here’s what we got:
- a design plan PDF with a colorized planting plan, pictures of plants for reference, pictures of materials to use (path lights, edging, uplights, stepping stone design, etc.), and installation guide (general tips for beginners for how to DIY each part)
- lighting plan one-pager
- planting plan one-pager
- “plant schedule” (a list of each plant, size to buy, quantity of each) one-pager

Tip: Having the one-pager of the planting plan has been nice to have outside with us as we’ve been working on transplanting. It’s been very easy this spring to get a printout smeared in mud or misplaced, so having a colorized version would have been a waste of ink.
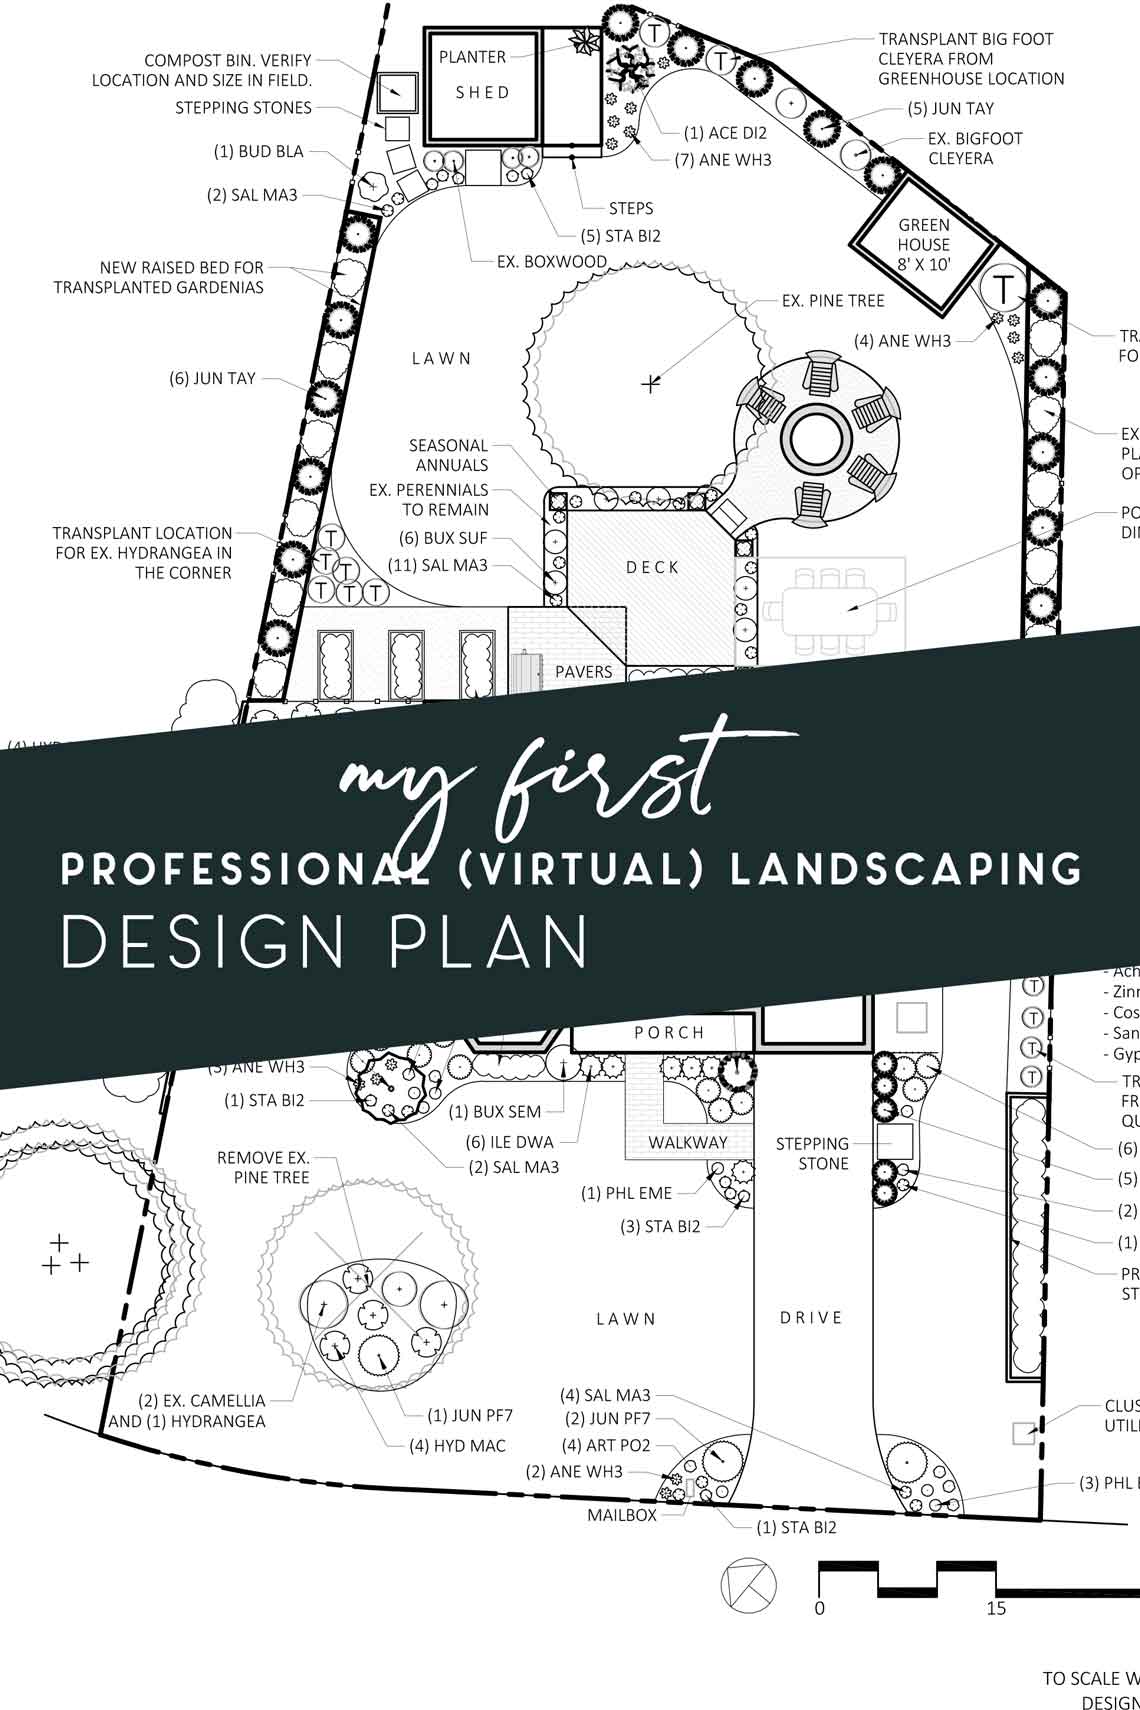
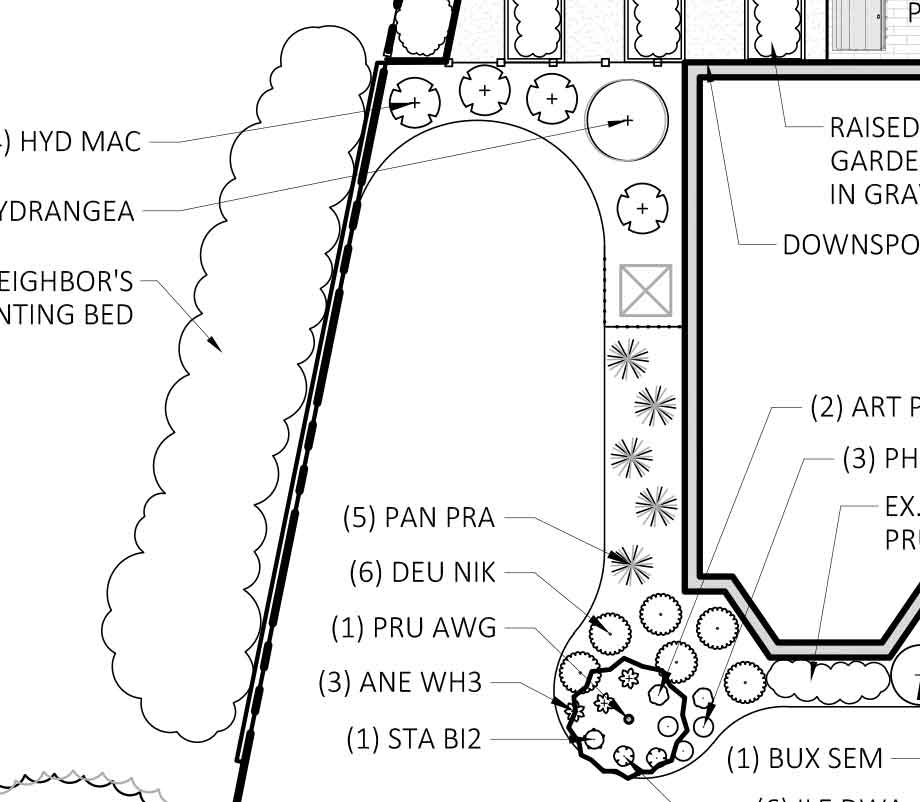
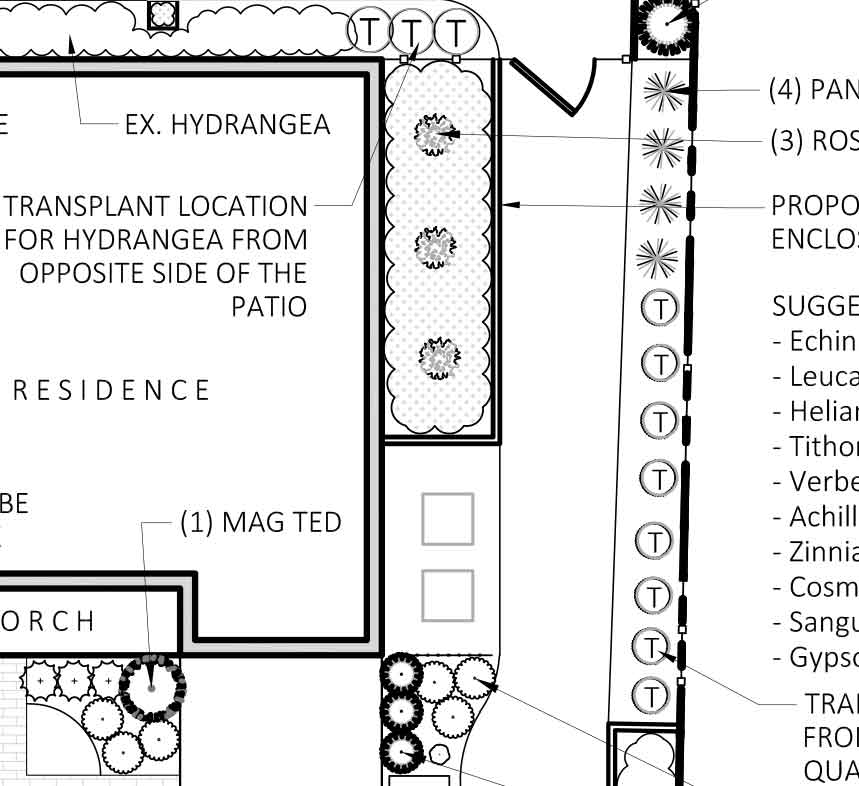
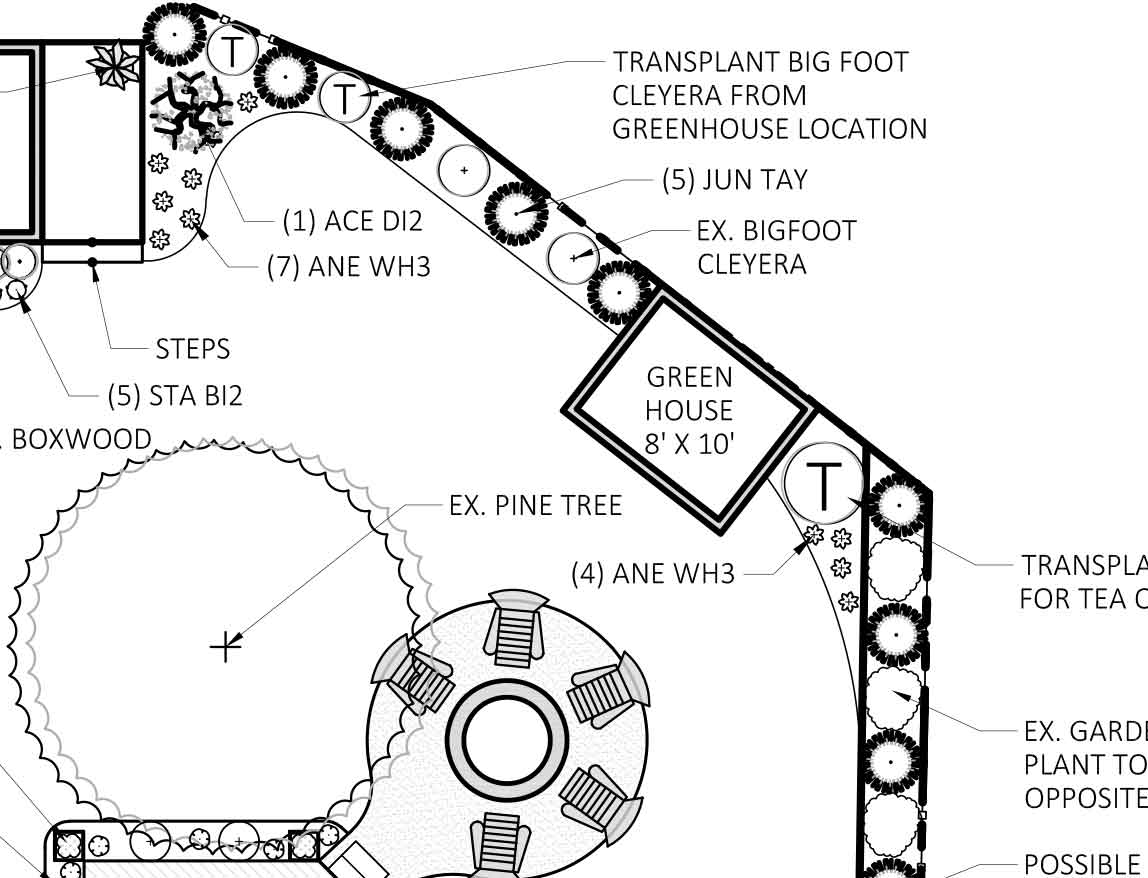
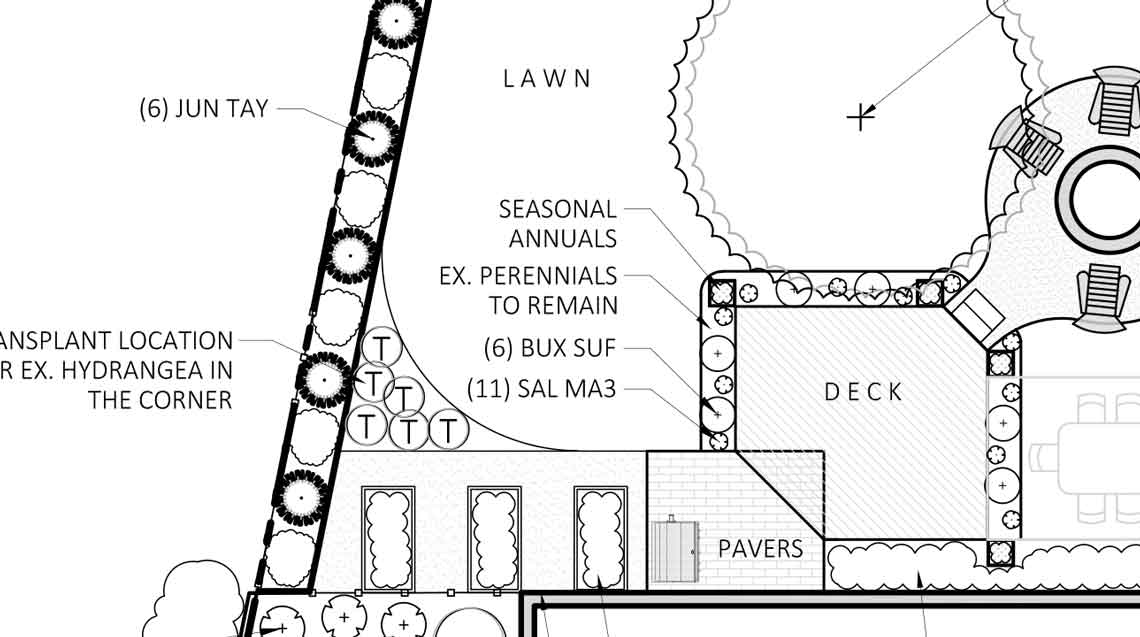
Here’s what our finished plan looks like. There are also a few additions in these plans I haven’t really talked much about before, but K and I have been eager to add. A lot of this has abbreviations of plant names and transplants are marked with a “T”, so I’ll break it down a little below and add more detail as we implement!
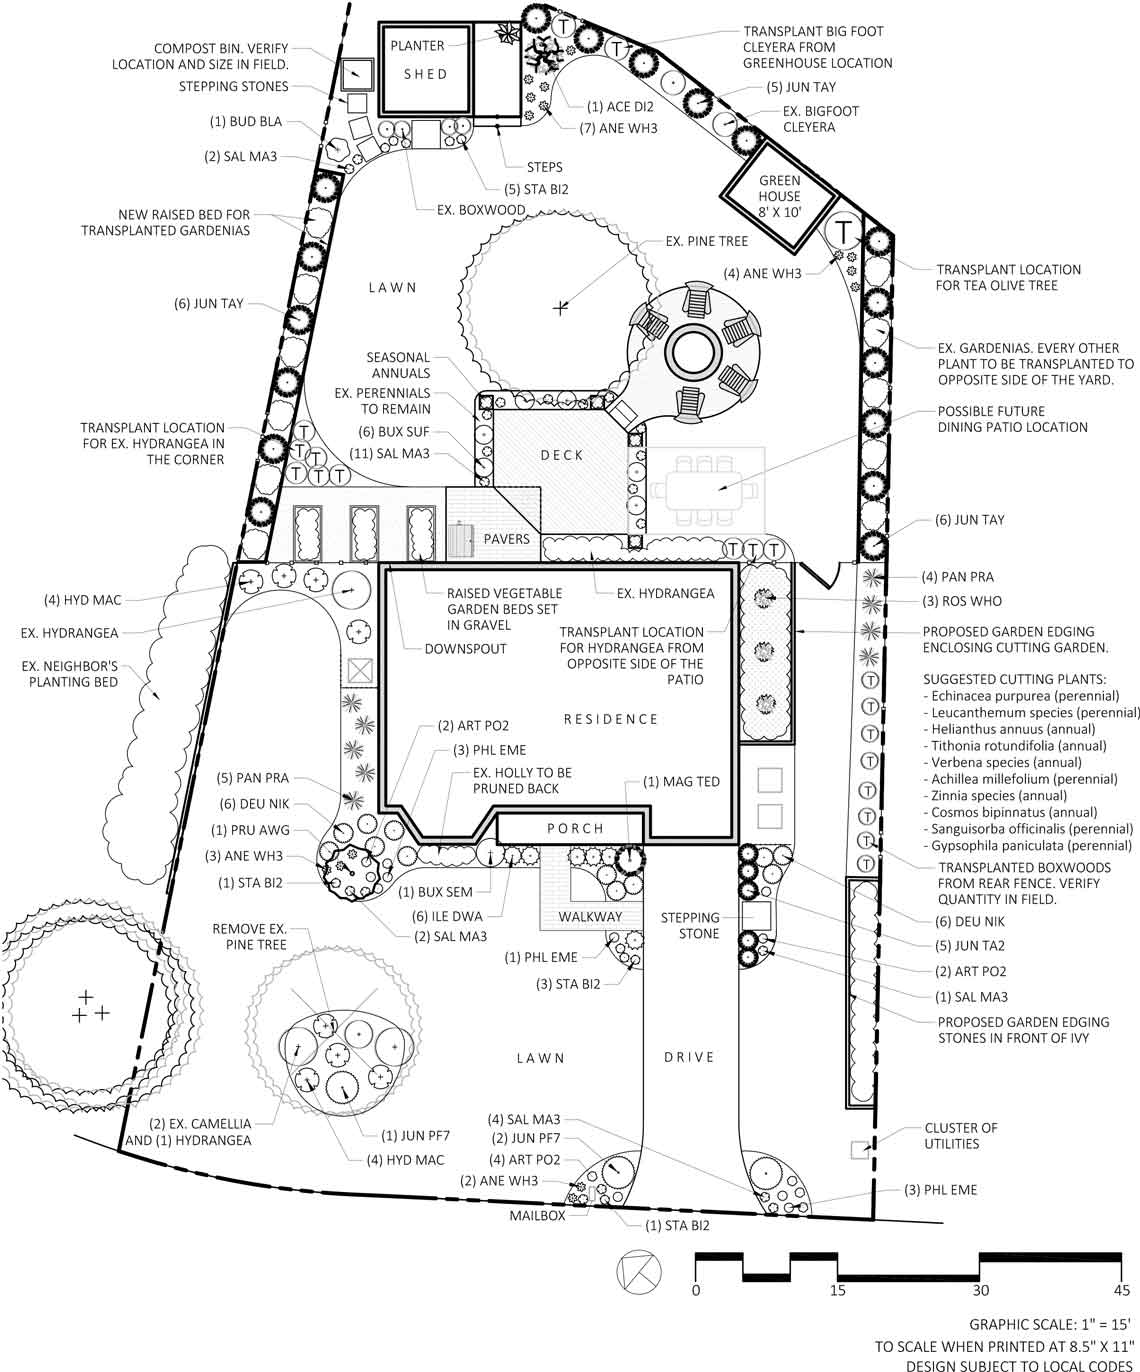
The Front Yard Plan
The main goal with the front yard design is to add some balance to the house’s exterior. Some of the suggestions (like adding a small magnolia?) I never would have thought to add myself! What I’m most excited about is extending several of our garden beds to add more curved shapes rather than everything being so boxy and plain.
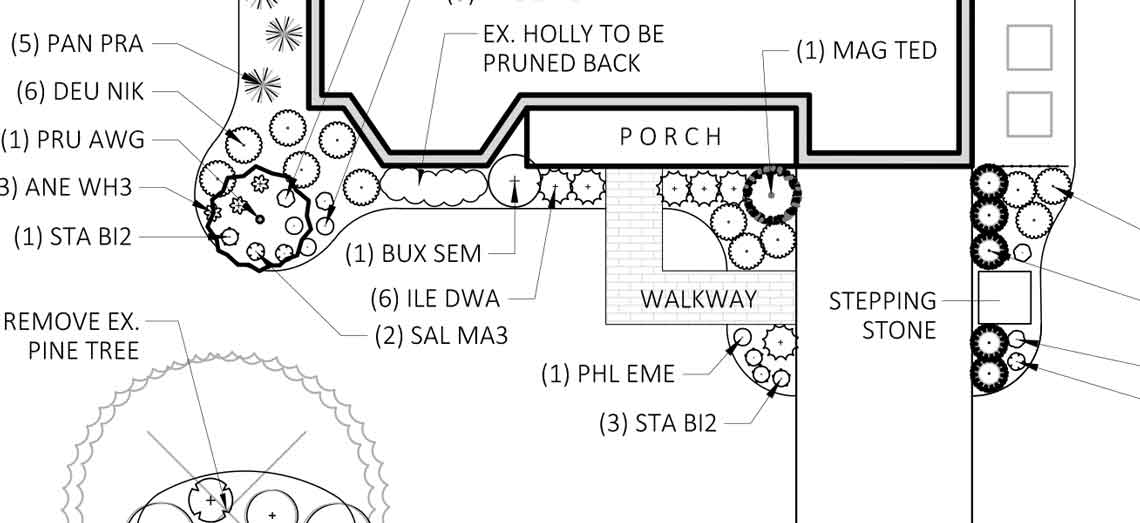
The lighting is really going to add some oomph, we’ll get rid of the tree that leans toward the house, plant a beautiful (small) one with colorful flowers each spring to sit right in front of the front windows, and the small garden in the middle of the front yard will be more filled-in with flowering shrubs that match other areas of the yard. I’ve gotten pretty good at propagating my hydrangeas now, so that will go a long way, too!
The Side Garden Plans
The area that is next to the air conditioning unit is somewhat of an afterthought most of the time (even though I’ve already spruced it up a little, I mostly ignore it), so I like that we’re extending it out a little bit and including plants that won’t shed into the A/C (for more on why that’s important, check out this post).
On the opposite side of the house — which gets the most sun — Zoe suggested a cutting garden, which I LOVE. It will require transplanting some of the roses and filling in the area with tons of color. I might regularly be able to bring into the house for bouquets!!! The opposite side will address hiding part of the neighbor’s fence and adding edging to create more of a barrier with the neighbor’s ivy, which I’m also glad to resolve.
The Back Yard Plan
The back yard isn’t necessarily getting the biggest transformation, but since it has so much going on, I wanted to elaborate a little further.
Greenhouse?
The greenhouse idea is for K; he’s been talking about wanting one and I asked Zoe if it was feasible to squeeze one in somewhere (considering we already have the shed, I didn’t want things too cramped). She placed it basically where the slabbed wood stack of magnolia sits now (which we already know is temporary, so it’s a good spot). So, it could work (maybe?). Still making up my mind about that, but he is SO excited that I kind of just want to do it because he’s so into the idea and he’s borderline crazy about seedlings and growing things.
Dining area
The dining area idea is also new, but I’ve been thinking it would be great to have for eating outside. The deck is meant for lounging with comfortable seating (almost finished with those chairs so a new video + plans coming soon, but you can see them a little below!), but this smaller dining area would be great for a pergola, some gravel underfoot, and a handmade outdoor table. This spot next to the house is really difficult to grow grass and looks sloppy year-round (it becomes an easy dumping spot because it’s a place to drop something so it doesn’t ruin grassy areas). So, replacing it with gravel (basically opening the edging that’s already around the fire pit — which we might narrow the size of the fire pit too) seems like a good solution. It would require some leveling of this spot to have less of a slope, but I think it would look beautiful next to the deck. Any excuse for more twinkle lights, right?
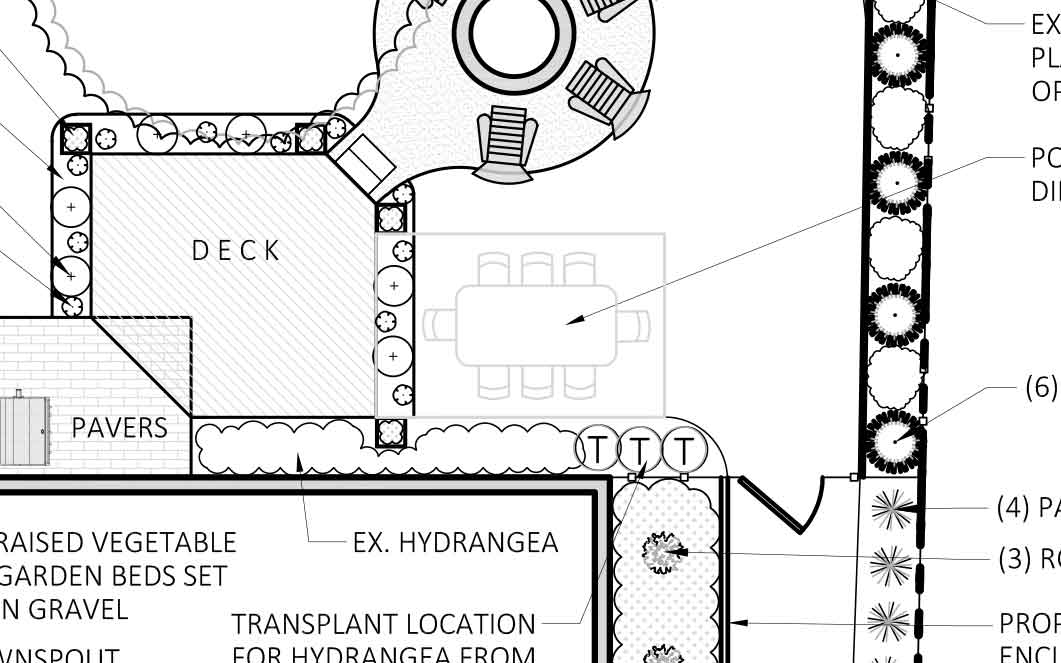
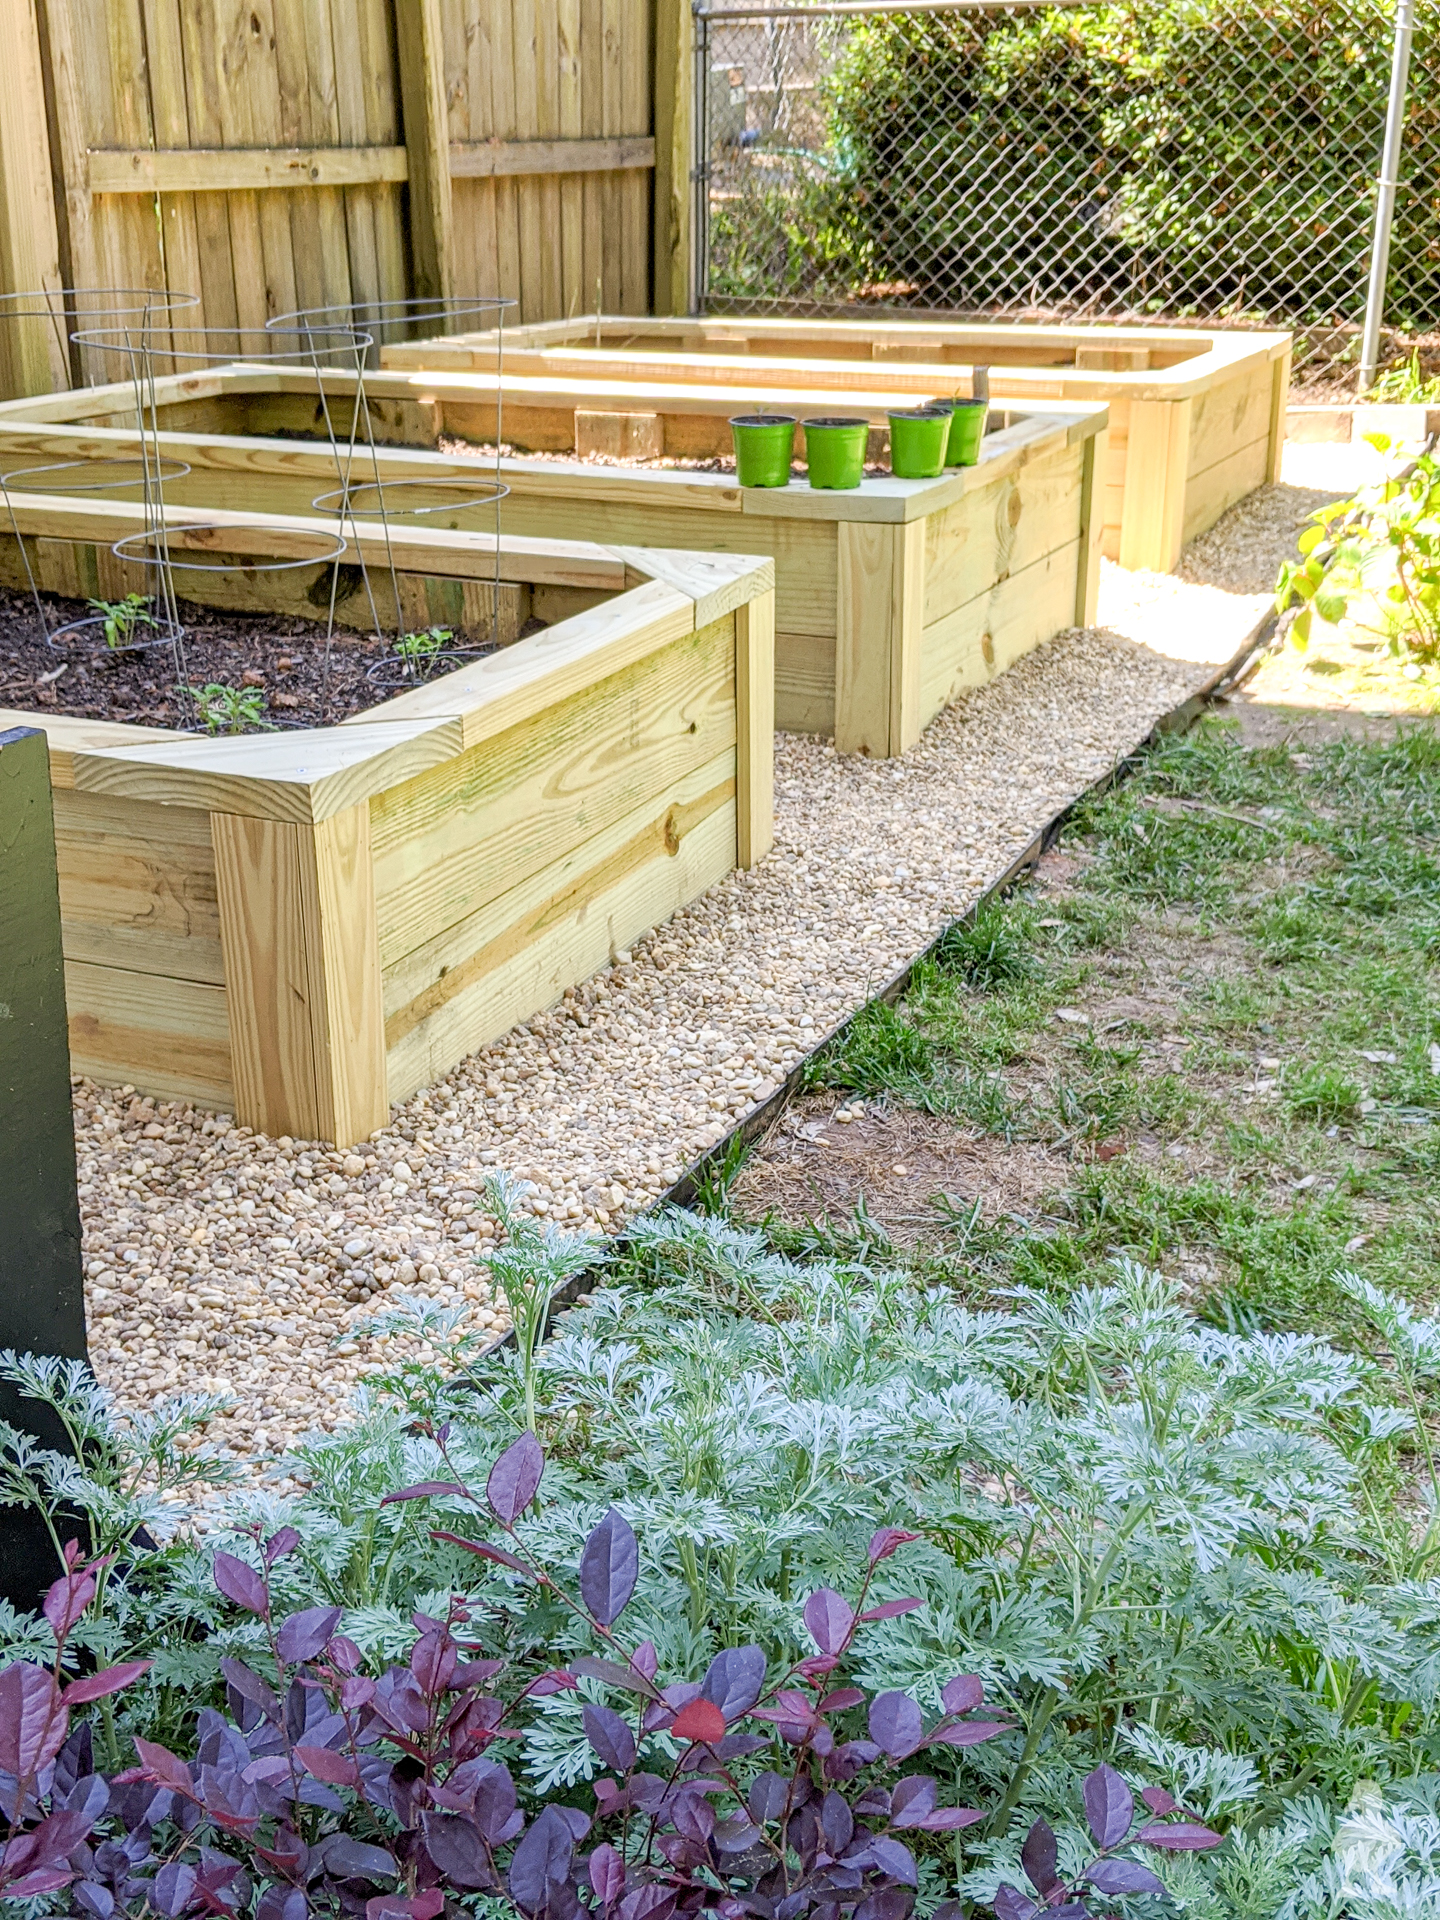
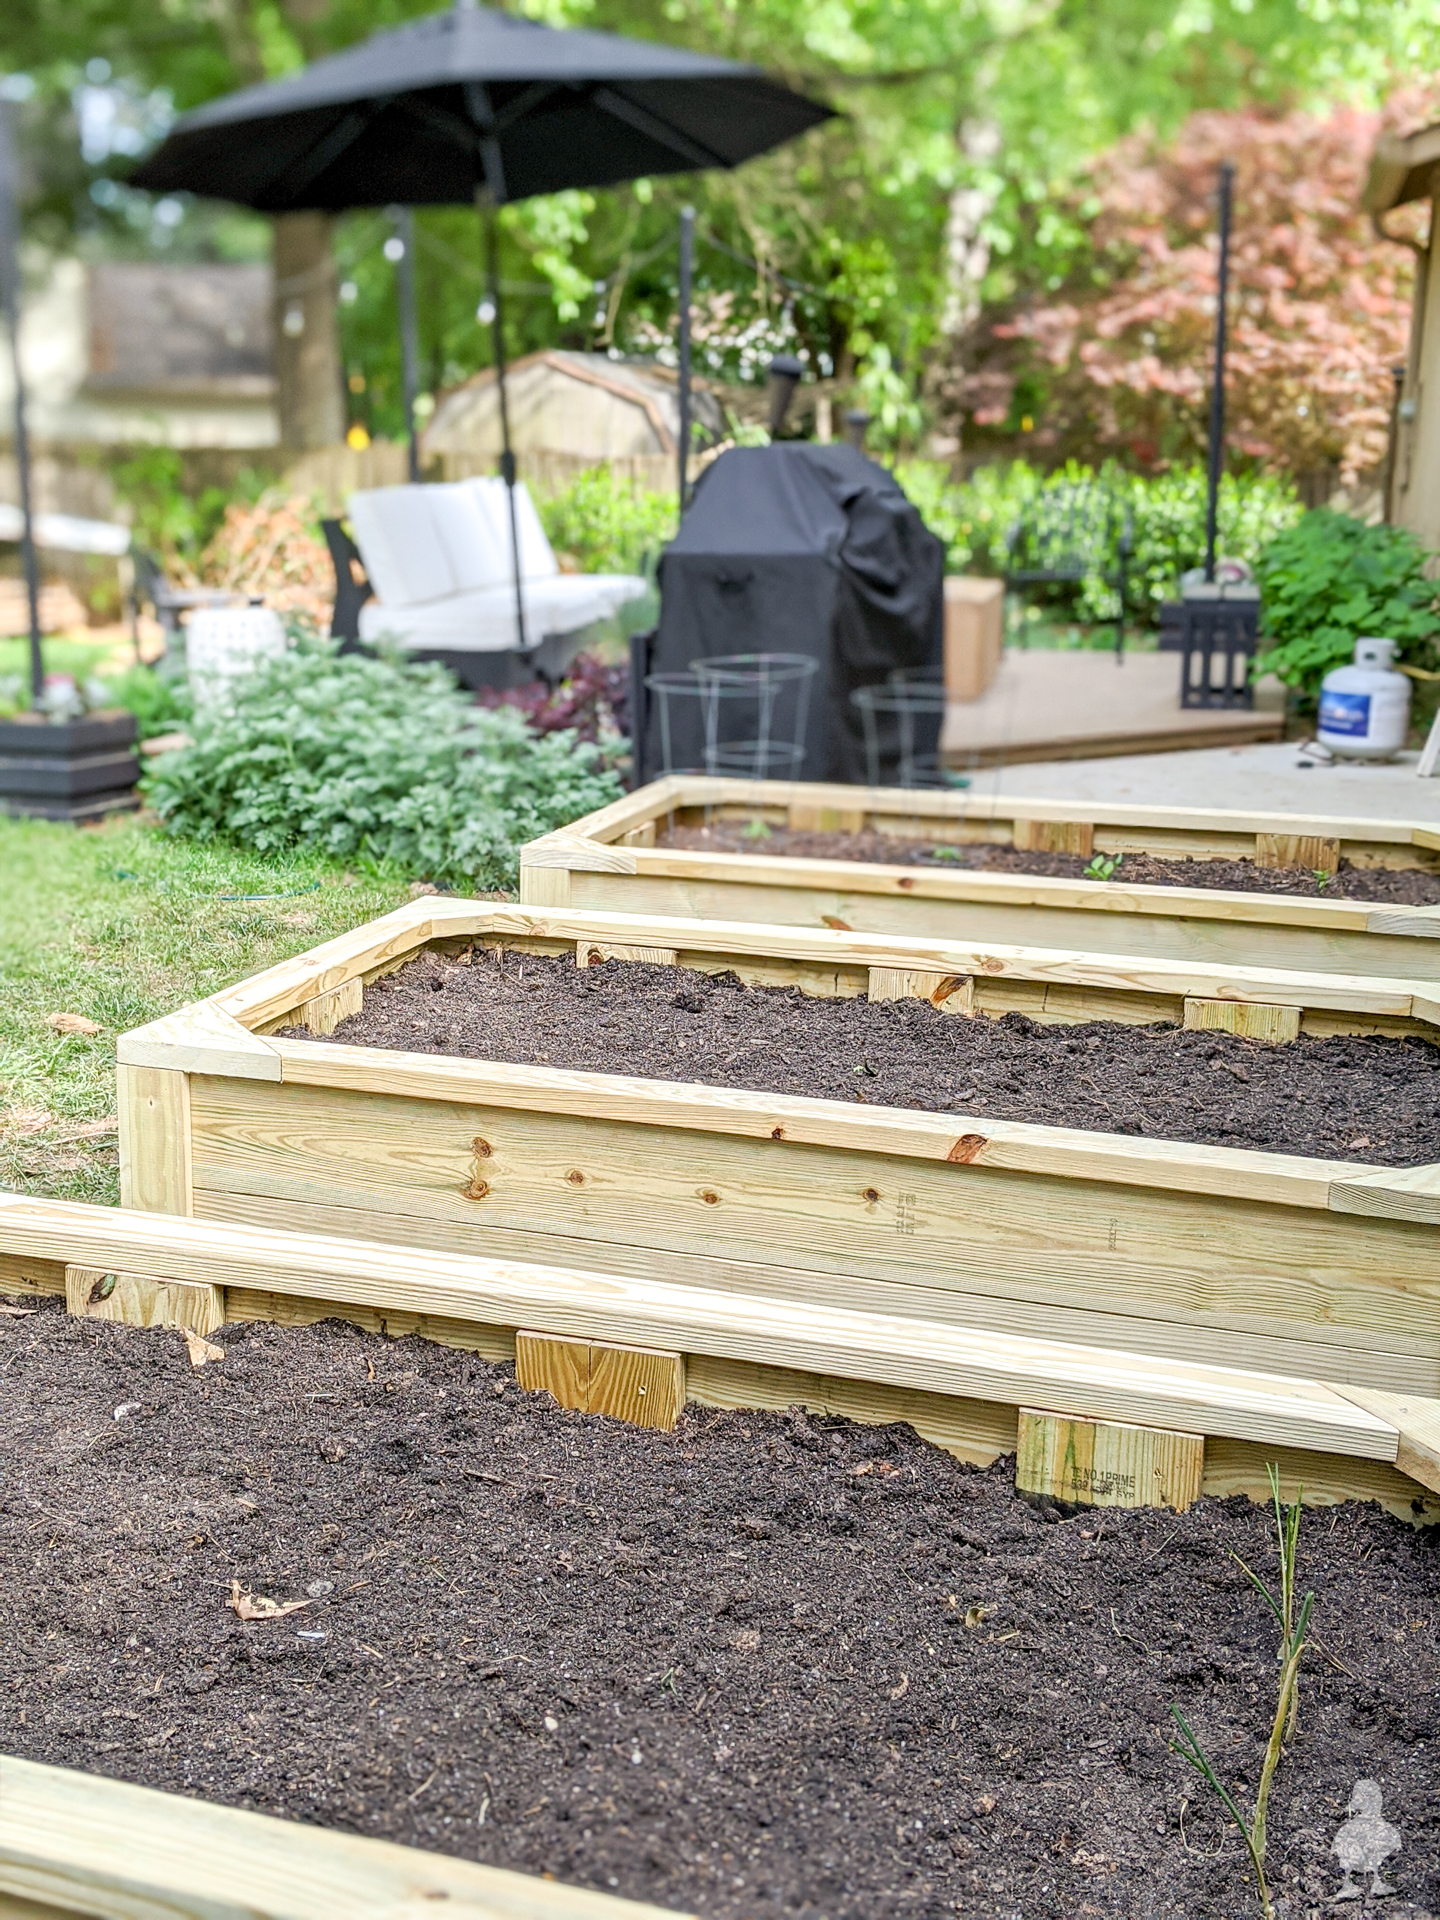
New vegetable garden
The final big(gish) change is to move the location of the vegetable garden beds from the middle of the yard (which gets kinda scraggly looking) to where the corner hydrangea garden is. If you weren’t around for when I built those a couple of years ago, I made a simple and inexpensive garden bed area out of cedar fence pickets. Untreated, these garden beds would last a few years (hopefully 4-5ish total for the amount of humidity we have) before needing some upkeep or rebuilding. I always considered that we might relocate them when that happened.
Thanks to this new plan… we went ahead and did it! The cedar beds were still in good shape to last a few more seasons, so I felt a little guilty to get rid of them sooner than planned. But, in order to get started with executing the rest of this landscaping plan, K and I agreed that the timing seemed right to just go ahead and do the new ones before spring planting vs. waiting until next year. So, I’ll have a new post coming up all about these new beds (and new plans), but I’m already LOVING this new spot! The beds also have a few upgrades based on what I wanted to change about the old (mainly a little taller, gravel added between, and more comfortable to sit, so less irritating to maintain).
It is SO unlike us to just whoosh and do a project of this size that I’m kind of still amazed it all happened so quickly. But, I suppose that’s part of the upside with having a complete plan that’s ready to go — it’s removed some of that hesitation and we jumped at it so we could get our seedlings in the ground and fix some drainage issues. I’m also already dreading the amount of crap I’m going to get on YouTube when I share that new video (I get snarky commenters on my cedar bed video predicting that the beds won’t last a single season even though this would have been our third year, but posting a video about building new beds will only add fuel to that no matter what I say! 😂 Oh, well.). Expect to see that new video + post once I get the opportunity to stain them (I’m ordering stain that is safe to use for this application but there are some shipping delays).
Alrighty — there you have it! I feel way more prepared for all the work we’re about to do, and it has lifted a lot of weight off my shoulders! It’s pretty refreshing to just go ok, this is the plan, no second-guessing. It’s already given us an extra push to jump into these next few projects sooner than planned, so who knows how much change is in store this year? Can’t wait to find out!
Disclosure: Tilly provided these plans at no charge and asked if I wouldn’t mind sharing them on Instagram if I liked their services. I decided, on my own, to write a little more about the plans here on the blog since I plan to reference this often enough to need a link back for projects I’m doing in the future and the price comparison to them vs. some of their competitors is really reasonable. So if you’re considering virtual landscaping design services, I wanted you to know of a budget-friendly option!


This is a great plan. I noticed the greenhouse right away and love you’re going to have one. Both my front and backyards are overwhelming to plan, especially with minimal knowledge! One day I may be in a place to look for a designer. Too many unhealthy trees that are 60+ feet tall will make it expensive!
Yes, it can get really pricey! I know you’ve read many of my posts but I wrote about removing a bunch of trees back here if that helps with any info. Also, you can always get a design done that doesn’t involve the tree removal itself (they can design your landscape not to include them, but assume you’ll hire someone else at some point to remove the trees so it is all broken up over time).
Thank you so much for this article. We’ve recently finished a nine year renovation of our old house and this summer we’re finally able to get to the outside/landscaping. I’ve been researching online design sites, too, and haven’t found one yet that’s right for me. I will definitely check out Tilly.com. Being an woman-owned business is a huge plus in my book.
Same here! And they REALLY took the time to listen (so, so important). It makes me so eager to do more of our landscaping now, and considering that it’s relatively affordable compared to some of the others I’ve compared (especially since I know I’M the one doing all the labor) it was win-win for me. I hope you find a perfect design for you too!
Beware a Magnolia tree. They drop leaves and seed pods all year long. I think they look rather messy.
To each their own, but this will be a shorter magnolia variety, so there really won’t be an area underneath the tree (my neighbor had a giant magnolia with an area to walk under, so I know what you’re talking about with dropping stuff). I love magnolias though! Maybe it’s the Georgia gal in me, but I have always loved their glossy leaves and fragrant flowers.