Disclosure: this post may contain affiliate links, which means I may make a commission if you decide to make a purchase through one of my links, at no cost to you.

Taking tile all the way up to the ceiling in the primary bathroom had an unanticipated puzzle: what on earth do I do with the crown molding as it transitions from the tiled shower to the wall? The answer was simple, but I’ll admit — I had to think on it…

**thinking to myself in 2010…** “How does a person paint stairs, exactly? Do you paint them and wait for it to dry? Good god, Sarah, that’s probably not it and you should never tell people you don’t know how to do basic things.”
Sometimes, in all honesty, there are the little things that I have to think about for a minute — like the time I had to load a giant box spring by myself onto a flatbed cart, or that time I realized that some drills use chuck keys — and then all of a sudden, it’s SO CLEAR what the solution is, I feel like an idiot for never realizing it in the first place. But then someone asks me the same question and I admire them for being brave enough to admit they didn’t know.
(*The stair solution, by the way, is here… and the box spring had to be loaded onto its side and at an angle to keep from tipping or bowing over the edge of the cart. I have my moments, folks.)
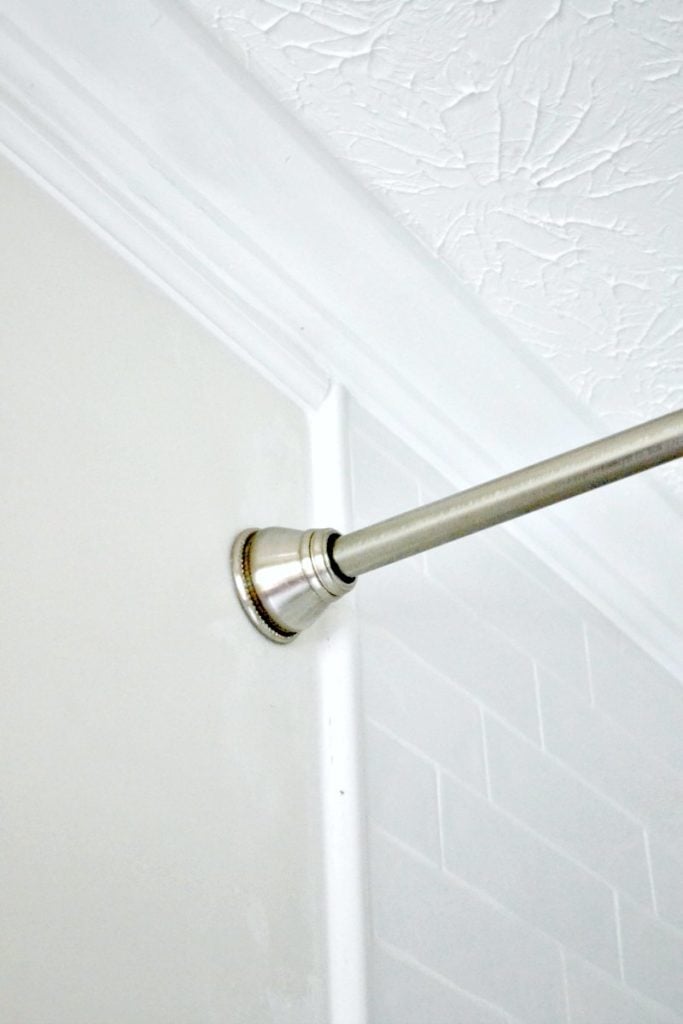
Anyway, today I wanted to cover a topic that I think has stumped more than one of us out there in internetland: when you tile a bathroom all the way up to the ceiling and plan to add crown, you suddenly have to figure out what to do once it’s at the ceiling.
Crown molding when you tile to the ceiling? lots of options

- Do you tile all the way up, add molding to just the walls, and skip the molding that would go in the shower?
- Or perhaps the exact opposite and leave the walls bare?
- Do you cut extra little pieces of molding to account for the “bump” when the wall transitions to tile (similar to how you would with larger wall corners)?
- Or maybe cut out some of the bottom of the crown molding to fit around the tile?
Transitioning crown molding between tile and drywall
If you were to search for this problem online, you would find people have tried every single one of the above for solutions to this same bathroom problem. Each had a few upsides, but some of them looked like they could wind up very frustrating to cut neatly (and I’d maybe go through a lot of pieces of crown before getting it right). But I found a different option that worked really well, and it was much simpler than complex cuts around the tile edge and looks (in my opinion) more professional than trying to stop the crown anywhere along the wall or tile.
The answer: baseboard!
First, I cut a small scrap piece of both baseboard and the crown molding I planned to use (just because it would be easier to make marks with a lightweight piece of scrap in one hand rather than try to lift it all just to get a visual). I flipped the piece of scrap baseboard upside down so that the routed “fancy” top edge was actually on the bottom.
This allowed me to get an idea of how much space to leave right at the ceiling so that the baseboard would stick out juuuuust enough below the crown once installed (about 1/2″). This is a fun little trick for getting crown to look a little beefier (which it definitely does), but it also solved my problem of getting the entire wall to sit all at the same depth.

And the rest was easy as pancakes.* With the wall and tile now (basically) the same thickness where I needed to attach the crown, I nailed everything in place with my pneumatic, save for a few swear words whenever I couldn’t get the angles right (I eventually did, and Sandra’s templates for crown molding are oh-so-helpful). I took a few quick shots in between attaching pieces so you can see what I mean.

I almost wound up taking a Dremel to shape out the vertical pencil tile where the edge of the subway meets the wall (because it was just a tiny bit thicker than the subway tile and baseboard), but the crown was flexible enough to fit right over it without trouble and the resulting gap filled easily with caulk.

And there you have it: a simple solution to an otherwise puzzling problem. It doesn’t hurt that this fix also makes the room look even more luxurious with a little thicker crown. :)

Have you ever found a simple solution to what you thought was going to be fussy at first? Do tell — I may learn something for another project!
*I’m writing this during dinnertime and I’m craving pancakes.
P.S. Want to see more about the bathroom makeover? You can look here to get caught up on the series but here’s the big shower makeover!

More Drywall Tips
Drywall can be intimidating; luckily, I’ve got more posts to help you learn what you need to know! Check them out below.


Your bathroom looks lovely. Sarah, have you ever thought about removing your stipple ceiling? We have it all over our house and I hate it! lol I apologize if you covered this; I am still pretty new to the site.
Thank you! I have thought about it (and I understand your hatred)! But so far, it hasn’t been worth it as far as an effort thing… yet. For one, it’s a whole-house thing since it’s in every room (including the garage), overhead work is very tiring, and I’m fairly certain that it will be a lot of fixing if the walls in this house are any indication (I’ve done a lot of drywall work in this house so far, and I don’t have much faith that what’s lying underneath is going to be pristine). Given that the stippling is meant to make less work for a drywaller, I doubt the seams and whatever else it’s hiding will be a simple scrape & done kind of thing. Maybe someday after I get a few more other big projects completed!
I learn so many “duh” things from you! lol
Keep ’em coming, please :)
My forehead-slapping moments are your gain. ;) Will do!
It looks so nice! I am having the same problem in my kitchen. I want to tile up to the ceiling above my window and add crown through out kitchen so I understand your clever solution but what I’m not clear on is how do you attach the crown on the tile portion of the wall? Do you only nail the top and glue the bottom to the tile?
Yes, the nails won’t go through the tile, so you’re going to have to use adhesive for the bottom and extra-long nails to make sure the top sticks well. Usually if you run a bead of caulk along the backside it will act as a glue as it cures to help hold the molding in place. Use tape until everything is dry if you’re worried it will slip. Hope that helps!
Great idea for solving the crown molding over tile dilema. I am in the process of remoldeling our bathroom DIY. What kind of glue do I use to glue the crown molding to the tile? Would I use tile adhesive or epoxy?
I actually used caulk on the back (top and bottom of the molding), and it stuck just fine once cured. I held things in place as it dried with painter’s tape and finishing nails through the top of the crown into the ceiling, and since the tile had about an inch of wall space at the top where it meets the ceiling, I was able to put a few angled nails in that direction as well.
Thank you for these helpful hints! We have a tiled shower, with tile to the ceiling, and my husband has been considering different ways to accomplish this. This looks like the best option for us. I ddn’t read how, exactly, you attach the crown to the tiles. My husband is worried about cracking the tile by nailing, but worries about only nailing the crown to the ceiling. How do you attach the crown to the tiles? Thank you for your advice. Jill Bolton
I didn’t… there’s a small gap of about an inch where the tile ends and it’s just drywall before it’s at the ceiling. So, I was able to take long finishing nails and nail through the crown to the wall at an angle. If you don’t have that as an option, I wouldn’t recommend nailing through the tile. I would just put a bead of adhesive (the same kind you’d use if you were adding one of those triangular ceramic soap dishes into the corner of the shower) along the back of the crown. You’ll probably need to tape it with some painter’s tape until the adhesive cures so that it doesn’t slip along the tile, but that’s how I would do it.
What do you do if you want to tile a wall that already has crown molding?
Hmm, good question! I’ve never done that myself, but I would probably look into how hard it might be to remove the crown so I can run the tile all the way up and put the crown over it, or possibly cut the tile where the crown stops (but the concern would be whether or not I could get an even enough line). Sorry to not have a better answer, I probably could if I’d done it myself before. I would check out Houzz forums to possibly see if someone has run into it before!
I’m running into this problem! What do you think about cutting the bottom of the existing crown molding up to where I can get an even line with the tile? Do you think the slightly different crown molding (compared to other walls) would be an eyesore?
Here’s the honest truth: no one looks at your crown except other people who are about to install crown (or insert similar scenario that causes a person to pay THAT level of detail to someone else’s home)! So the question is really: how much would having it look that way bother YOU? Would you wish you had done it differently and spent the time to figure out a different solution? I’m a DIYer, so my tolerance level for “the way it SHOULD be” is a lot different than say, a professional crown installer. So what might never bother me would get an earful from some “pro” online who will never actually step foot in your house (and the level of noise I get on said topics is skewed by the fact that I post the evidence online). So I try to satisfy my own preferences when it comes to what I do, as I think we all should. This crown vs tile vs drywall option was my solution, and (tooting my own horn) I think it’s still the best option out there. But always keep these questions in mind you’re uncertain about a decision in DIY: “Would people ever really notice unless I pointed it out? Will I find myself looking at it every day and wishing I’d tried something else (hard to know but good to ask)? Would it be a “thing” that sticks in my mind every time I’m in the room?” Just my two cents, but framing your decisions in this way often shows a clearer picture. Best of luck!
What did you use to go down the edge of tile?
I used what’s called “pencil trim” tile. It’s just a separate type of tile design that can be found in most tile supply stores (the stuff at the big box stores are usually a little fancier and often just call it “accent trim” but you can find it more easily online by using the pencil term in search).
Thank you! Just finished replacing our shower/tub combo with a curbless walkin shower, complete with a 16″ raintree and heated flooring throughout. Porcelain goes all the way to the ceiling and i was stuck when contemplating the tile/drywall tranisition. Thanks for the guidance!
Happy to help, Jim! I was so thrilled to figure this problem out and spent HOURS researching what to name the post so people could find it. Ha!
Bathroom looks great! I am doing something similar DIY. This advice is perfect for what I want to do. Have you had any issues with the crown molding being wood in the shower? I am worried about moisture. I am also putting a bead board on the ceiling. Thanks!
It’s actually not wood! I picked a vinyl/PVC crown that would be appropriate for higher moisture areas. There are usually a few options like crown, shoe molding, etc. available at the home improvement store.
Mmm. Why not install the crown moulding around the bathroom, then tile all the way up to it, Sarah? Just curious, because I’ll be facing the same dilemma soon.
The lip of the crown is slightly narrower than the thickness of the tile, and the pencil tile on the edge is even thicker than that; IMO it would look weird to see the two butting up against each other and the tile just end, rather than fit under the crown. I couldn’t find any images online where this was done in a clean way and I worried that after all the work to install the tile, it would look like DIY amateur night if the tile jutted out more than the start of the crown. I saw that crown has been (frequently) used over tile walls, but every time I saw examples, it was OVER the tile, not up next to it.
The transition looks great I went through the exact same options when figuring out this dilemma.
Question since you used vinyl/PVC did you cope the corner joints or miter them?
Miter. I have a coping saw, but I don’t have the patience (or honestly, the practice yet).
Great idea! Did you keep with the same baseboard and crown combo all the way around the bathroom or did you end the baseboard at the next corner?
My primary bathroom is pretty small, so it just made sense to keep going! It also meant I didn’t have to address any other transitions other than these two spots.
I can’t tell you what an amazing solution this is—I was sweating this one. thank you from the bottom of my heart 💕💕💕
glad I could help!