Disclosure: this post may contain affiliate links, which means I may make a commission if you decide to make a purchase through one of my links, at no cost to you.
Once you’ve painted just about every room in your house (and sometimes, twice), you learn to paint straight lines without needing painter’s tape. In this post, I’ll show you how to master it with ease!
There are a few techniques out there (and all of them requiring practice), but here is how I do it:
How to Master “Cutting In” on Walls Around Trim, Ceilings and Edges

Recommended tools:
- my favorite angled brush for edging (it’s got a great grip and is easy to control)
- a handy container to hold paint (dipping straight into the can might contaminate the can, and a smaller container is easier to manage if you’re climbing a ladder at any point)
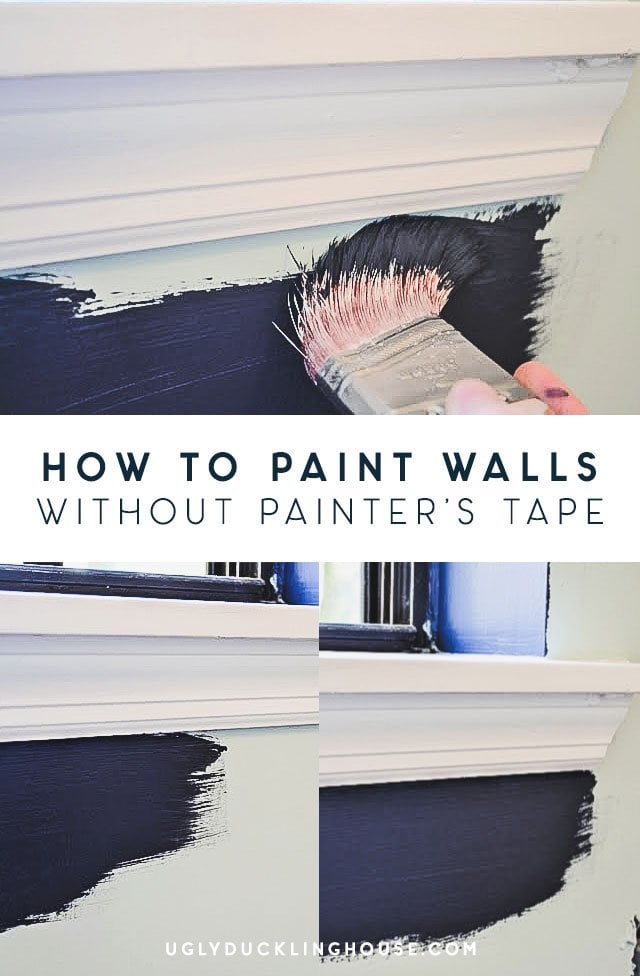
1. Load the brush and wall
With a loaded brush, swipe a paint streak about a half an inch below the line you’re about to make. It’s important that the paint in this spot be wet but not drippy (you’ll see why in a sec).

Now that you’ve unloaded most of the paint onto the wall, use this as a place to basically pick up paint and drag to the line you’re going to create.
2. Create the actual line
By keeping the brush a little smushed and sufficiently loaded with paint, a line is actually pretty easy to create. Go as slow as you need to in order to keep full control of the brush (you’ll get faster with time). When the line gets streaky, just move the brush down to the stripe of thicker paint to load more paint onto the brush, and continue on.

3. Don’t worry about streaks
Of course, all you’re concerned with really is getting the straight line. When you’re done, it’s likely your straight line will also be a little streaky. That’s ok!

4. Clean up with more paint
One more swipe of a loaded paintbrush, and you’ll have both a straight and solid line.
There you have it. It may take a steady hand and a little time to concentrate, but it will save you plenty of time (and money) in the long run when you don’t have to tape every baseboard, windowsill, and doorway. Plus, the pride of knowing you’re painting skills are pro quality is great, too!
Want more tips? Check out this entire blog section about painting techniques and time-saving hacks!


When we did the majority of painting in our house, I was to impatient to properly cut in, or tape, so basically the house looks like crap. But as we renovate and finish rooms, I'm definitely going to be taking my time and cutting in nicely! Or at least trying.
Cool post..thanks for sharing! We plan on repainting most of our house, eventually, and to hire a pro painted will cost us over $10,000 because of the sheer size of the house. Blahh….DIY it is! Haha! Thanks for the GREAT tip!
heard! I inherited one of these from my dad, and I LOVE IT. I know it's only a couple of bucks, but I didn't know about it until a few years ago.
http://www.lowes.com/pd_40657-1077-100C_4294766319_4294937087_?productId=3143337&Ns=p_product_prd_lis_ord_nbr|0||p_product_qty_sales_dollar|1&pl=1¤tURL=%2Fpl_Specialty%2BApplicators_4294766319_4294937087_%3Fpage%3D2%26Ns%3Dp_product_prd_lis_ord_nbr%7C0%7C%7Cp_product_qty_sales_dollar%7C1&facetInfo=
When I saw this on Pinterest I thought “I already know how to do that.” But you never know what tips you can pick up so I checked it out and I learned something! I have been doing it the opposite way, and sometimes get too much paint at the edge. Have to wipe it off and start over. Since I am currently in the midst of a big painting project, I will be using this tip today! Coincidentally, I recently put your blog on my “top sites” so I check it most days. I really admire your carpentry skills. Wish I had learned some of those things when I was your age.
For every “baseboard, windowsill, and doorway” I have, the color will be the same as the wall. So no contrast white coloring to worry about!
But when I do it your way, I do it the way you describe. It makes it so easy, and sometimes even with tape, it bleeds through! But not with your method!
I am SO going to need this–thanks a bunch!