
Disclosure: this post may contain affiliate links, which means I may make a commission if you decide to make a purchase through one of my links, at no cost to you.
I’ve always wanted to post a lengthy tutorial, along with a dedicated video series, to help beginners get a good foundation to start their cross stitching journey. That will all take time to bring together, but for now, I’ve created a quick-start guide that anyone can use! Below, you’ll find the most important tips to get you started with your first pattern. Just click on the table of contents to jump down to each section (if you’ve done cross stitch before but need a refresher, this will work for that too). Enjoy!

Preview some of my patterns available in the video below:
The Beginner’s Guide to How to Cross Stitch
Unfortunately (because I have been blogging a long time and know there’s always one or more party poopers), I’m going to need to add this blurb before we begin: this is how I cross stitch and (to some degree) how my grandmother taught me. She made amazing works of art with cross stitch — some actually featured in an art exhibit once using beading, metallic threads, complex creations — that we still have in our home to this day (I’ll update this post someday with photos of that!). So, I’m giving this tutorial based on how I stitch. There are other techniques out there, some that may even may save you time (insert any reasoning for doing it differently). By all means, if you think it will help beginners, feel free to leave a comment about a trick or tip you find helpful, but PLEASE do not leave condescending comments or gatekeep that there is a “right” and “wrong” way to stitch. Those kinds of comments will be deleted, as they are unwelcoming to beginners just trying to start on something they might enjoy.
What is cross stitch?
Cross stitch is a form of counted thread embroidery and is one of the easiest forms of embroidery to learn. It consists mainly of X-shaped stitches done on fabric with an even and open weave like Aida or linen, so it is plotted a lot like a grid. There are some more advanced stitches too, which we will not cover in this beginner tutorial (yet). Designs can be traditional or modern or anywhere in between. Cross stitch embroidery actually has a fascinating history that you can hear more about the Tinkering Belles podcast — where I was a recent guest!
These days, beginner cross stitch projects are sometimes sold as kits, but you can also purchase basic supplies (listed below) to create a pattern you have purchased or downloaded from me.
Regardless, follow the below guide to learn the basics of cross stitch.
Gather Your Supplies
As with most DIYs, cross stitching has a supplies list. Some things I’ve listed below are common to use in just about every pattern you come across, while other craft supplies aren’t always needed but nice to have.
Always necessary
- Pattern — This is a chart that fully plots out the design, instructions, which colors to use, and more. I have a number of exclusive pattern designs available in my Etsy shop! Read more about how to read a chart further down.
- Embroidery hoop or frame — To stitch properly and prevent the fabric from bunching as you pull on the thread, you’ll want to keep the fabric good and taught. I use an embroidery hoop 100% of the time, but some folks like to use a frame or even a lap stand. Any way you choose, the purpose is the same.
- Needles — Decorative stitching, such as needlepoint, tapestries, and cross stitch, use blunt-ended needles that won’t prick your finger if you accidentally touch it and sometimes have a little bit larger of an “eye” (where you slip the thread through) to accommodate different sizes. I have often used sewing needles (that have a sharp point) too. You can get an assortment like this to see which is your preference.
- Cloth — The cloth used is most often Aida cloth (designed for cross stitch), but sometimes linen or other cloth that has a weave. I recommend starting with a 14 size, which refers to the number of cross stitches per inch. Therefore, 16, 18, and larger numbers indicate smaller and smaller stitches. This also means that if you choose a pattern than is designed for 14 but use it on an 18 cloth, the overall pattern will come out smaller (because more stitches will fit into a smaller area). Evenweave fabric has an even higher thread count than Aida, but that also means very small stitches, which may be difficult or frustrating for beginners. Cloth comes in a variety of different colors, so you can get really creative here!
- Floss — I use DMC embroidery floss
Nice to have
- needle minder (or you can DIY your own!)
- threader
- thimble
- magnifying glass
- clip-on light
- stitch scissors
Sometimes you might purchase cross stitch kits which include quite a lot (if not all) of the “necessary” items and possibly include things from the “nice to have” list.
How to Read a Cross Stitch Pattern or Chart
A cross stitch pattern has a graph (often several) charting the entire design. It also has a “color key” or legend with symbols associated for each color, the number code and name of the color (so you know you have the right color), the total yardage of thread used per color, etc. Colors are usually specific to a particular brand, DMC being the most often (but not always). The graph is marked in groups of 10 so that you can more easily count the number of stitches (thus counted cross stitch) as well as an arrow at the top and side of the graph indicating the center (in case you want to start in the center and work outward; a popular option for beginner and experienced stitchers alike). Sometimes, the pattern comes not only in black and white, but with color charts so you can better visualize the finished piece or keep track of where you are in your progress (something I’ve begun adding to all of my patterns and I’m going back to add them to older ones).
Prepare the Fabric
Iron your fabric to keep everything nice and smooth as you stitch; Aida fabric usually comes in tubes so that there are no creases because wrinkles and creases can form pretty easily (it’s a stiff fabric). Also, it’s best not to fold it when storing between days you’re working on your piece.
Woven fabrics tend to fray on the ends. So, you have a few options to minimize that from happening: 1) add masking tape around the edge (keep in mind that lots of tapes leave residue so be selective!) 2) zigzag a stitch around the edge 3) use a serger to add a stitch around the edge.
To keep the fabric taught, stretch the fabric in an embroidery hoop or frame. Embroidery hoops are incredibly simple to use: loosen the metal clasp so that the top round is loose, then sandwich the fabric between the bottom (inner) hoop and the top (outer) hoop. Push the top around the bottom hoop, securing the fabric in between. Pull the fabric taught as you turn the clasp tight. Pull, tighten, pull, tighten. The fabric should be tight so that it doesn’t give when you pull the thread through, but not so tight that it stretches the fabric. I like to re-tighten mine as I stitch because it tends to loosen with use.

Prepare the Thread and Needle
All of my patterns are made with DMC floss colors and designed for 2 strands of floss per stitch. When you buy a skein of floss, it comes in 6 individual strands that you’ll need to split. I cut a length from about my elbow to my fingertips (a manageable length that doesn’t get too long/increase the frequency of knots) and split.
Once you have your thread ready, slip one end through the eye of the needle you’re using (the size of the needle depends on the fabric you’re using… you don’t want to use too thick of a needle that it stretches the holes as you stitch).
How to Start Your First Row
Most stitches on charts and most beginners will start with full cross stitches, so that’s where we’ll focus first.
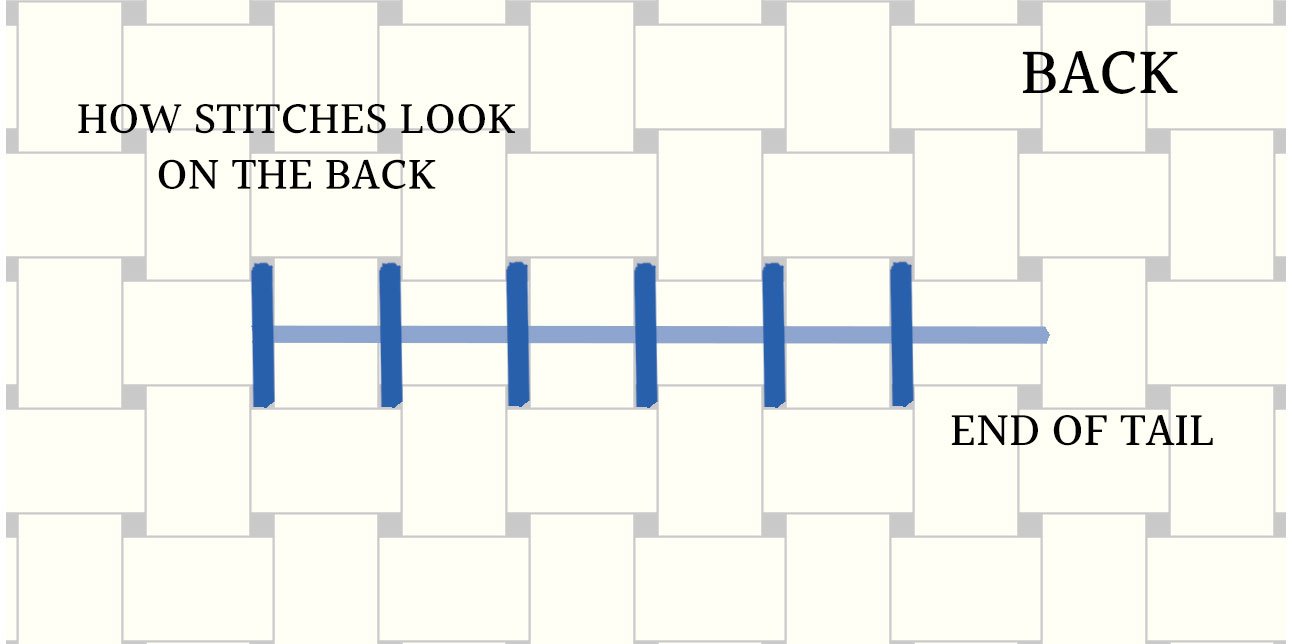
The way my grandmother always taught me to start my first row is to pick a row that uses the same color thread and pull the first thread through a hole in the fabric, leaving about two inches of thread at the back as a “tail”. As I make my first few stitches, I make sure that the tail is held along the back of the row I’m making on the front. As I stitch across, the end of the thread is secured. So, no knots required!
You can make a knot, of course. I won’t judge. But 1) the end of the knot may pull through the hole if you pull too hard, 2) it may widen the hole excessively, or 3) it may leave a lump in your finished piece, which is why I don’t like to use them.
To make a row, think of each stitch like a box – two holes at the top, two at the bottom. You stitch at an angle similar to how you would draw an X. I usually stitch from the lower left to the upper right. If you can imagine a bunch of X’s in a row, then you can make lines going all in one direction, like / / / / / / / / /
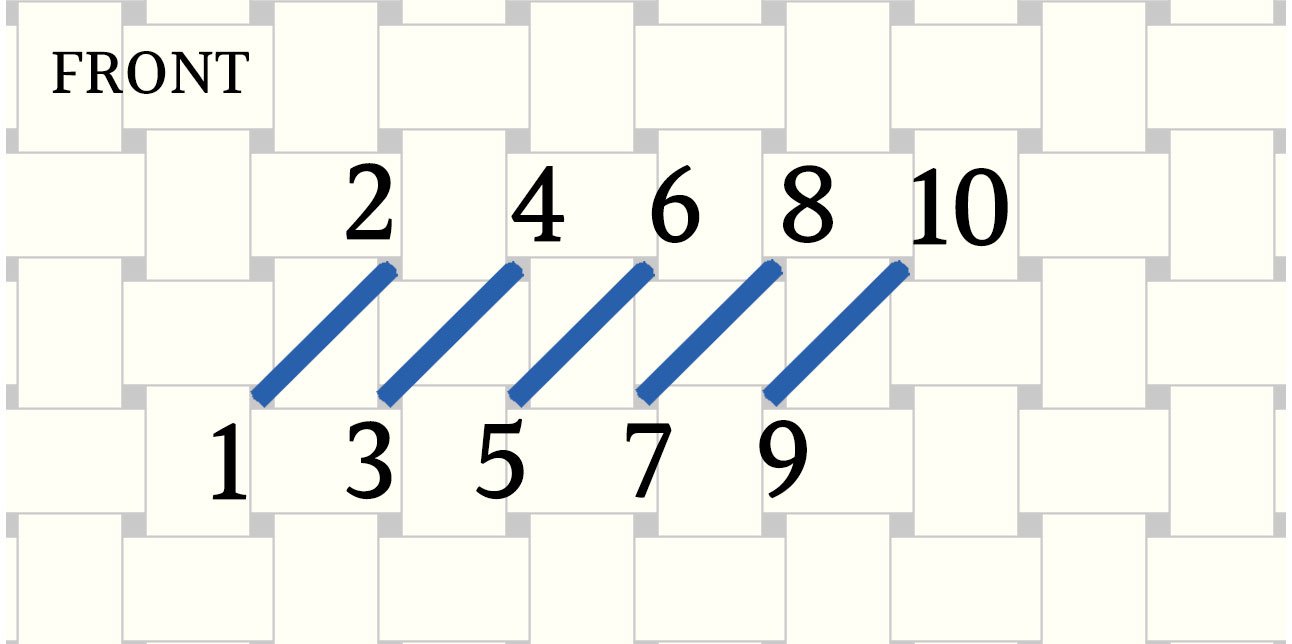
and then back in the other direction, like \ \ \ \ \ \ \ \ \
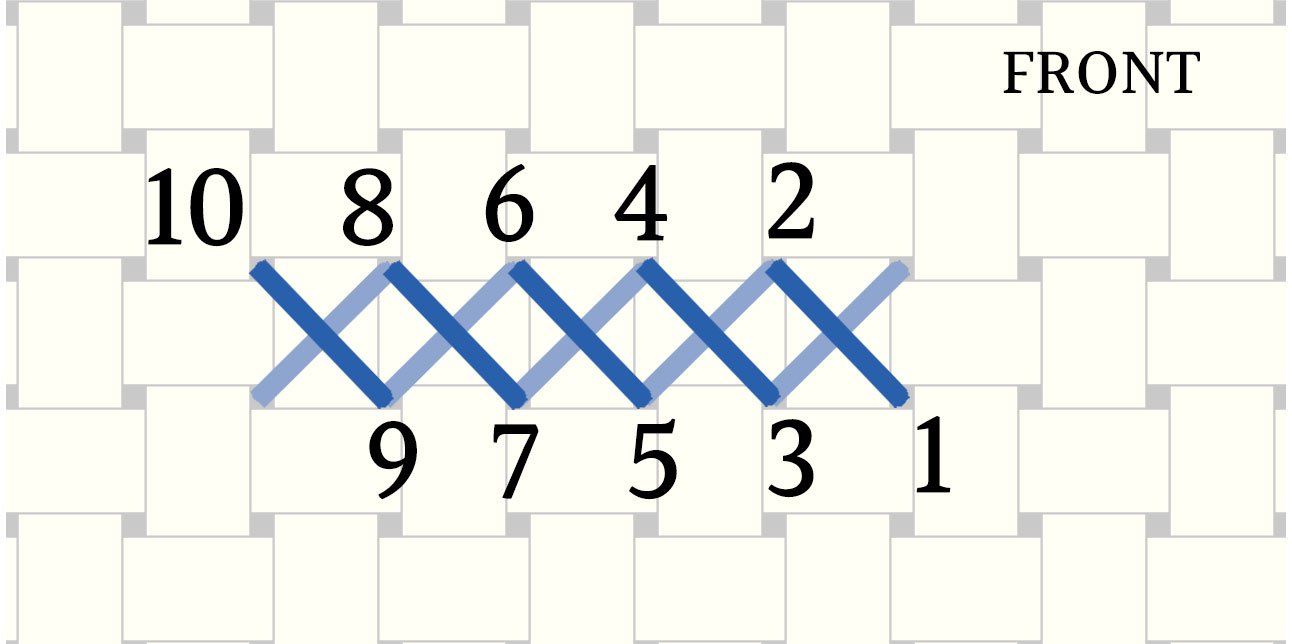
and when you’re finished, you’ll have a row of perfectly neat XXXXXXX! Each X is considered a “full stitch”.
Can I make complete stitches instead?
Sure, and in some places, may be easier (such as if one color is scattered all over the pattern). However, I find that my finished pattern looks best if I stitch in rows as above.
How to Switch Colors
Some folks like to pick an area of their piece and stitch it with every color before moving on to a new section. Some folks go row by row (which switches colors the most often IMO). I tend to be a little scattered, but for the most part, I like to use up colors before moving on to the next, or at least run out of a full length of cut thread before making a color change.
When I’m ready to switch colors, I flip the piece over to the back and run my threaded needle through the back of a row so that the tail catches in between the existing stitches, much like starting the first stitch. I usually aim for similar colors to thread through so that nothing peeks out of the fabric onto the front (for example, I never thread black thread through the back of a light-colored area, etc.).
How to Finish Your Project
Keeping the stitched piece inside of a wooden hoop is a popular way to display patterns these days. The only downside is that you’ll have to keep buying new embroidery hoops. :) To finish your pattern this way, pull the pattern taught (the way you want it to look when hanging on the wall) and cut off excess fabric, leaving about an inch on the back side all the way around. Stitch these ends together to keep the fabric pulled tight. Hang.
I’ve also written a blog post about framing finished pieces right here.
More Tips & Tricks
This area will be filled in more with time, but I’ll get you started on a few!
- Always wash your hands and keep them clean of lotions, creams, etc. because they will stain your fabric.
- Be consistent with rows of stitches and which direction you go in first. So, if you make a row of /////// and finish with \\\\\\\, do that for every color, every time.
- Try to find a happy medium with tension in your fabric and stitches. You don’t want to pull the thread so tight that it buckles or puckers the fabric, but loose stitches look sloppy in your finished piece. Aim for everything laying flat and even (it takes a little practice but not much!).
Don’t forget to pin it!


It looks like you’ve been taught mostly the way I was, but I was self-taught. I like to do an entire row no matter how many color changes it entails. The most complex piece I ever did had 30 colors, and won a 1st prize in the county fair. But these days I mostly like more simple projects – that one took a loong time. Fair is a distant memory these days.
I have seen people do rows like that and I think it looks beautiful as it’s coming together because you can pretty much see the picture as it happens, almost like a printer! But I guess old habits die hard and I tend to stick with one color until it’s done (my Granny was similar, but she would tend to do sections because she too did huge pieces). I imagine those big works of yours were beautiful!
I think they were, LOL.
I’m totally new at cross-stitching. I haven’t even made one stitch! I bought the pattern with kit, hoops and lighted magnifying glass. I’m a little intimidated by it all. Years ago I used to do needlepoint which wasn’t as fine. I like your tutorial so far.
Thanks Lore! I’ll try to cut down some video I made recently to provide some more visual examples but if you pick a beginner-friendly pattern (lots of my free patterns are designed for beginners), you should be able to get the hang of it fairly quickly. The fact that you’ve done needlepoint gives you lots of skill already. Plus, this is a pastime you can easily take your time with and have patience with yourself. I hope you enjoy it as much as I do!
Thrilled to get confirmation that other stitchers use pointy tipped needles! I started doing that and is actually quite helpful. By the time you complete a piece, there are a whole lot of strands going in and out of those tiny holes and a sharp end really helps sink the stitches in place.
Yes! I have always used pointy-tipped needles!
Great advice on getting started.
Thanks Maureen!
How do I get from the first completed row to begin the second row……1. where is the needle placement when working up after my first row, 2. Where to put my needle working the row down from my first row?
I usually go from lower left to upper right in both circumstances to form a new ////. But as long as you’re not undoing the previous stitch in some way (sticking the needle right back through the same hole that you just finished to complete an X on a different row will most likely just pull the thread back out), you are fine. Cross stitch is very forgiving in that you can kind of choose your own style to make completed X stitches (some folks will do one full X stitch at a time when starting out; some will do a full row of //// and then go back \\\\ to complete them; it’s entirely your call but I think it looks slightly neater when done in rows). I’m so glad you’re giving it a try!
Thank you for this post and all your good advice! I’m so glad to have stumbled on your site as I looked for advice and patterns to feed my new obsession. I’m a newbie, self-taught with a little guidance from a pro, so this is great to have on-hand as I continue to create!
I’m so glad you found this post too! It’s always nice when someone stumbled across a new craft. I hope you find lifelong joy in your new hobby!