Disclosure: this post may contain affiliate links, which means I may make a commission if you decide to make a purchase through one of my links, at no cost to you.

Using scrap plywood, I created this DIY air plant wall art in no time at all.

Are you looking for a way to create some simple wall art? Have you seen all the awesome air plant wall art out there? I love the look, so I decided to use up some scrap wood to make a unique and pretty piece of wall art (for cheap)!
So, a quick note on this DIY air plant wall art tutorial. Initially, I was thinking of combining my recap of the WorkbenchCon and this DIY idea, but the post got WAY too long!
I decided it was better to split them up in two back-to-back posts so you can get more details about my experience as well as the DIY wall art tutorial. Read all about my experience with building a booth for Rust-Oleum for the first-ever WorkbenchCon in Atlanta, GA right here. This DIY air plant wall art was inspired by my booth and used a lot of scrap wood leftover from that project.
Even though my booth from the WBC inspired this project, it was actually first created as a backup idea for the Wood Art Challenge last month. I wasn’t 100% sure my carved wood art would work out, so I needed something I knew I could whip up quickly in case of failure. Once it came together, I wanted to see it all the way through, and boom: new air plant wall art in my office!
I put most of this air plant art together on the floor in a little makeshift photo studio in the guest bedroom. It’s going to evolve (I hope) someday into a real table setup, but since I’m in the middle of all of that room makeover chaos in there, I’m working wherever I have space.
Video Tutorial – Air Plant Wall Art
click here to subscribe to my youtube channel

Without further ado, onto the DIY air plant wall art tutorial!
DIY Air Plant Wall Art Made from Scrap Wood
Materials & Tools Needed
- drill
- drill bit
- brad nailer
- brad nails
- 1 x 2 furring strips (or other scrap wood to form a frame)
- 1 x 2 pre-primed MDF (or similar, you can paint plain wood too)
- thin plywood or thick cardboard
- 1/4″ oak plywood cut into random shapes
- painter’s tape
- wood glue
- Rust-Oleum Aged Wood Accelerator (brown)
- white paint
- caulk or wood filler (wood filler is best, but I am sometimes lazy)
- small paint brush
- foam brush
- craft or jewelry wire
- air plants
- flush mount wall hangers
Once you’ve gathered all your materials, you’re ready to begin pulling together this simple air plant wall art.
1. Start the Wall Art with a Frame
As you can see from the photo above of my “studio,” I began this DIY wall art project with a square frame made from cheap 1×2 furring strips from my scrap pile (100% of this project was scrap wood).
I glued the furring strips together and used painter’s tape to help secure the pieces until the glue was fully dry.

(Also, I can’t help but laugh that I’m using two pieces of scrap plywood as my temporary table surface. I eventually used the 2x4s you see propping the art project up as the platforms on either side of the guest bedroom Murphy bed—where the cabinets and built-in shelves will eventually go. My house is like a scrap wood graveyard.)

2. Cut and Glue Plywood to Fit the Frame
Once the frame for my plant wall art cured, I cut and glued thin plywood to fit inside the square. You can also use stiff cardboard if you have it. This forms the main canvas of the artwork.
Instead of using painter’s tape to hold down the front, I used anything substantial I found around the room to evenly distribute weight and keep the pieces of the project snug until it was dry.
And there you have it: a boring wood canvas. Woot! DIY minimalist wall art complete! (Just kidding.)

3. Add a Decorative Frame
Next, I added a decorative frame to the piece of wall décor using 1×2 MDF turned on its side.
I’ve shown this technique before on previous wall art projects, and it has confused folks since I used 1x2s to make the back as well. The difference here is that the back frame is laid flat. When you make the MDF frame, you turn those pieces on the side. The corners are all mitered to 45-degrees, then filled and painted. This is so there are no visible gaps between the plywood canvas and frame.

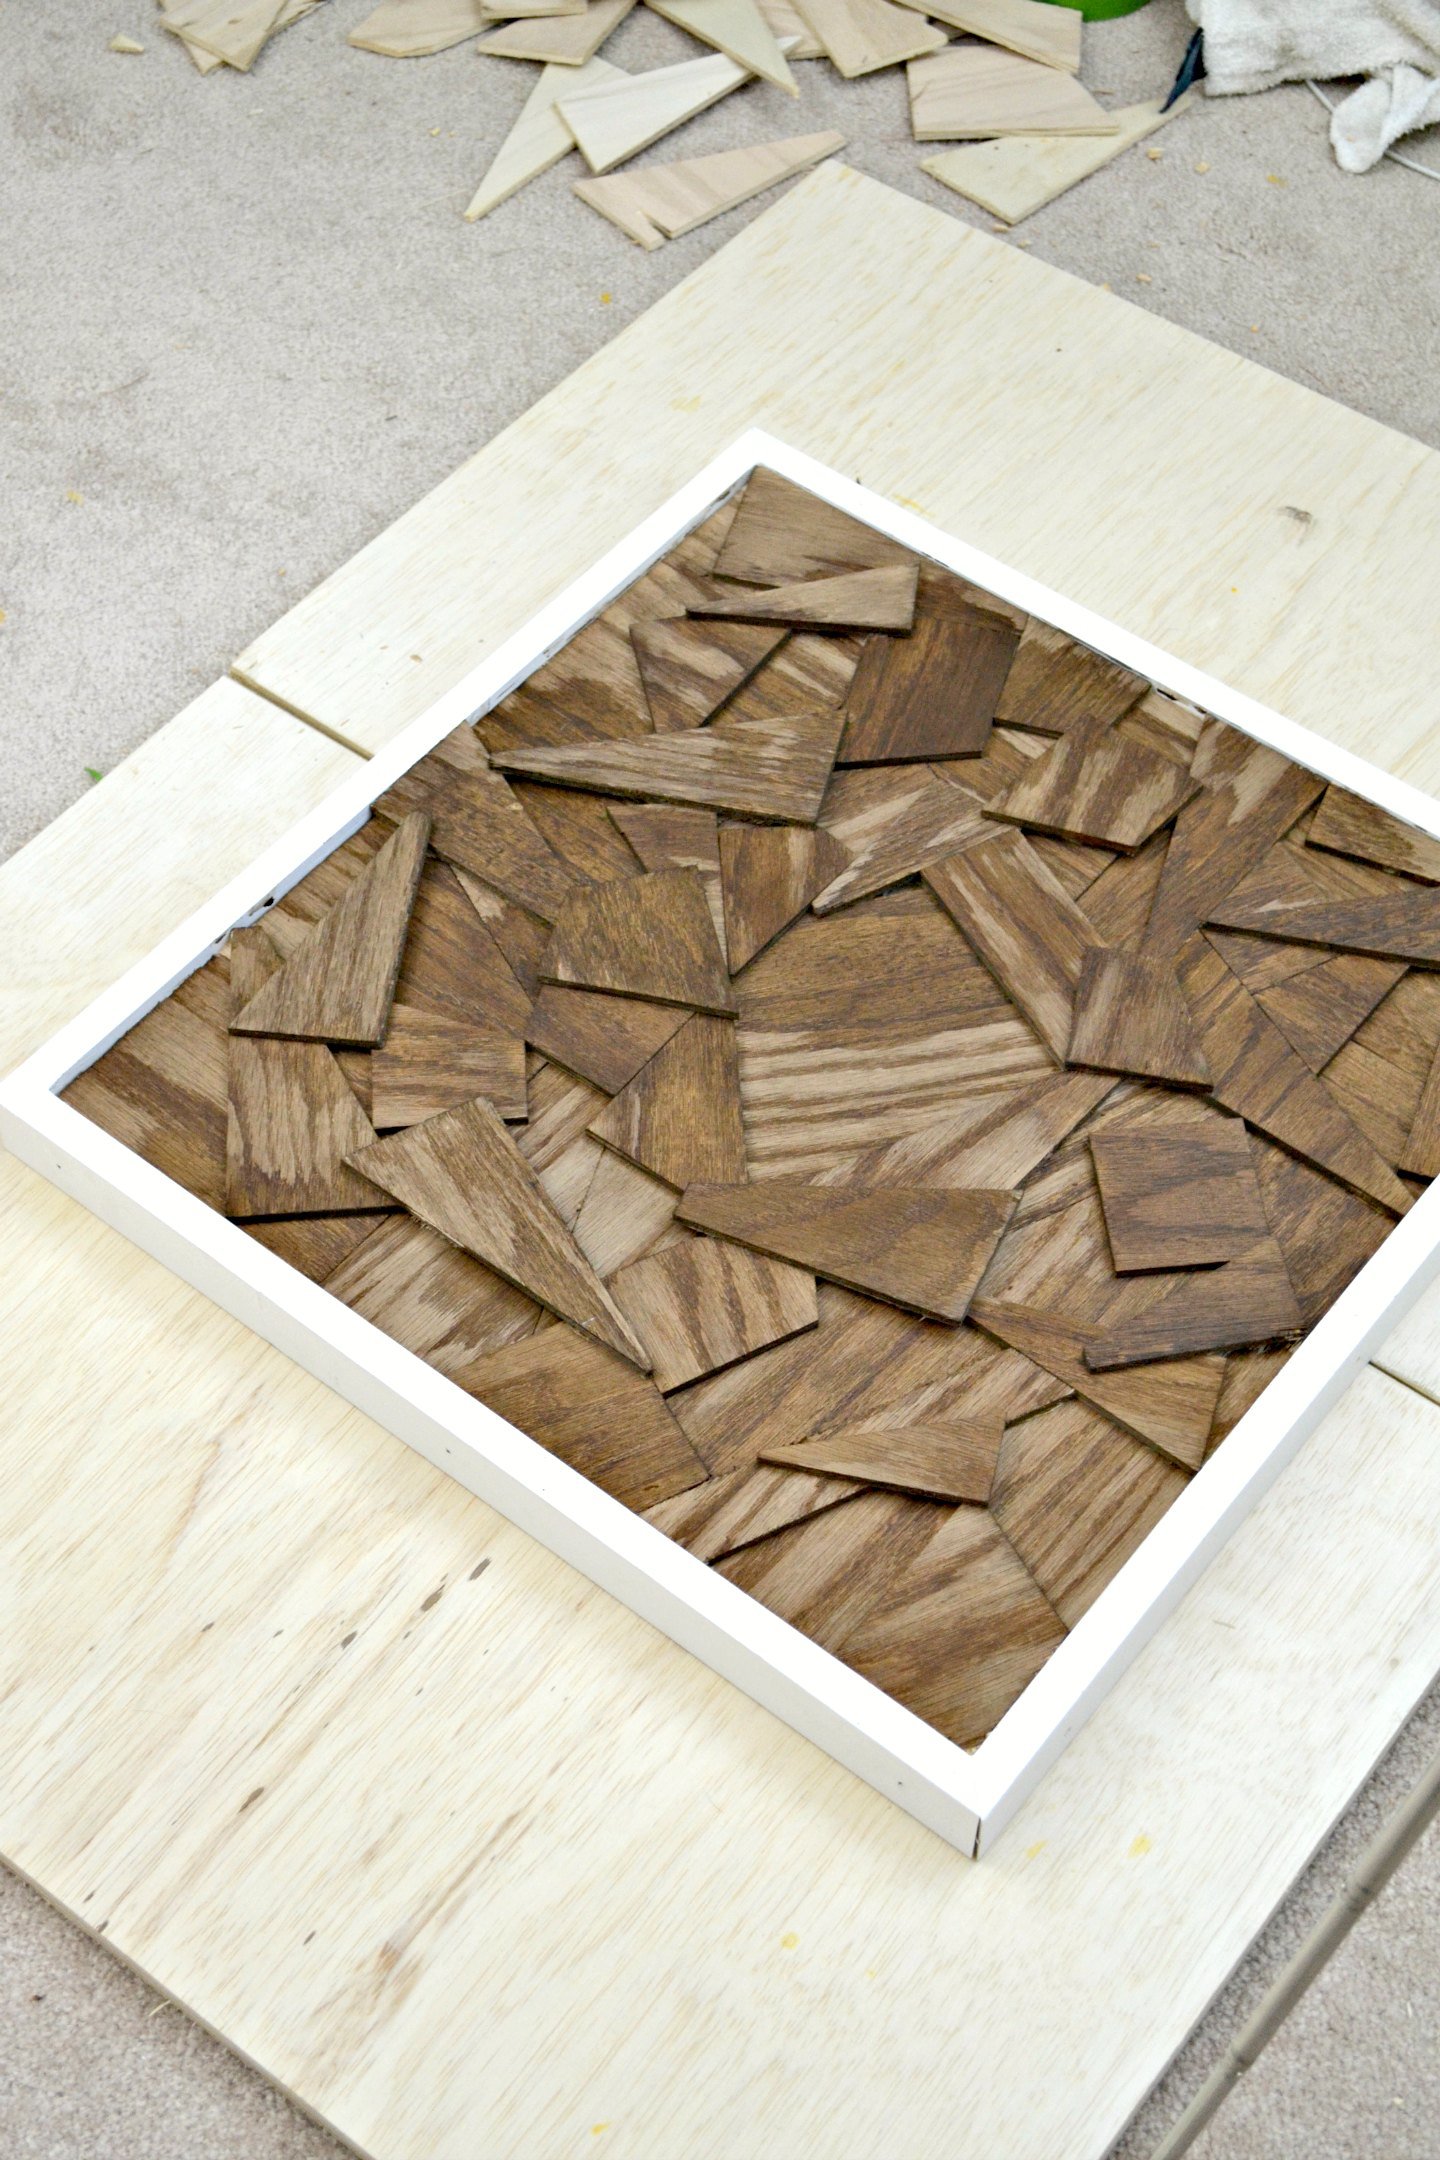
4. Layer in the Scrap Wood
Using the pieces of scrap wood that I had from all my previous projects, I began gluing the first layer of wood to fill in the background as much as possible. I made sure I started by pasting in the center piece first and then gluing in the four corners so there would be no problematic areas to fit later.

With the next two layers, I placed more and more pieces of scrap wood to completely cover the canvas and give me a lot of nice texture. I tried to use a variety of shapes and sizes—I think this makes the wall art look really modern and unique. I love the way the shapes play together behind the plants.

5. Stain the Wood Scraps
Rust-Oleum had originally commissioned me for their WBC booth to showcase their new Aged Wood Accelerator. They have a “weathered” version of the accelerator that makes the finish look gray, while this looks browner.
I wasn’t sure at first if I would even like the Rust-Oleum product before I started using it, but I’m officially a convert! It doesn’t stink like a regular stain and you can be really sloppy and uneven with it—you don’t have to wipe it back off if you put too much on. Plus, it has a great color after it dries.

Even though the Rust-Oleum Aged Wood Accelerator works on common boards, I highly recommend using it on red oak. It really brings out the wood grain and the slight red tinge looks nice and rich.

A little sponge brush is excellent for stain application because it lets you get into all the little nooks and crannies. Turn the piece around and around to make sure you don’t miss spots.
The rough edges of the plywood cuts handle the product extremely well and practically make tear-out invisible (the stain is supposed to look rustic after all, so it just seems like it’s on purpose).

As the wood accelerator soaks in, parts dry up, and some will keep soaking in. I didn’t worry about wiping any of it off; that’s part of what makes the product easy. This stain adds an aged finish to the wall art that’s really unique and beautiful.
It is possible to add a second coat of accelerator if you want (I did). Like a regular wood stain, the second coat will darken the first.

As the pieces of scrap wood dried, I took some time to touch up the MDF frame and paint over any nail holes.

6. Drill Holes for the Air Plants
Next, it was time to add air plants. I ordered this bundle from Amazon, which also came with fertilizer spray. Air plants don’t need much care, but they do need water or mist and access to sunlight.

I raided my stash of jewelry-making supplies to find some thin brown craft wire (similar) to secure the air plants to the wooden canvas. After fussing with placement, I drilled two holes in each spot where I wanted an air plant to go.

In places where I wanted more than one plant, I still drilled two holes for each plant. That way, I could control precisely which direction the plant would sit and nestle the plants next to each other to create interesting visual patterns in my wall art.

7. Place the Air Plants Using Wire
Placing the air plants with the wire occurred in one of two ways. For most of the air plants, after threading one side through the back, I would wrap around the base of the plant several times and feed the other end through the remaining hole.

Once both ends of the wire were through the back of the “canvas” and taught, I twisted them in place to keep the plant secure.

Alternatively, for thicker plants without a stem to wrap, I threaded the wire through parts of the plant and then secured it to the wood. Don’t pull too hard on the wire, or you may damage your air plant.

I kept going with each plant, starting in the middle and fanning outward. This way, I could work on securing each plant without damaging any I’d already placed.

8. Hang and Enjoy Your New Air Plant Wall Art
Once the air plants were placed and secure, the DIY wall décor was ready for me to hang up! I already had a spot in mind where I knew this modern piece of wall art would look amazing.
Using my favorite new flush mount hangers (which I love—they hang so well!), the art piece found a new home in my office!
As you can see, this easy DIY air plant wall art is a great project for any afternoon. It doesn’t require many tools, and this project gives you a great way to use up all those wood scraps that you might have around from other projects.
This DIY plant artwork fits with almost any décor style—bohemian, rustic, or modern. It would look great in a beachy cottage or a country kitchen. Play with the stain and the finish, and you can create something to suit the walls of any room in your home. Any corner where you need a little green, this plant wall art will do the trick!


Don’t forget to pin it!


How do you care for the air plants?
I plan to water them with a water bottle regularly. The air plants also came with a spray fertilizer (link to the ones I bought in the post). I’ve never had air plants before, so I’m hoping I get into a routine that keeps them healthy.
Hi Sarah…..I know nothing of them nor ever even heard of them but let me if I have this right ( didn’t even google before replying here so I’m all ears. These plant items you stove pipe / decorative wire to your projects to holes drilled through the piece actually grow some after spraying with a liquid plant food while it’s hanging on the wall? Iif so and they grow some y’all actually have a moving forming art piece changing by nature…..pretty kewl indeed, Grant Wood Iowa farm boy artist would be envious I do believe :) You could even go a step further and make little pockets on your wood art piece and put herbs or dwarf cherries in them with plastic liners hang it outside for sunlight near the back door and as they grow pick some for cooking dinner on the way in the house. Or grow cherries or mini onions hang it on the side of the cabana or outdoor 10 x 10 shed addition bar and use the yeilds for libation concoctions…just saying ofcourse.Its unique and turned out good
:)
I think the food items might need more direct sunlight like you said, but the new vegetable garden is right next to where the shed will be. I didn’t think about using them in cocktails next to the bar but that’s genius!!
And air plants: they don’t need soil to grow, so they can basically grow anywhere that’s in bright filtered light. The only challenge (so I hear) is keeping them regularly watered. The way I made this, I’m planning on misting them regularly. If they need more than that (like soaking), I may have to redo the wiring so that they can be pulled off/on the art, but we’ll see. The plants I ordered came with fertilizer so I think I’m in good shape to keep them happy so far.