
Disclosure: this post may contain affiliate links, which means I may make a commission if you decide to make a purchase through one of my links, at no cost to you.

It’s long overdue: my primary bathroom shower makeover is finally complete, and it’s time for the big reveal!
If every room in my house had its own little story to tell, the primary bathroom renovation is one of the longest I’ve ever told (those of you who have subscribed the longest need no reminder, but just in case you want a look back at the twists and turns, you can check them out here and here and here). But as with any good story, there are also some truly satisfying moments of relief and excitement — like finally being able to reveal my primary bathroom shower makeover!

This is a sponsored conversation written by me on behalf of Delta® Faucet. The opinions and text are all mine.
Primary Bath Makeover: Shower Reveal
I love my new shower so much I might dump my boyfriend and run away with it (sorry hun).
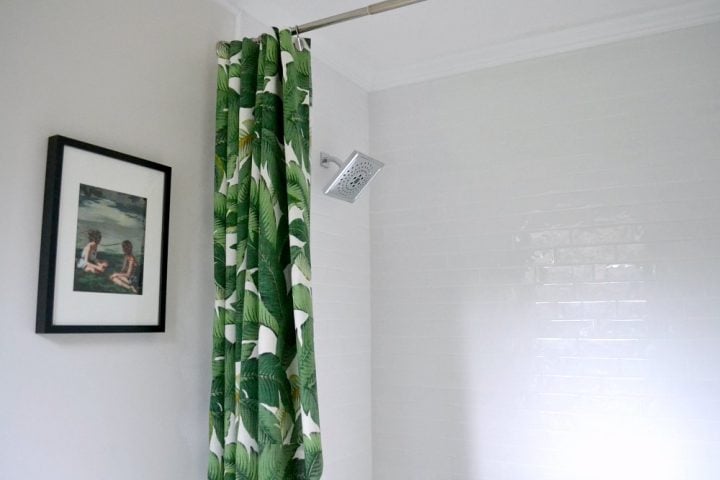
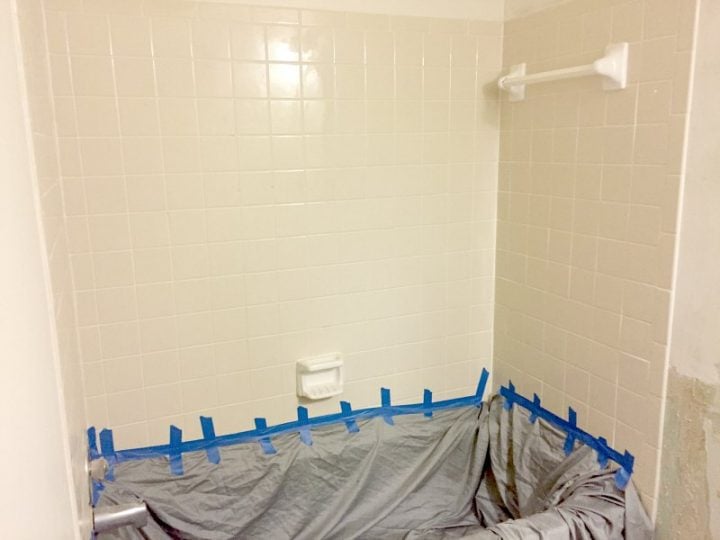
Looking at these pictures, I feel an incredible amount of weight lifted from my shoulders. Where you might see a shower, I see each of its elements, too: space planning, maximizing light and height, tile, shower head, grout lines, caulk, crown, ceiling paint, and so on. I also still see in my mind what it used to look like (scroll further down the post for that!). Renovating is a stressful and dirty job sometimes, and since I did/am doing both the design and the labor for the whole room, I’ve had to overcome quite a few challenges. In time, I even started calling it my “bad luck bathroom” — the room that just didn’t want to get made.

Finding new inspiration
No matter how much I tried to force myself to finish the room before, I just couldn’t seem to find that wow factor to really push this renovation forward. That all changed earlier this year after a trip to Chicago with Delta Faucet. I’ll admit that I was a bit skeptical at first that I’d be able to get direct inspiration for my bathroom, but as it turned out, there is no mistaking the uncanny resemblance of my new shower tile’s handcrafted surface to the beautiful rippled effect of Chicago’s waterfront:

Plus, the way the light bounces off of the delicate tile reminds me of some of the absolutely gorgeous (and painstakingly intricate) tile work I saw in some of Chicago’s historic buildings:

After returning from the trip, I had a new plan in mind for what was truly missing from my primary bathroom. The shower needed to go.
It took several weeks to remove, prep, and install, but the end, I think it was 100% worth the effort.


Compared to normal subway tile, the edges and the surface has a more organic look to it that reflects light in all directions whenever the window is open. I really wish these pictures could do justice to how glittery the tile looks when the light hits just right.

I lit a candle in the corner of the tub just to give myself a way to picture a candlelit bath in here. I can’t wait!

I was really happy to be asked to partner with Delta Faucet for this project. Not only did they help with the budget to make the shower tile a reality, but they also supplied me with a new chrome shower head from their Zura™ bathroom collection.

I think the contrast between the flowy, water-like effect of the shower tile and the super clean lines of the shower head create a nice pairing for an entire look that is fresh but not cold (sometimes “modern” styles can look really severe, but this combo softens it).

One of the other things I’m particularly proud of is the new crown molding added to the very top of the shower tile. At first, I wasn’t sure how I would overcome the pronounced edge of the tile and tile trim vs. the wall, but I found my answer by flipping baseboard molding upside down to add to the wall and putting the crown on top (I’ll have a separate tutorial for this). It makes the molding look even more impressive and avoids awkward cuts when the molding reaches the tile. I love it!

After taking the new white tile all the way up to the ceiling, I still wanted to make sure that there was enough color in the room to keep things interesting (but still overall neutral and creating a sense of calm). Green isn’t normally my go-to color, but I saw this outdoor leaf print fabric a few months ago and have been dying to use it in a project. The shower curtain is a complete DIY, so I’ll have to show you how I did that too.

Finally, a little art from one of my favorite painters (source list below), and this bathroom is finally starting to look the way it was always meant to be — and a far cry from where it was when I first laid eyes on it (this is the listing photo from when I first bought the house!).

Have you been finding inspiration anywhere lately?
Sources:
- Elida handcrafted white tile
- Toilet – Delta
- Shower head – Delta Zura™ bath collection
- Palm leaf print shower curtain fabric (the curtain itself is a DIY project)
- Red Ribbon art print by Clare Elsaesser
More from this series:
- Removing the wallpaper
- Repairing damaged drywall
- Demoing the linoleum floor
- Installing/replacing porcelain floor tile
- Demoing the shower
- Waterproofing and tile installation
- Figuring out how to get the crown molding to look right with the transition between drywall and tiled wall


AMAZING! This bathroom is really coming along now. I love the tile! I’m also a fan a Clare Elsaesser. I’ve been eyeing a few of her prints for my house. I want either Married To The Sea for my main bathroom.
It’s awesome Sarah! Wowsa what a transformation! Everything is so fresh and bright…and that DIY shower curtain! ❤ Kudos!
What an absolutely GORGEOUS end result. You should be very proud–your hard work shows!
It looks great!
Wow!!! Your choice of tile and decision to add crown moulding in the shower elevates the look! It looks very high end spa, to me! Nice work!
This looks great!
I think this is possibly the only subway tile I’ve ever seen that I’ve liked. <3
Wow! It’s so beautiful! You did an amazing job!
Hi! I really love this look. Can you provide a link for the trim/bullnose tiles that you used between the shower and the wall? I think I would like to use this as a kitchen backsplash but I will need a coordinating bullnose tile.
Thanks!
I tried to find an online example but I found it through a local outlet type of place, so I wasn’t able to find an exact match. BUT, what you’re looking for is called “pencil” tile. Some of them are textured and more complex design, some are simple. Just make sure you bring the other tile with you (I almost bought a different one at a bigger store but the “white” color didn’t match at all). As far as your kitchen goes though, I found an alternative for my backsplash you might find even better (the pencil tile sticks out a good bit, and I wanted something that was virtually unnoticeable on the edges of my kitchen backsplash). Check out this post for all of those details and installation info.
That’s an awesome looking shower head. i was looking at replacing our current shower head at my home. My wife really likes the products from Kohler that advertise a natural rain feel, however; when I look at the reviews the shower heads are said to constantly drip. Does this shower head have a natural rain feel, and does it constantly drip?
OMG! This looks amazing and beautiful. Thank you for the inspiration. I, too, am a DIYer. I am a little nervous about taking on this kind of project but with all your step by step, I think I can do it! Have to put this away to reference back to. Thanks for the posts!
I love it!!! Favorites are the crown molding all around, and the tile up to the ceiling. Can not believe the condition when you bought it. Aaahhh!
Thanks Tricia! It really took some hard work to get all of that tile in (you think it’s not THAT much more to extend it to the ceiling, but working with your arms constantly above your shoulders gets HEAVY fast!). I am really happy with how it all turned out. So glad you like it!
Sarah, where did you buy the shower curtain? It looks amazing.
I made it! Tutorial coming when I find a moment to edit all of the photos.
I love the subway tile looks similar to one I saw recently. Do you know what it’s called
Sources for everything in the photos are listed right at the bottom of the post with links back to where I purchased them, hope that helps!
You did a beautiful job redoing your bathroom! I love the subway tiles and the shower curtain design.
Thank you Nicolette! So nice of you to say.
Wow, that came out amazing! I was wondering if you had to seal those tiles after? I heard marble needs to be sealed
They’re ceramic, not marble, so they didn’t need to be sealed! But I’m glad to hear they look enough like marble for the fakeout!
Oh wow that’s neat! I wonder if it can get stained at all?
Could you be talking about the grout, and not the tile itself? You first asked about the tile, which if it were marble, would need to be sealed, but sealing the tile is different than sealing the grout. I went over tile installation in greater detail in this post, so that should help clarify a few things for you if you want to give it a read!