
Disclosure: this post may contain affiliate links, which means I may make a commission if you decide to make a purchase through one of my links, at no cost to you.
As you might have already picked up on previous posts, my Instagram, or if you just have a pretty awesome streak of ESP this week, I’ve decided that my primary bathroom is finally going to get my focus this summer. It’s not going to be just my floor that gets some tile help, though — I’m redoing the shower, too!

But before I get into the whole do-it-yourself project of how to tile a new shower (I’ve actually already had some trial and error in the last week I need to share with you, and I’m trying to get some video too!), there’s a part of this whole process that I really have a fondness for: DEMO… DEMO… DEMO

However!
Demo isn’t just jump right in, hammers a-swingin’ — if you want to remove an old tiled shower properly and efficiently, you are probably going to need this handy list of tips. Not because I don’t think you aren’t perfectly capable of figuring this out on your own (and a lot of it is common sense, really), but because the temptation to swing a hammer at ugly tile you can’t wait to remove is VERY hard to resist. So, you might be a little premature (like I was) and get all giddy from seeing the tile fall off the wall and ignore some important stuff. These tips will not only help you from damaging the things you don’t want to, but it will prepare yourself a little more than I did to avoid injury.

This post contains affiliate links — for the full disclosure policy, click here.
How to Demo A Tiled Shower — Effectively and Quickly!
Protect the Tub
In my case, I wanted to keep the tub. So, I laid down some old sheets and taped up the edges with painter’s tape to give the tiles something to land on. The tiles may not seem razor sharp, but if it breaks at a weird angle, it can still chip the tub below. Even if you don’t plan on keeping the tub and want to sell it or something, it’s still better to sell it damage-free. And don’t forget to plug the drain with something!

Start at the Edges
This seems obvious, but outside > in works best. If your shower is as old as mine, you might even have some looser tiles around the tub base and can start there first (and note to self: any areas you find water damage or areas of the tub where water tends to drip should be spots you’re sure to waterproof when you install new tile).

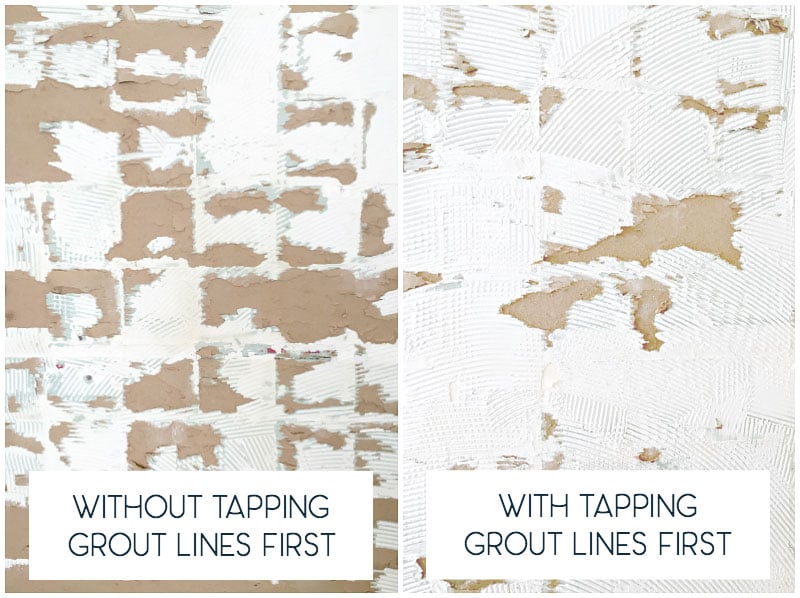
Hammer a Putty Knife at Grout Lines
One of the things I least expected was that using a putty knife blade (more specifically, one of those 6-in-1 painter’s tools) along grout lines and hammering on the end of the handle (sort of like a chisel) before trying to pry at each tile seemed very effective. I tried it mainly out of curiosity at first. My impression was that the tiles were still stuck on pretty well, but I assume the hammering at weak points created enough vibrations to fracture underlying spots of old thinset and grout. I only know that this was more effective than not because I started secretly (aka, unbeknownst to him, but for my own demolishing pride) competing with a very helpful bearded dude who was removing tile on the opposite side of the shower* — I wound up smoking his ass in demo. He swore it was only because I had the better putty knife, and while I can’t deny that I used a better quality tool, after a while he wanted me to whack at the grout lines on his side when mine started coming off in larger chunks.
*And yes, this is how we do date night sometimes, and I really like that we haven’t tried to stab each other with so many weapons tools at our disposal to do so (so far). There were plenty of “this is not how I pictured being in the shower together” jokes made that night.
Wear Protection
You know I’m laughing at myself for yet again having a suggestive tip for DIY, but honestly: if you are regularly doing DIY or woodworking projects and you don’t find yourself thinking “that’s what she said” at least once during each project, you might be doing something wrong. Or don’t have my sense of humor. Or aren’t in the U.S. and haven’t watched The Office (in the British version I’m pretty sure it was “said the actress to the bishop”).
But anyway, back to the important tip: wear ear protection, eye protection, and proper clothing. Hitting anything with a hammer in general tends to be noisy, and tile and grout in particular is very loud. And even if your removal is perfect, tile will chip and send little bits flying, like in parts of the room that might also contain an eye or two. In my case, I wound up with a bloody calf.
…
… (allowing those of you time to scroll past this spot if you don’t like the sight of blood or feet)

It was a small cut, and due to all of the debris falling, it didn’t register that I had been cut until after I was outside about thirty minutes later and felt my leg itching (then looked down and saw that I had been bleeding). It was small and easily dealt with, but still rather surprising! In hindsight, I probably should have worn pants instead of shorts (it’s Georgia summer, though — it’s shorts weather unless something has the potential to be really dangerous). Though now is a pretty good time to remind you guys to be up to date on all of your shots (like a tetanus booster… it’s easy to forget, but if you’re around rusty things and friends having babies like I am, use your friend’s kid’s birthday as a quick reminder of whether or not it’s been less than five years since you got a Tdap update, since you can get tetanus and whooping cough knocked out in one swoop).
Score, Then Hammer Old Drywall
I suppose a person could potentially reuse the old drywall, but with mine so wrecked from old tile adhesive, the easier approach seemed to be to replace the damaged areas. So, we tore into the old drywall with a hammer (so satisfying!) and then broke down the larger pieces for the trash.

To get a clean edge, I first scored the drywall with one of my favorite heavy duty utility knife and then made deeper cuts until it broke away.

Oh – and be mindful of pipes and other things. I reached a stubborn section and realized there was duct work behind the wall, so I’m really glad I wasn’t too aggressive with the hammer. As you weaken each section, the drywall will start to just fold off in pieces.

Take Out Nails/Screws
My house has nails holding up the drywall (this house was built in the early 80’s, so pretty much a house that had a lot of bare-minimum, “I’m going on a break in 5”-type of quality as it was built — if you remember the backyard sinkhole project, you’re already aware of the types of things these guys got away with!), so I had to pry them all out of the studs after the drywall panels came off. The only ones I left were around the bottom near the tub. These seemed to be where the original drywaller rested the old drywall to nail it in, creating a small gap above the tub and wall (this gap is later covered up by the first row of tile, but its function is to help prevent water from wicking up the drywall from the lip and corners of the tub). So, I planned to use the same nails to help me install the new board and give me something to prop it on.
Another thing I noticed that seemed kind of odd? The builders also used glue on the drywall when it came in contact with the studs, but not on most studs or on studs where it might make the most sense (such as near a pipe, where you might not want to chance the nail going in the wrong place). I haven’t really seen this before, so I even texted a couple of DIY buddies and they all thought it was weird, too. If someone has the answer on that, do tell!

Do Some Research
Here’s where I almost failed: I saw that the drywall I was taking out was the moisture-resistant kind, also commonly known as “greenboard” (called that because it’s covered in color-coded green paper to distinguish it from regular drywall). So, I assumed that to begin my new shower, all I needed to do was replace like for like and put it back in. I even did it and started taping the seams:

Except I also knew about waterproofing materials being a thing I’ve seen other people using in DIY projects, and after buying some of it and reading the instructions, I realized that greenboard is actually outdated (and even no longer up to code) for putting in a shower because it often still has moisture problems. I wound up calling a few friends for advice before ripping out the new greenboard and putting cement backerboard in instead. It was not a fun hiccup, considering that these materials are heavy and cumbersome when you want to hang them! But, at least I caught my own mistake before tiling over it or having to rip it out after waterproofing.

Alrighty… so I’ll leave this post as-is for now, but more posts are on their way! Any of your own tips to share? We’ve still got how-tos on replacing the drywall, waterproofing, tiling, and several videos I haven’t even had time to edit yet but I’ve committed to making, so I’m sure I’ll regret that decision later. And on Friday, I’ll cover a trip I took last month that serendipitously inspired my new tile choice. Stay tuned for all of that… definitely more to come.
Update: the shower is DONE! Want to see the tile I picked? Click here for the big reveal!


We’ve redone a full bath and a half bath in our 1950s ranch. Unfortunately for us, the tile was attached to the wall not with mortar, but cement. Cement that was glopped on to what was essentially chicken wire that had been nailed to the studs.There was no tapping along grout lines for us. However, slinging a sledgehammer repeatedly against a wall was satisfying (at least for the first hour or so.) The debris was so heavy that we could only fill contractor grade garbage bags maybe half full.
I now understand why bathrooms are where people hide in tornadoes.
I think I’ve seen that before! Not in this house, but I had a distinct flashback as I read your comment. Demo can be a lot of fun… until the next day when your back and neck are aching (cough cough, not that that’s why I’m sitting here reviewing comments instead of starting on the next part of the tile project, cough).
I have tile like this on my walls. Is there ANY way to get it out easier? Any advice. I have done it before but I need to do it again and I am looking for an easier way!
You can try completely cutting out the drywall that’s behind the tile. You’ll have to be careful you don’t cut anything behind the drywall, but that’s another way, and then the tile will come out in larger (heavier) sections at a time.
Out of all of this my ears perked up at “new tile choice “! Looking forward to this!
Barefoot!! :o
I love so much that you show how you take the drywall out in large chunks. DIY shows bug me so much when they show people whacking away with hammers. That leads to little tiny pieces that have to be shoveled or swept. Drywall easily comes out in large chunks and it makes demo, disposal and clean up so much easier.
Congrats on prioritizing your bath. I hope it comes together for you! (Your floor tile story was completely *terrible.*)
Yeah, you create a hole with a hammer if needed, but you definitely don’t just whack at all of it like that! To be honest, I don’t watch a lot of DIY shows just because they reinforce so many bad ideas that I wind up yelling too much at the TV. ;)
Hi, I wondered why you decided to remove the tile around the tub since you are keeping the tub. It looked like it was in good shape in your before photo. In fact, I was wishing mine looked that good! I’d be real happy!
Good question! And I get it. From a distance, it looks fine, but there was damaged grout and some of the tiles around the edge were loose. I could have fixed those things for a really cheap DIY (and did that in the guest bathroom), but since it’s the primary bath and I’m not crazy about the tile color or shape, I just wanted something fresher and brighter. Replacing the tub or converting it to just a shower was more costly and time-consuming than I wanted, so replacing just the shower tile seemed like my ideal option, and I’m extending the shower tile along the back wall as well.
might be a stupid question… but if your taking the walls/sheetrock out replacing it, couldn’t you just cut it out with tiles attached? rather than spending all the time/labor chiseling? and then removing the wall?
just a thought?
You absolutely could. Hindsight, I may have tried it, BUT I also didn’t know what I was going to find behind the tiles (would I need to actually take out the sheetrock after all, would there be mold that would mean larger remediation involved and more sheetrock to take out, etc.). It really didn’t take much time so it was a good learning opportunity for me (I have a duplicate bathroom I’ll eventually remodel as well).
Greenboard bad? WORD!
I installed greenboard as a tile backer in my tub/shower, and a few years later, the tiles removed themselves, no hammer needed!
Quite appropriate you wore a pink top – I’ve been secretly calling you “Pinky” – you have more DIY talent in your pinky than I and others have in our entire body!
LMAO! And thanks for the compliment! Because of my blog name, I’ve been called “The Ugly Girl” quite a bit, so the names people come up with really make me chuckle. This is only SORTA related to your pink comment, but I’ve been meaning to write a post for a LONG time about brands who send me stuff and color it pink for no reason other than I’m a chick doing DIY instead of a dude. I don’t have anything against the color and wear it when I feel like taking a break from my usual colors (I wear a shitload of gray and blue), but it’s when people assume pink hammers, pink eye protectors, pink this and that are going to make me like something just because it’s lady-colored.
Aww, I kinda thought this would be a post on how to salvage old tile as you removed it! Oh well. Still a useful post! Got to love people that just dicked around when they installed stuff originally… the glue on some of the studs thing makes sense to me. Not in an actually logical way, but in an amateur “i dont know what im doing i guess this makes it more secure right???” way. At least you haven’t found structural problems like Addicted 2 Decorating did! The whole roof was resting on one wall… without any decent studs. :o
Can’t wait to see this bathroom when you’re all done!
I’ll have to take a look at her post! But if you’re trying to salvage old tile, the main issue I think you’re going to run issue is HOW the original tile got stuck on the wall. I think if it’s like some folks describe and it’s chicken wire/cement, it’s likely going to be pretty tough. But if it’s like mine, you can save quite a lot of it (I was just really aggressive and didn’t care about the old tile… a lot of it came off in whole pieces and broke when I tossed them onto the pile of other tiles). The grout tapping/scoring tip I gave in the post made a big difference IMO on whether or not the tile would stay intact. So, I would suggest using that trick and then being a lot more gentle with prying the tile out.
Wait, what is that pink stuff on the paintbrush? PLEASE TELL ME IT’S YOUR PAINT COLOUD :D :D :D
Haha, no! It’s a waterproofing product (I’ll get to that soon, as soon as I can take a breather from the tile install!).
I sadly made this same mistake redoing my bathroom and had to spend an all-nighter removing old drywall and putting up cement backer board. Your demo was so neat and tamed! The only way the old tile was coming out of my bathroom was with a sledge hammer. And I don’t care what any one says, demo sucks. Messy back breaking work. It’s fun to beat up a wall for like 4 swings.
I feel ya on that. I think the “fun” of demo depends on your appetite for destruction and whether you are tired mentally or physically. Whenever I’m stressed, it is NICE to wield a hammer and take it out on something physically. But if I’ve been working really hard all week and my muscles ache, demo just isn’t a good time. I hope it all worked out for you in the end!
I can see why it would be important to lay something protective down over the tub so that it doesn’t get damaged. The tile may not be sharp like you said, but it can still do some damage if it falls on top of it. i’ll have to remember your tips if i ever remodel my bathroom.
I was googling on how to remove a tile lip. I live in the UK and we are a bricks and mortar society, whereas the US is more of a joists and drywall place, in general.
Good job on getting the tiles off, a potty knife sounds perfect when not working with plaster over brick.
Sadly the previous “builders” in my mother’s new home decided to cement the tiles to cement, no; or minimal grout. My mother got the tiles around the bath and shower with a wood chisel and a club hammer, it was all she had. I came in expecting the same from the opposite wall and oh wow was I wrong.
It took about 20 minutes with a cold chisel, a battery powered oscillating tool (the carbide tile tool on it cooked right off) so I (well she, it’s her house so if she wants to improve it and I live in rented accommodation I have very little need for it) got an SDS+ drill and started chiseling away with that. Unfortunately years of shoddy builders and patch jobs prior to the mother moving in.meant that while some tile and the lip came flying (seriously flying, I was dripping blood by the end of it) others dragged all the plaster off a wire mesh wall (think drywall but instead mesh is put down and screwed into place and then plaster is spread over it) I doubt the contractor will like a quarter of the wall needing either plastered over or maybe scrapped entirely and replaced with drywall. I picked up one he’ll of a dust storm too and because I didn’t have safety glasses (big sunglasses had to do) I didn’t notice until I removed my respirator (through which it was getting harder and harder to breathe) only to find it completely caked with dust (dust so choking I had to leave the room after one breath) that I had to tap off until I could suck down air again.
I’ll be back at it again tomorrow, getting the difficulty placed tiles (around toilet cisterns and the like) probably with a cold chisel and hammer as I’m not chancing breaking the toilet bowl (or worse the cistern, our toilets hold such a small amount of water breaking the bowl would hardly matter; it’s being replaced anyway) though the dust was unbelievable, if the mother needed to use the facilities I would have to vacate the room, pass the respirator to her so she could breathe then take it back afterwords.
Tiles ain’t easy.
Sounds like quite the project! Tiles/old houses are always an interesting mix. I hope you get some more safety gear soon — I’m betting that breathing that dust in would be really rough on your lungs. Best of luck on finishing the bathroom quickly!
So should i worry about asbestos in my drywall? We are retiling a bathroom in a house built in 1969 and there is some kind of crumbly claylike substrate under the tiles and then we have to remove the drywall. Thoughts??
Sorry, I don’t have any info on asbestos at all — my house was built after they banned it. You may want to reach out to some asbestos removal companies in your area to ask them where it’s likely to be in a house built in the late 60s and describe what you’re finding. I do know there are test kits available for asbestos as well. I’ve also found helpful information from professional tile forums when I have a question. I wish you luck and hope you find a quick answer!
Oh my goodness!!! I just discovered your blog! I would LOVE to show you a pic of my bathtub area in my condo! (colossal eye roll!) Your DIY website was the fire I needed to continue to power through the empty space above my bathtub. I especially agree about the safety equipment. I didn’t wear gloves while chipping away. About an hour after the first round of chipping, I noticed my knuckles on my left hand hurt. Apparently, the glaze on the tiles was micro-shattering and cutting my knuckles. Lesson learned: I wore gloves for the remainder of the demo.
Thank you for your intrepid foray in the dreaded bathroom remodel. Can’t wait to see the finished project!
So glad you found this info helpful, Christine! But ouch, that must have really hurt! Just a head’s up, but the bathroom shower is done, so here’s a link to the reveal! And thanks for pointing out to me that I hadn’t updated the post with that info so others can see what the new shower looks like now… I always forget to go back and update things like that! And since I’m sharing links and you mentioned gloves, I have a post all about gloves for small hands like mine (I’m not going to assume you do as well, but just in case… finding great small DIY gloves was a challenge so I could also keep the dexterity, so I tried on a bunch of pairs to help other people out there know which ones to buy!).
A HUGE thank you for this! Today, my 15 year old daughter and I removed all the tiles around the kid’s tub (identical to yours). You made it sounds so reasonable and explained it so well, I had to give it a try. It took us about 3.5/4 hours, working 1 at a time. Not bad for first timers. I used the 6 in 1 tool and it was PERFECT! The walls will come down in a few days. Off to look through the rest of your blog in hopes it will help me on the reno journey!
Jennifer, 46
Jennifer, I’m SO PLEASED it helped you and your comment made my day! I hope you find other posts that are helpful and happy DIYing! Renovating can be a challenge but it’s easier when you know you can trade ideas and learn from others!
Good Job! I wish behind our tile in our shower looked that clean! We have a 1965 mid century home and like the other commenter, they put our tile on with cement and we also have chicken wire in the wall. We had to take the tile off first but very easy to do with a putty knife and a hammer. Took us a total of three hours with cleanup, didn’t think that was so bad! The cement on the wall is gonna be another issue and another day. Considering we had never done it before it was quite easy and you can save a lot on the demo work if you just want to put some sweat into it…and sweat we did!
Looking back our tile was in very good shape with no cracks and we could’ve tiled over it. I wish we would’ve thought of that before we removed at all!