
Disclosure: this post may contain affiliate links, which means I may make a commission if you decide to make a purchase through one of my links, at no cost to you.
This post may contain affiliate links. This won’t change your price, but may share some commission. Read my full disclosure here.
Not in the mood to shop this year? I get that. If your style is more gift card than
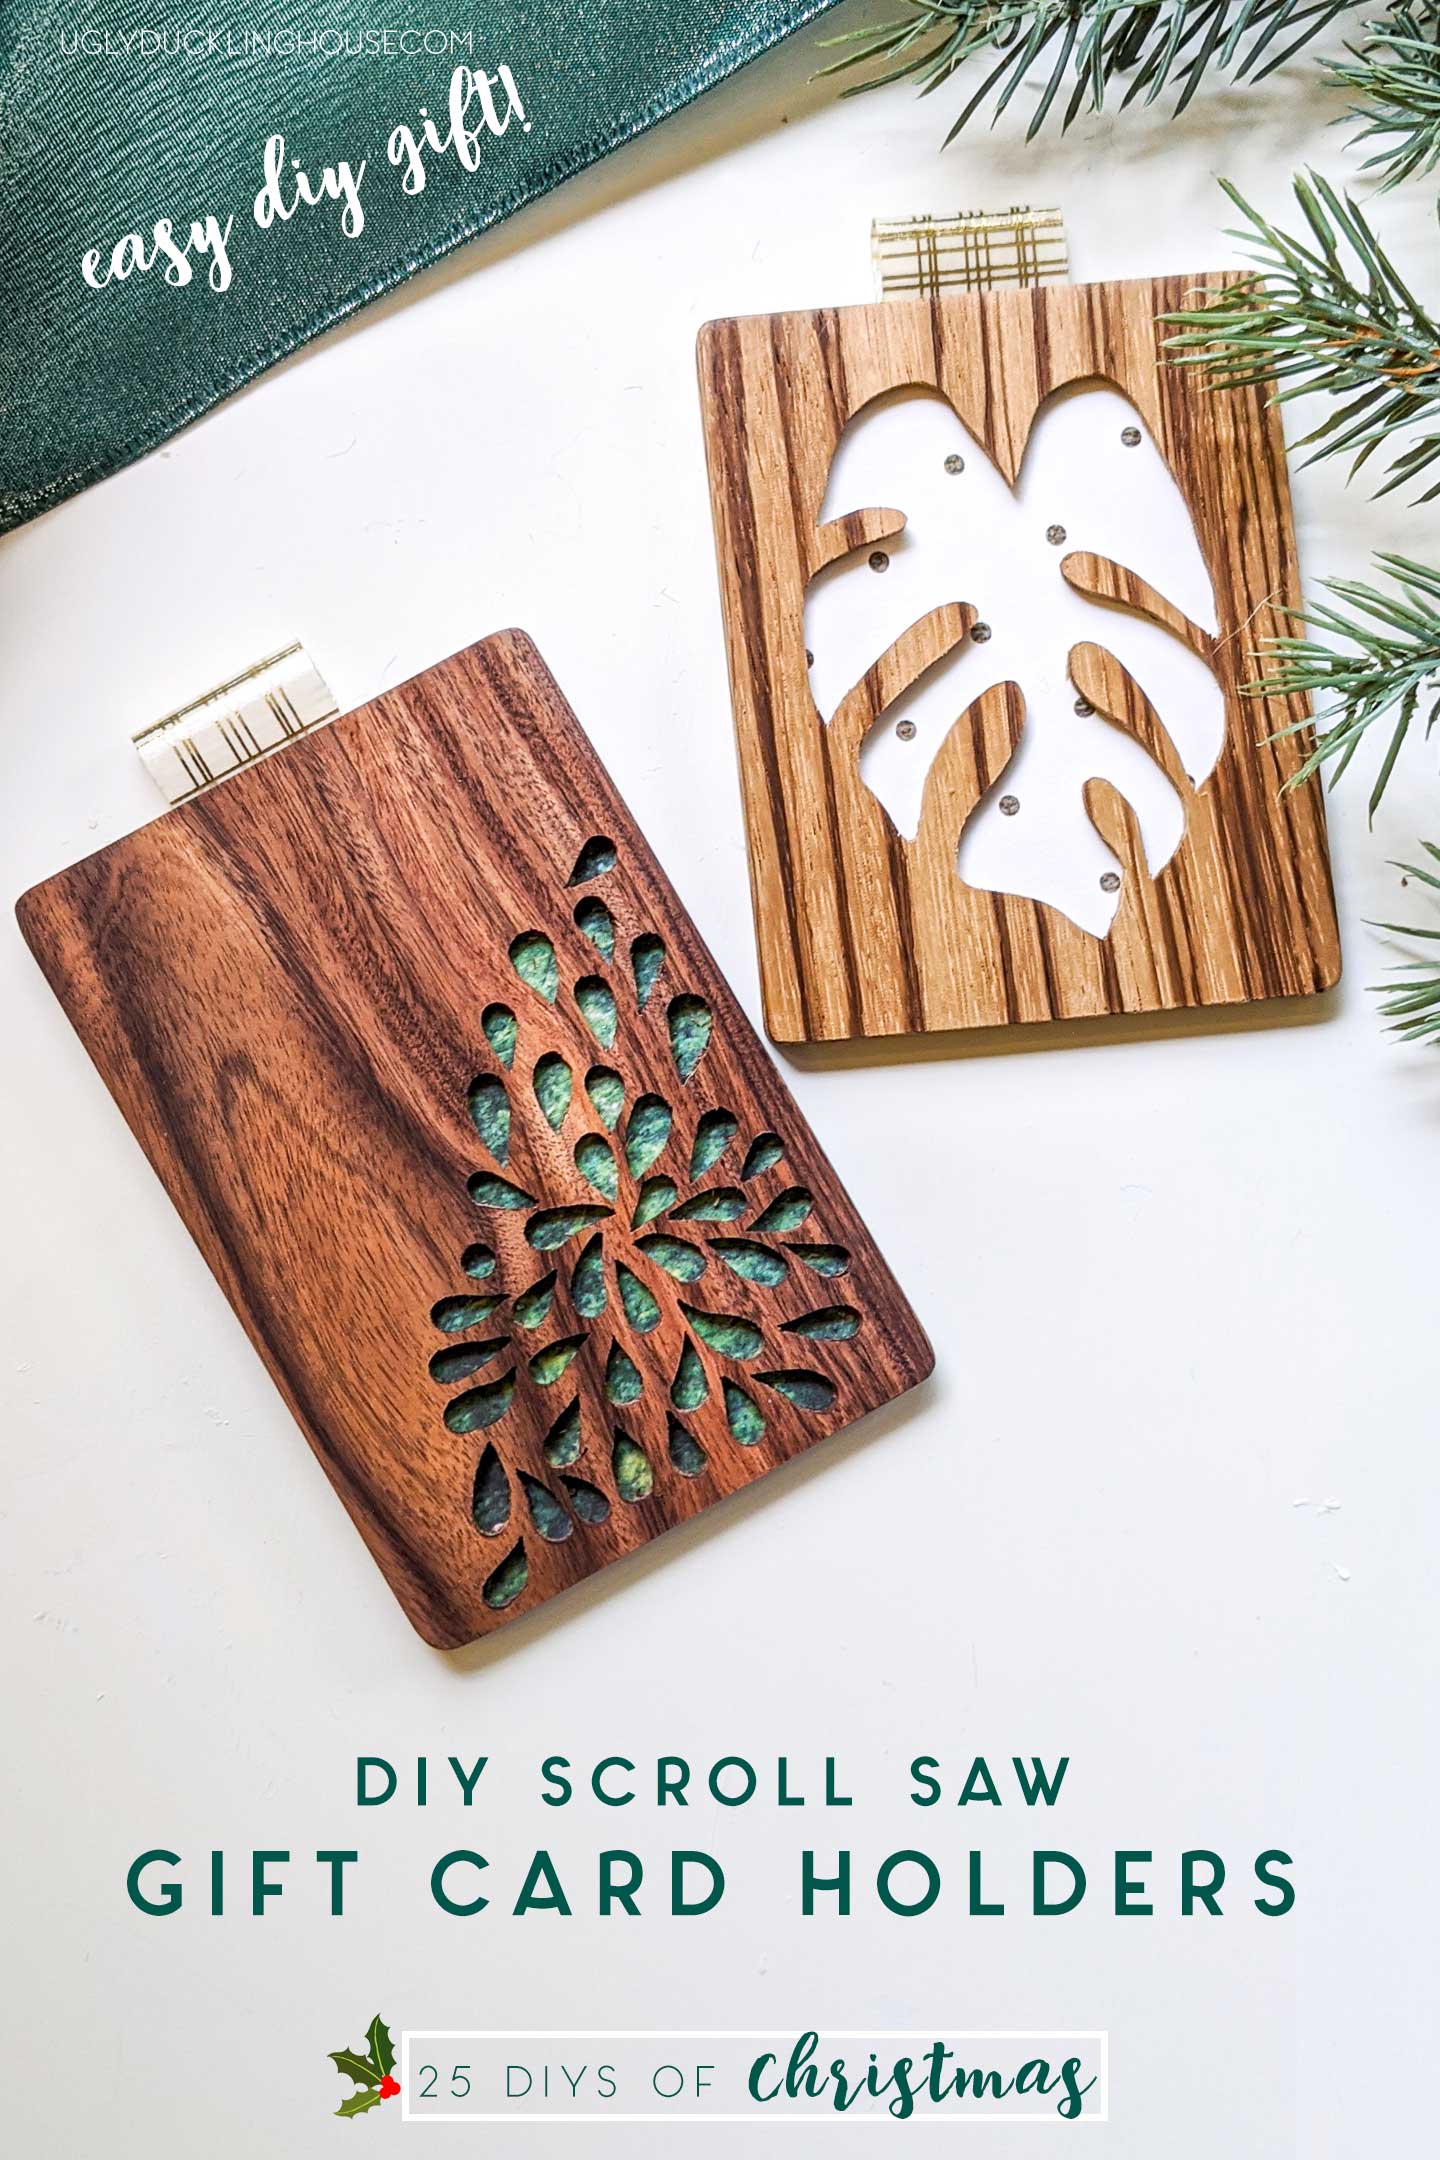
Alrighty, folks! I promised you in my last post that I was beginning a new series to share 25 DIY projects with you this Christmas season, and here we go with project number TWO! I had the idea to make a scrolled gift card holder as a creative way to show off this gorgeous wood. But I wound up liking both of the designs I came up with, so you’re getting two projects today!
My intention is to make both a video and blog instructions series, so if the below tutorial needs some extra visual help (or you just want to see this project in action), check out the playlist! I’ll be posting different versions of each video tutorial to YouTube as well. They take a little longer to create/record voiceovers for, so I’m getting posts up on the blog first and then pushing out to YouTube when they’re complete!
help me reach 25k!
How to Make These Custom Gift Card Holders with a Scroll Saw
Materials & Tools
- pencil
- miter saw
- scroll saw
- Dremel
- coarse rotary burr
- rotary bits
- orbital sander
- sandpaper
- 1/8″ x 3″ x 24″ wood
- wood glue
- gift card
- scrapbooking paper or wrapping paper
- washi tape
- acid-free tape or glue
- painter’s tape
- spray adhesive
- printed templates (here)
- water-based spray polyurethane (satin finish)

A scroll saw, wood, and paper can go a long way to personalizing the look of these highly customizable gift card holders.
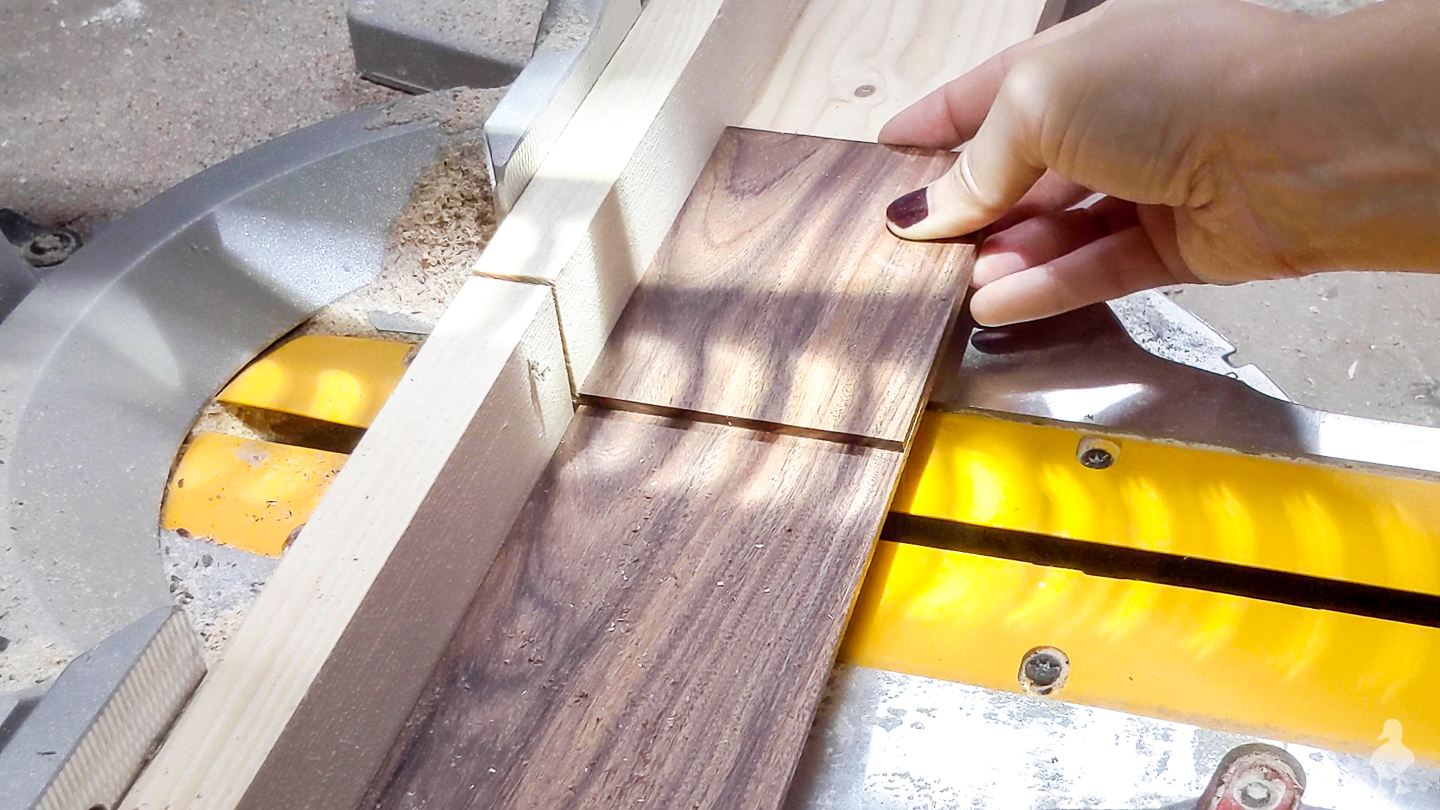
1. Cut wood to length
Cut 2 equal pieces of your choice of wood for each card holder (I chose zebrawood and Brazilian rosewood, both ordered online from Rockler). I actually held the gift cards themselves against my computer to make sure the cutout would fit and the placement was right (you can skip this if you download the printout here).
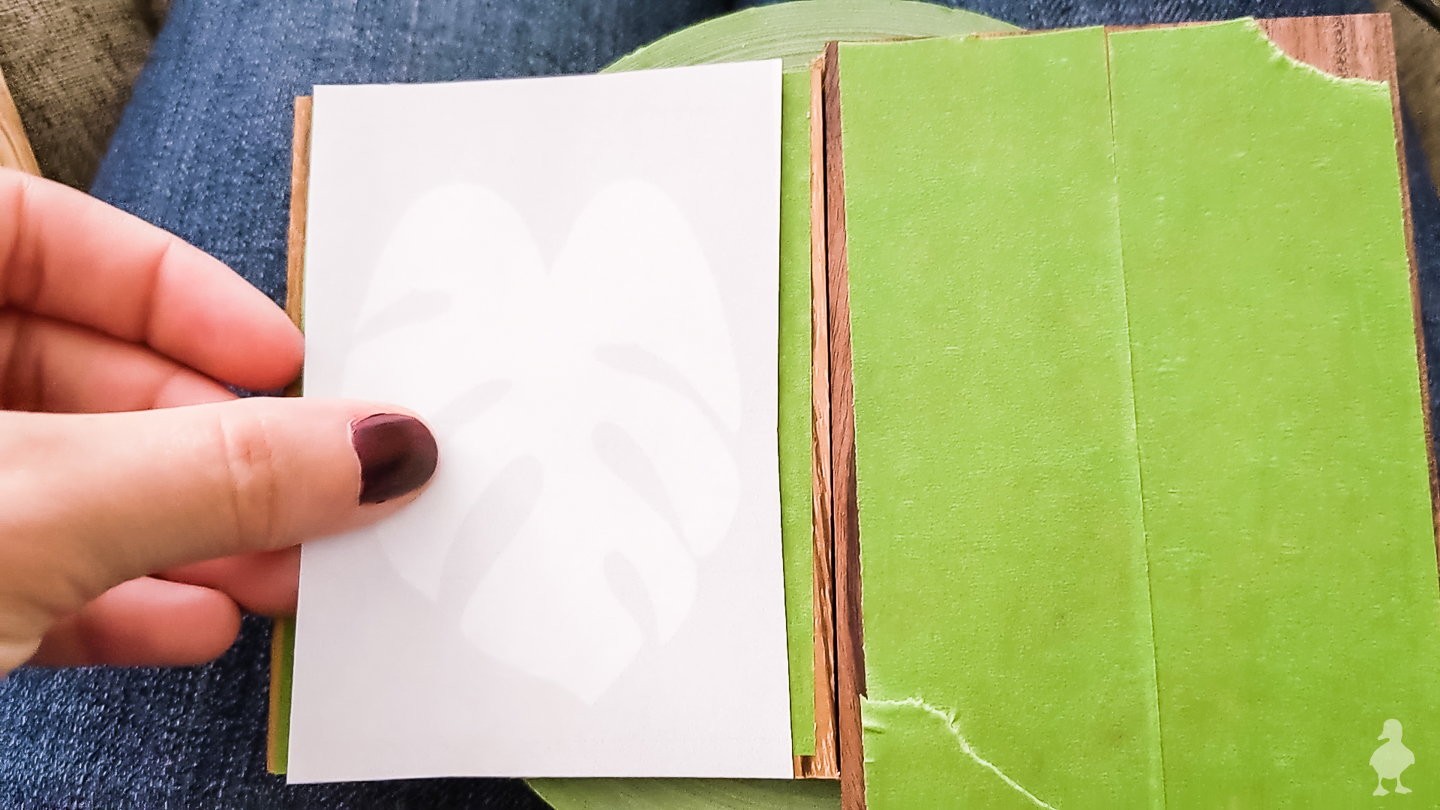
2. Print and adhere the image to scroll
Using painter’s tape and spray adhesive, I grabbed the images from my printer and attached the paper to what would become the front of each holder (see this post if you need the step by step on using spray adhesive and painter’s tape to make residue-free templates you can peel off later).
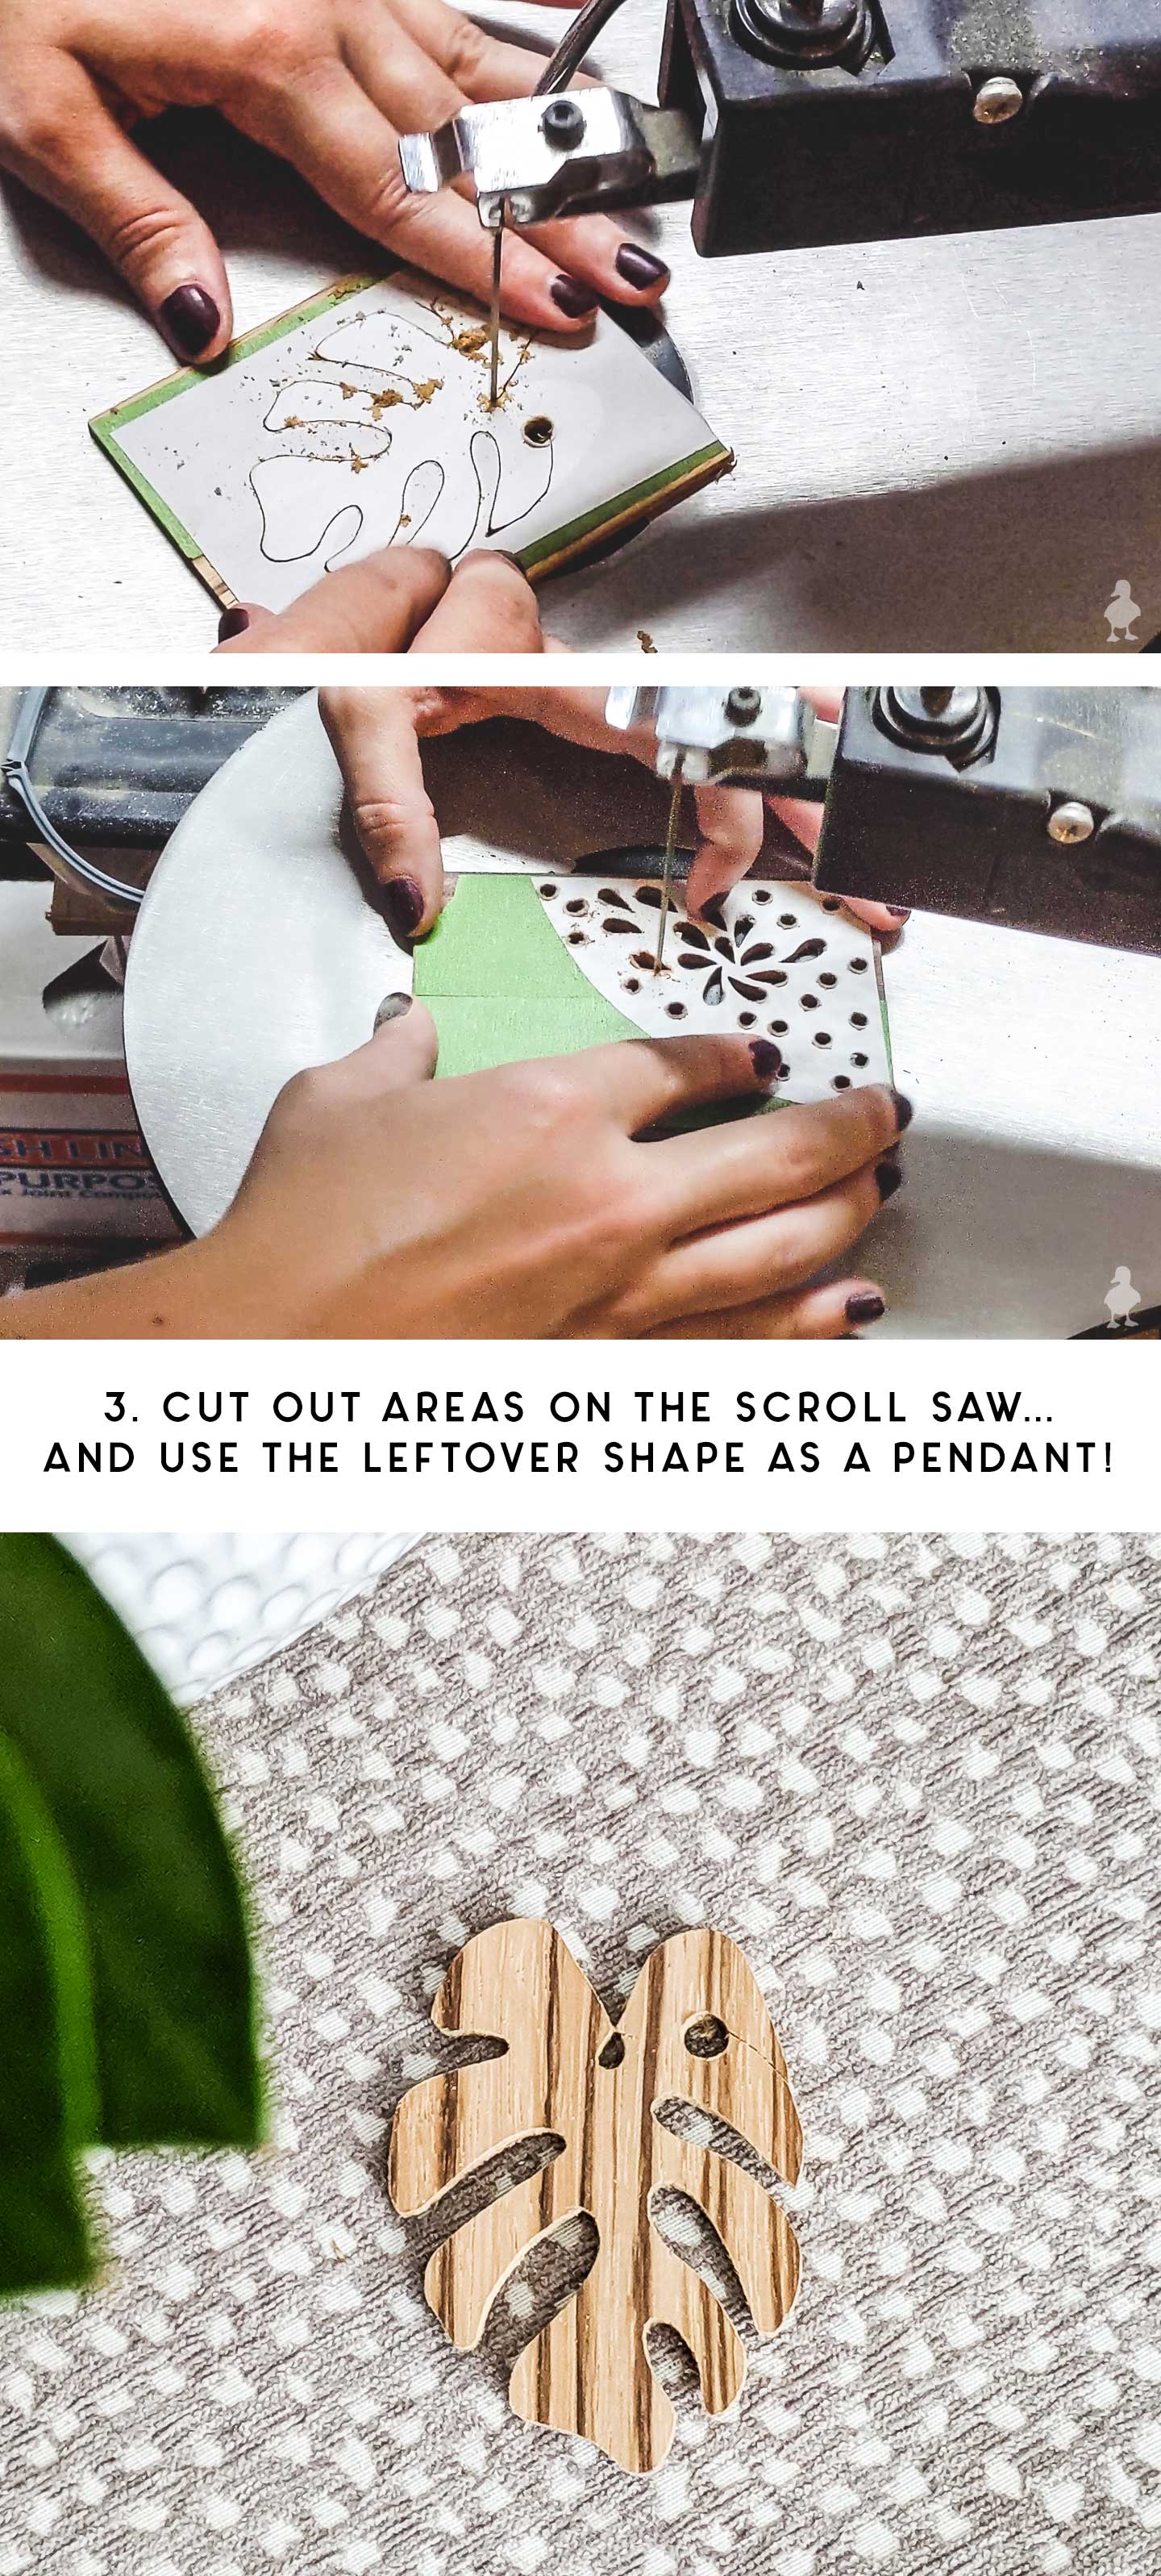
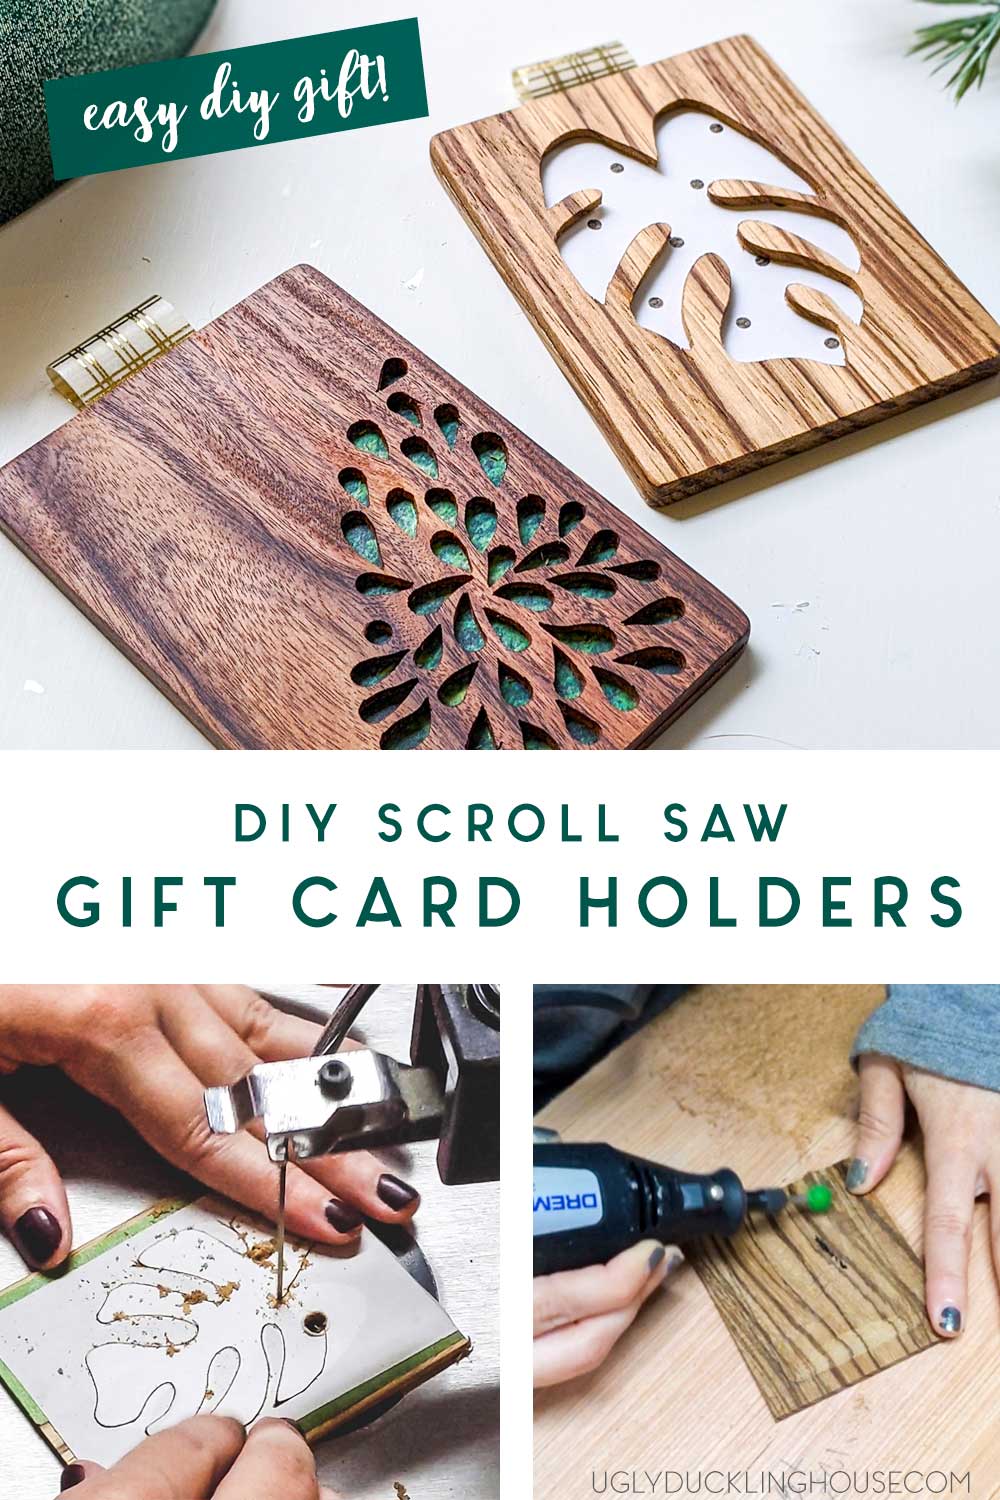
3. Cut out the images on a scroll saw
To make these negative cuts, I drilled holes wherever I would need to poke a blade through and then cut out each shape. The more intricate pattern was a bigger challenge, but the cutout of the leaf (the leftover part I wasn’t using for this project) is intact enough that it will make a beautiful necklace pendant!
4. Trace the gift card shape on both sides
Evenly space a gift card in between both sides of each piece of wood with one side that goes all the way to the end, and make sure they mirror each other (once they’re glued together, this will be the pocket the gift card sits in). Trace around the gift card so you know where to carve!
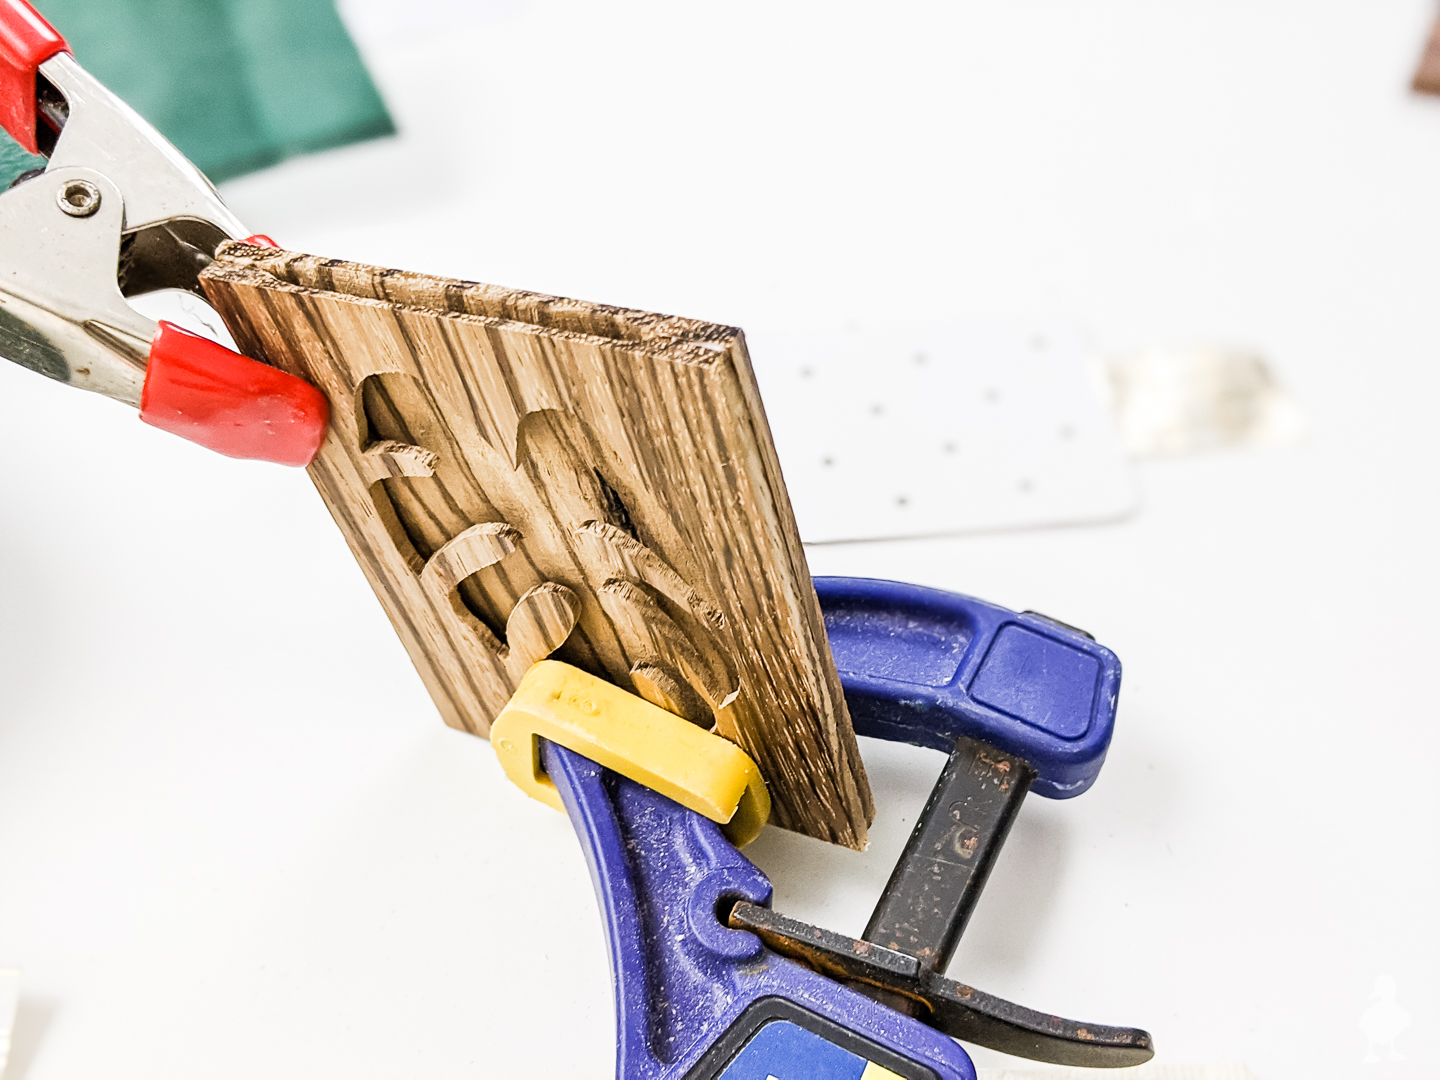
5. Carve out both sides (carefully) with a Dremel tool
Starting shallow and carving deeper and deeper, I created space for the gift card’s thickness while leaving the outside edge intact. I’ve never worked with either of these gorgeous wood species before (I later learned they are threatened species, so I will elect to use more readily available wood options in the future). They were tough but still delicate because of my cuts. Nothing like the pine or poplar I’ve carved before. So, I ordered a new coarse burr that could cut through the wood a little easier and make the carving process smoother and faster. You can still carve with a Dremel carving bit, but I tried that first and it took a lot longer. I’m going to re-use this burr in a future project, so the extra expense will be worth it for me in the long run! Be sure to go SLOW around the more delicate edges (you’ll see in my video that I got too aggressive and one part of my leaf cutout popped right off!?). I also used the Dremel sanding bits to smooth out the rough surface after I was done carving.

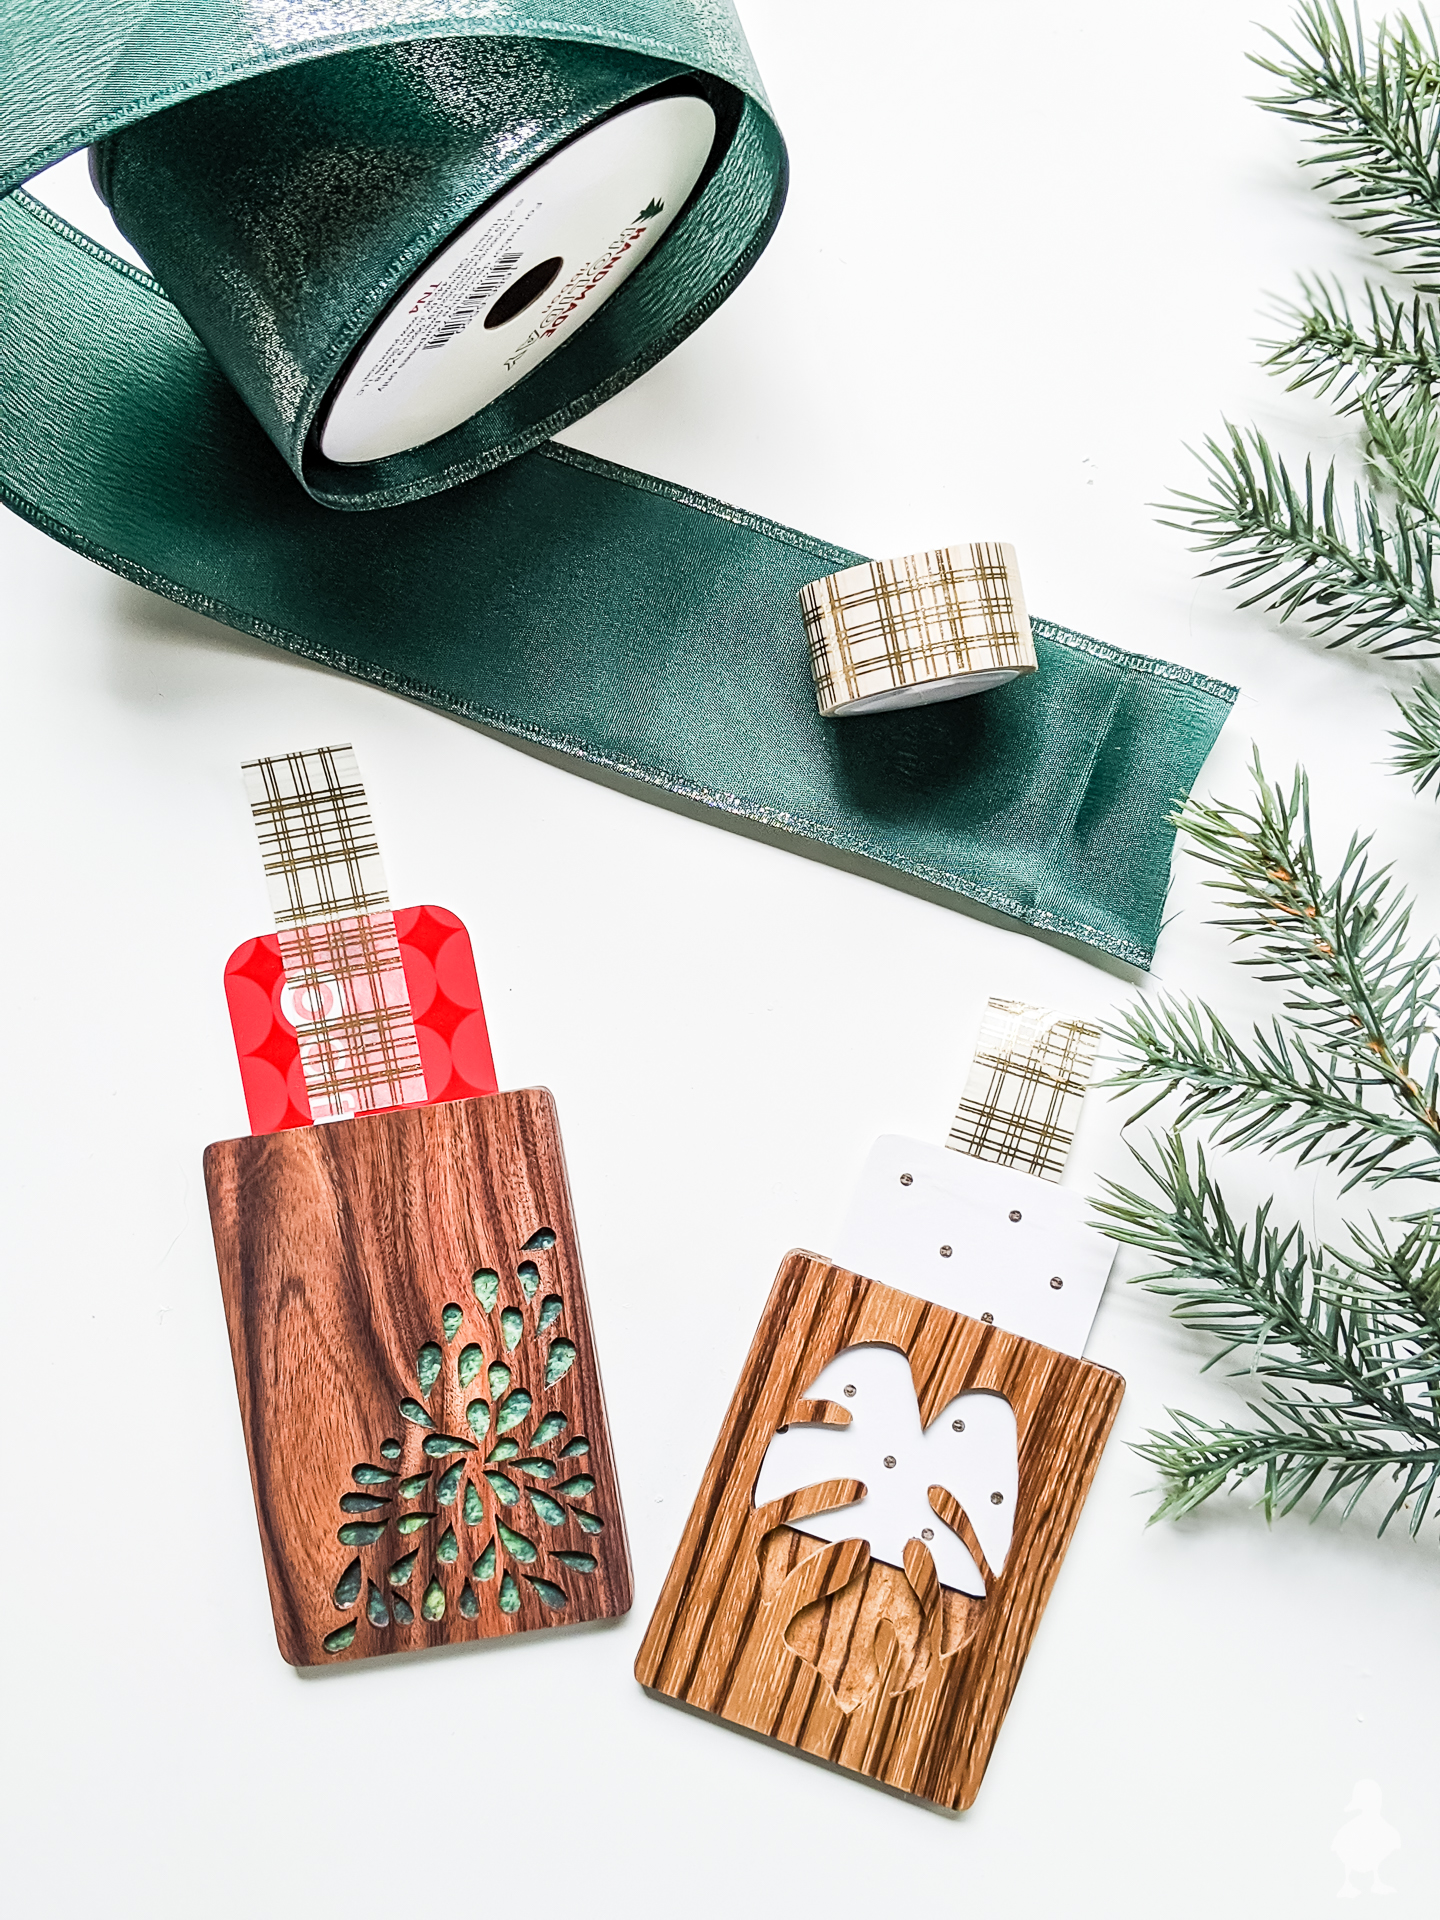
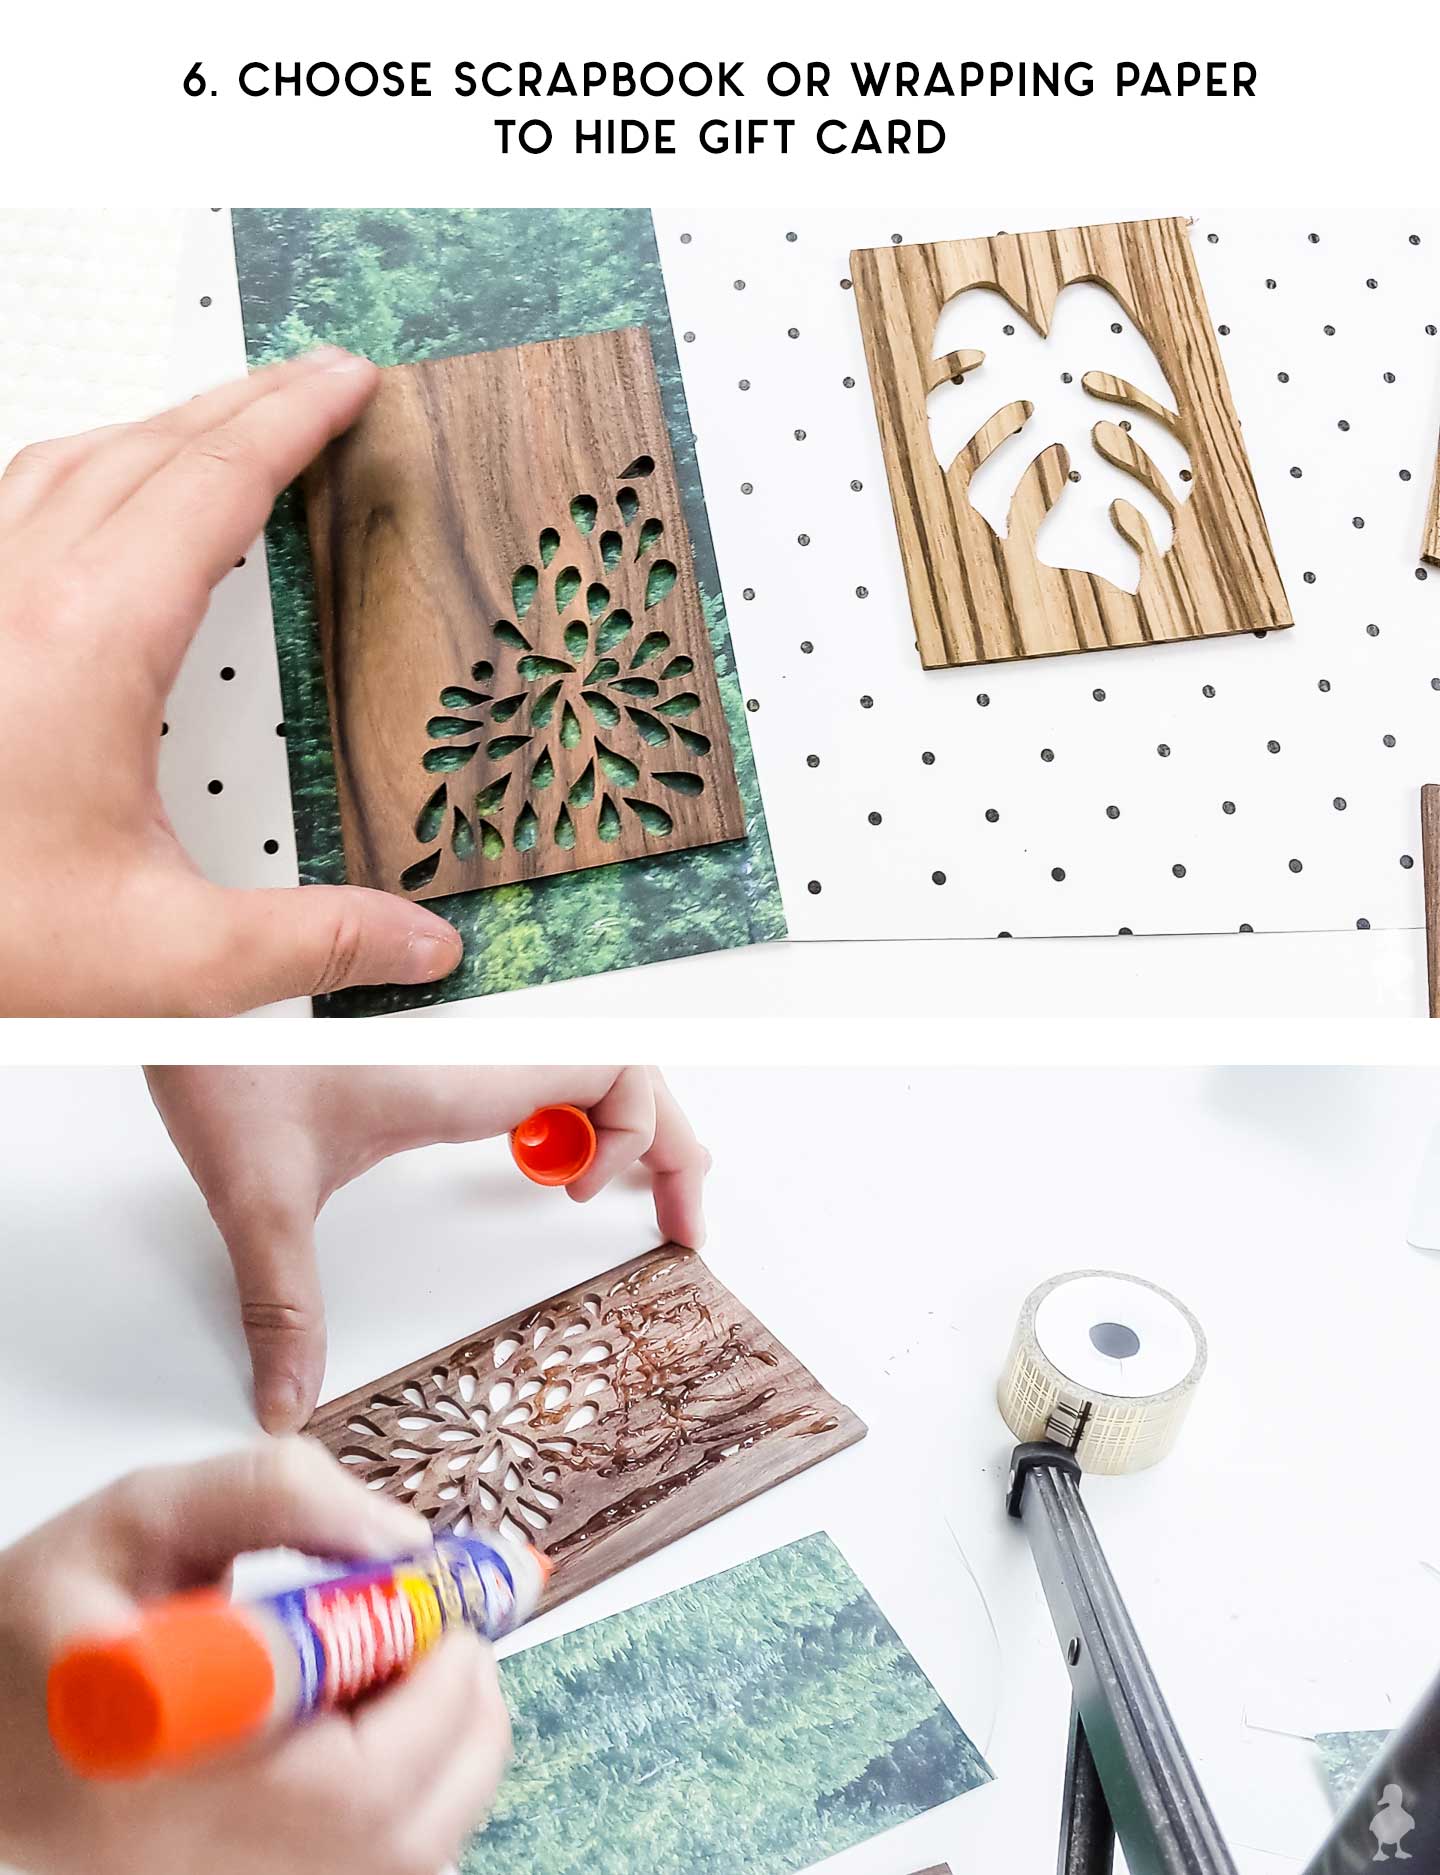
6. Optional: cover the gift cards or inside of holder with a decorative paper
I plucked two $5 gift cards from my wallet I always forget to use at the store for staging this project. I realized that with the color, text, or bar codes of the gift cards peeking through, you couldn’t see the scrolled design as well. So, I picked two pieces of decorative scrapbook paper from my craft supply and glued them in (one I glued to the card, one I glued to the inside of the holder… this was simply based on what I thought looked best). Plain card stock or wrapping paper would also work, but keep the paper’s thickness in mind when it comes to sliding in and out of the holder.
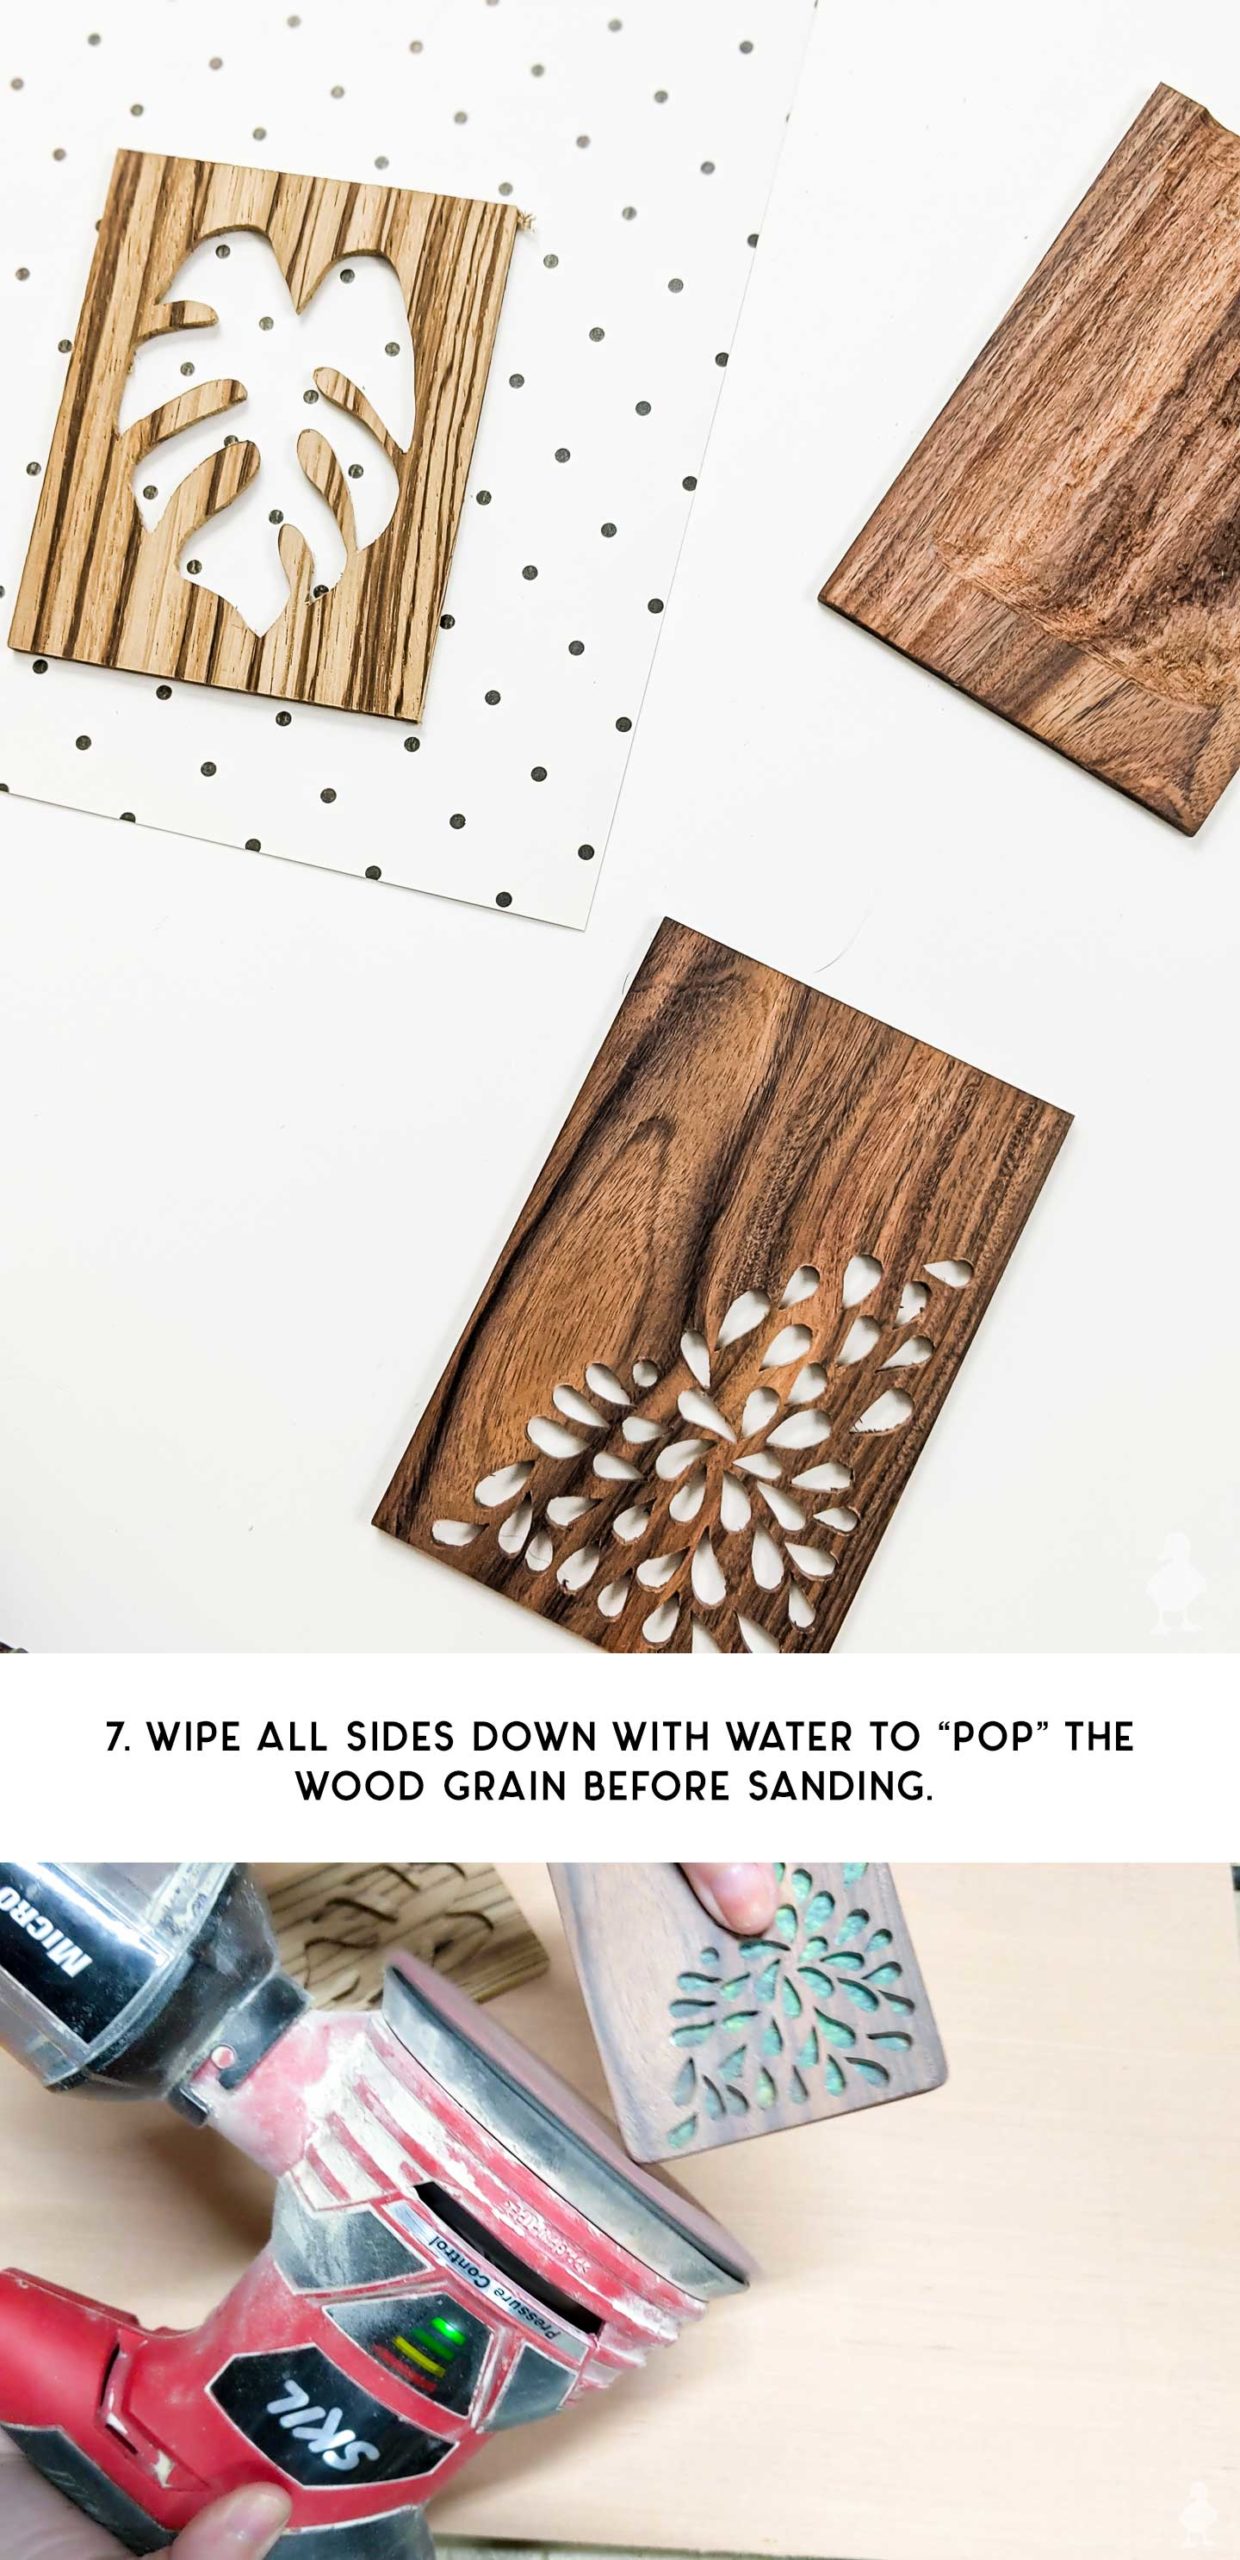
7. Sand smooth and “pop” the wood grain
Since I knew I would later use water-based poly on the outside, I wiped down the gift card holder with water and let it dry before sanding. Water expands the wood grain, so this essentially goes ahead and “pops” that rough surface up so you can sand it smooth and avoid it becoming rough again when you do the finishing step. I also wound up curving the edges a little bit with some 80 grit sandpaper before going all the way up to 320 grit. It makes the card sleeve really smooth and nice to hold in your hands (and pet, but that’s just me!). I actually wound up curving the edges after the holder was glued together, but since it’s important to wet down the wood grain before you attach the paper in the next step, I’m covering both here!
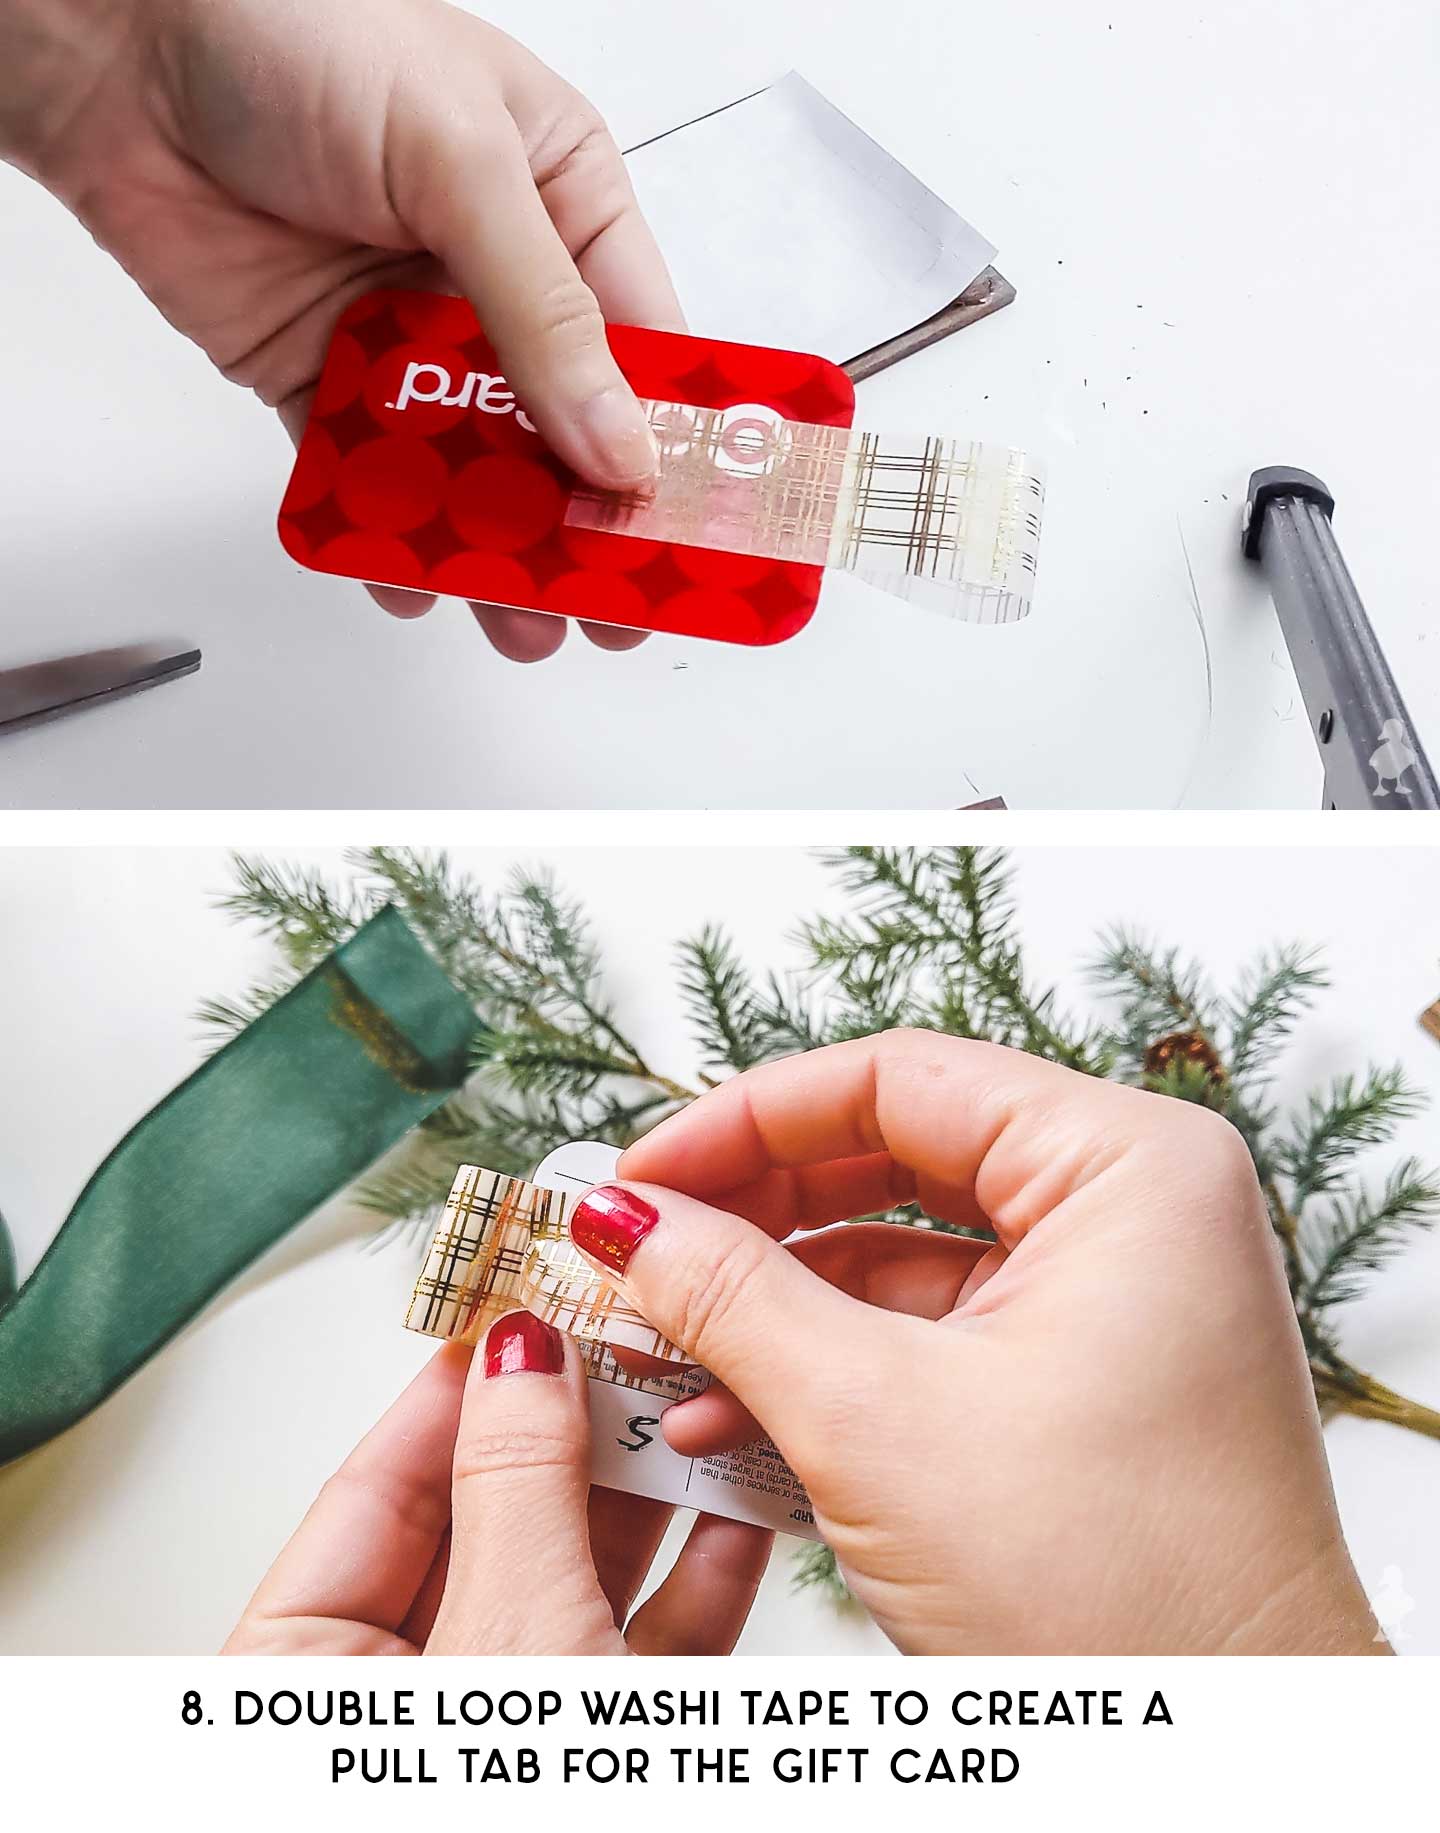
8. Add a washi tape pull
To make the gift card slide easily in and out, I could have indented the cardholder in the middle (basically modeling the design like this) but I thought a washi tape tab pull could be a fun twist. To make the loop, I cut a long piece and taped the end it to one side of the gift card, folded it, then taped the other end to the back. Then, I doubled this (now no longer sticky-side-exposed) piece over again and used another piece of washi tape to tape it down on the back. It might be easier to see this step in the video if that doesn’t make sense!
9. Glue and clamp sides together
I wish I’d grabbed more tiny clamps, but with reorganizing the garage, I still have them somewhere in a big plastic tub and didn’t have the patience to go digging after I found these. Rule #294 of being a beginner woodworker: never enough clamps in the right size!
10. Finish
Both kinds of wood were beautiful as-is, so my last step was merely to cover them in a few coats of polyurethane to make the color a little richer.

And that’s it! In my mind, this leaf version is perfect for any friend who has recently caught the houseplant bug and will match the kind of gift card inside (obviously, go buy more planters and/or houseplants).
These adorable gift card holders are simple enough to make a stack of and you can really customize the designs, paper, and cards for plenty of recipients. How about an initial for newlyweds with a card for a movie date night? A cute pencil cut out with latte money for teachers’ gifts? Something super funky for an ugly sweater party? There are so many creative ways to put your own spin on these DIY Christmas gift card holders that you don’t really HAVE to limit making (and giving) them for just Christmas. And how freaking cool is it to say you MADE your own gift card holders?!
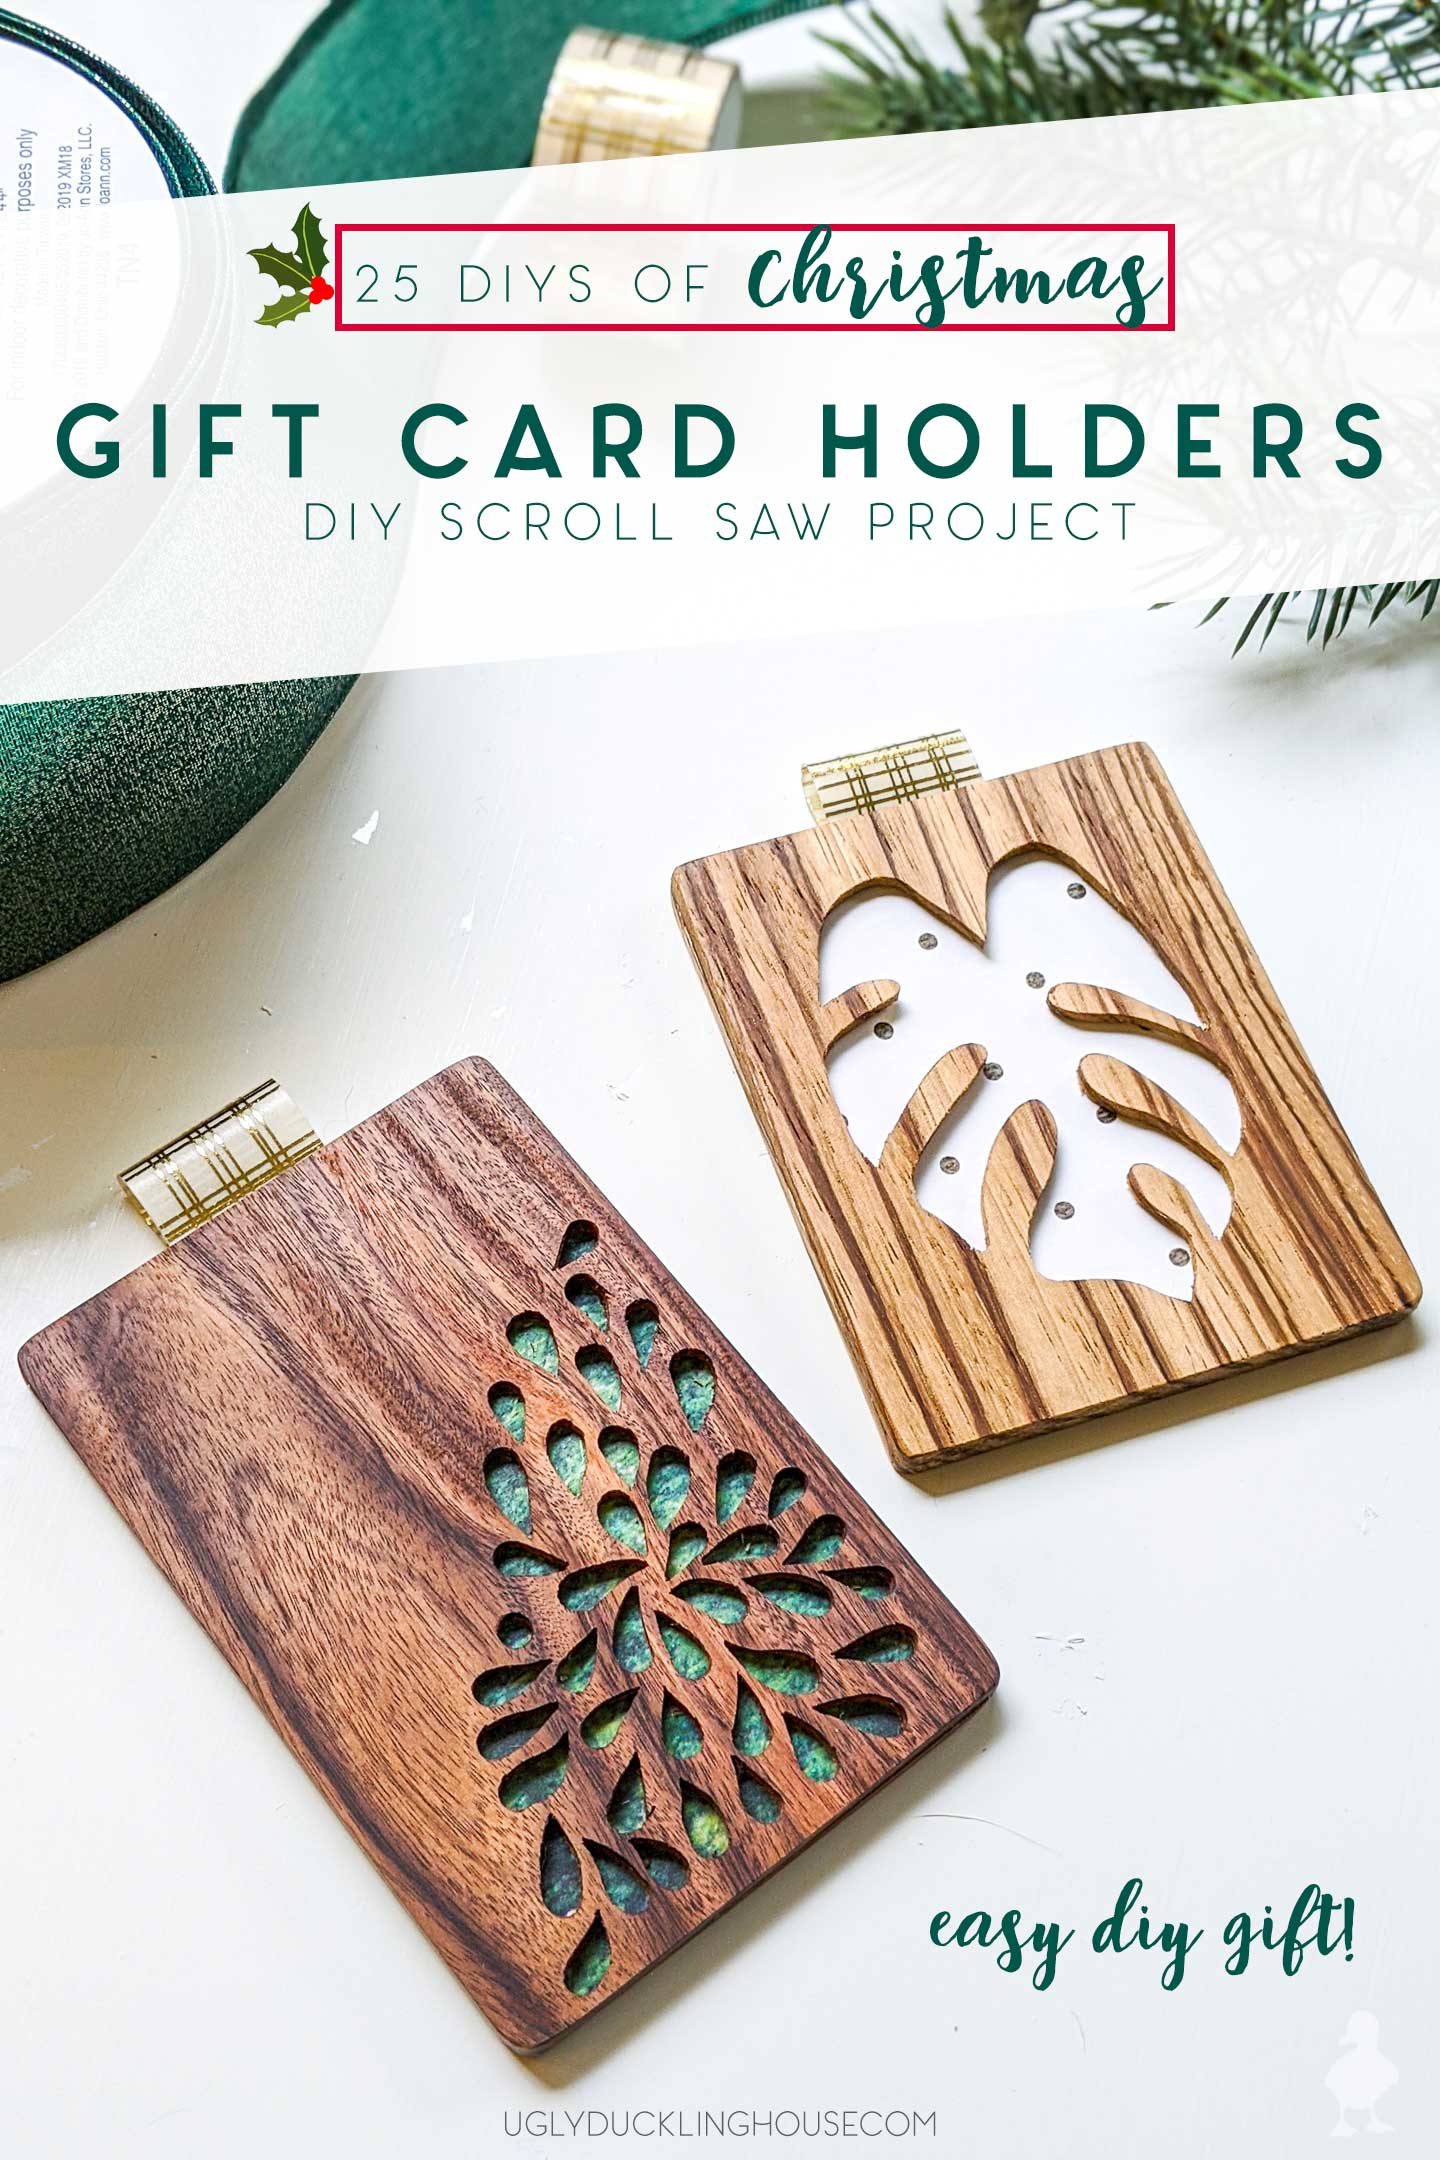
The more intricately cut one is just plain pretty with that green popping through. If I’m being honest, I kind of wish I’d cut the holes a little better, but I’m still happy with the result. If you want to try either of these yourself, you can download copies of each printable gift card holder template in my Woodworking Library.
Sooooooo, this completes DIY number TWO of my 25 DIYs of Christmas series (or is it #2 and #3, since I made 2 versions?? I guess we’ll see if I get through all 25 whether that counts or not ?). I’ve got lots more projects in store for you (DIY ornaments posting MONDAY!), so I hope you’ll follow along. It would also do me a HUGE favor if you share these posts to help get the word out (Facebook, Twitter, Pinterest, dealer’s choice but please and thank you!). This is a series I’ve always wanted to do but never made the time for in all my years of blogging, and I’ve been thinking about all of these projects for months, so your sharing = encouragement and some incentive to keep going! Continue reading below for more ideas as I update the list of projects. Love ya, mean it, you rock.
Don’t forget to pin it!
25 DIYs of Christmas
This project is part of a series of DIY gifts, decor, and other fun inspiration that I’m calling my “25 DIYs of Christmas“! Check out the list below to see each post (step by step tutorials, recipes, videos, free patterns, and woodworking plans available for each (where applicable). Lots of these ideas have multiple versions to show you the possibilities of each DIY. Even better, you can subscribe to make sure you don’t miss a single post!


I LOOOVE these! This is a woodworking project I actually may be able to handle.
Thanks Ellen! I’m pretty proud of them and they are DEFINITELY easy to create! They add enough personalization that says you didn’t just go out and get a gift card last minute, which is my favorite, since some of the folks in my family are hard to buy for!
Hey! I’m sitting here catching up on posts, and I just wanted to say these are so cool! My carving skills are a little primitive, so I’m considering a spacer to join the two sides and leave room for the gift card. Maybe a popsicle stick or a small piece of balsa wood or something. Thanks for the inspiration! I’m off to catch up on the rest of your recent posts…
That would totally work too. However, I would (if it were me) glue the three pieces together and THEN cut the outside so it looks like a nice solid piece on the outside. Gluing up multiple pieces like that can slip and slide all around, so it’s often better to trim it a little more after the glue is cured (and be sure to keep that in mind so you don’t cut it too narrow if you try it that way).
Love this idea! Plus a couple others that I scrolled past! I literally just wrapped a gift card for my cousin’s baby- they’re back home in HI and this would have been perfect! I’m weird like that where I have to wrap the gift cards. But since we’re not going anywhere for Christmas =shipping a lot of presents. So we went with gift cards this year. But I’m saving these for next year!
I’m with ya on the gift cards! I like to wrap them for a more personal touch too, so I don’t think it’s weird at all (or maybe we’re both weird, ha!). And Hawaii? How awesome… I’ve never been! I imagine Christmas could be pretty neat in a place like that.
OK Girl….these are INCREDIBLE! I WANT/NEED these for my gift giving this year! Unfortunately I have ZERO confidence in my woodworking ability! I would have to buy all the tools…and then have a FAIL of epic proportions?! Do you have a shop or can you, will you sell these premade? Thank you for all your amazing creativity!
Aw, thank you Alisa! I’m so glad you like them! I have always wanted to open a shop, but right now I have a toddler and I have been reluctant to open up a shop because of the time requirement to create inventory. I’ve been thinking of launching something in the near future, but it might even wind up being something where I sell the DIYs I make as one of a kind items after I’m done making them. Not quite yet, but thank you for giving me a reason to think on it some more! For now, I just share the PDFs and instructions so others can make their own.